Air Conditioning System - Refrigerant Charging
PROCEDURE
Only R-134a refrigerant oil must be used to charge the air conditioning system of the vehicles covered in this Manual.

1. Obtain a standard R-134a charging kit (available from automotive accessory stores). The kit includes a can of refrigerant oil, a valve fitting, and a length of hose connected between the valve and the low-pressure service port of the refrigerant line (see the accompanying illustration). Since one can of oil may not be enough to fully charge the system, it makes sense to buy two as a precaution. Make sure at least one of the cans contains dyed red oil, which allows quick detection of refrigerant leaks if they occur.
Never add more than two cans of refrigerant to the system!
2. Connect the charging kit to the system in accordance with the manufacturer's instructions.
Never attempt to connect the kit to the high-pressure service port! The port design allows connection of the kit only to the low-pressure side of the system.
3. Close the valve on the adapter fitting and screw the fitting onto the can head, after making sure the sealing O-ring/rubber gasket is in place.
Always wear protective goggles!
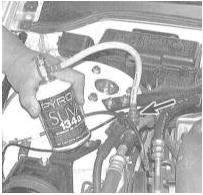
4. Remove the dust cap from the low-pressure service port of the refrigerant line and connect the charging kit hose, equipped with a quick-connect coupling, to it.
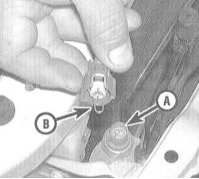
5. Start the engine and turn on the A/C. Make sure the charging hose does not contact the blades of the engine cooling/air conditioning fans.
The system must be charged with the compressor running. If the compressor clutch cycles off, set the system to maximum cooling and open all doors.
To keep the compressor from cycling off during charging, disconnect the connector from the low-pressure switch (on some models a combined low/high-pressure switch is used) and jumper it with a paper clip or a piece of stiff wire.
6. Turn the valve adapter to pierce the can seal and release refrigerant (a characteristic hissing sound of escaping gas should be heard). During the entire charging process, hold the can strictly upright and shake it from time to time. Between charging sequences, pause as needed to allow the system to stabilize.
7. If an accurate thermometer is available, insert it through the vent into the central A/C duct and monitor the temperature of the air supplied to the cabin.
8. When the can is empty, close the valve and disconnect the hose from the low-pressure service port. Immediately install the dust cap on the port.
9. Disconnect the valve adapter from the can. If necessary, transfer it to a second can and continue charging. When the procedure is complete, place the partially used can upright on a shelf and use it for topping up the system as needed.
Test yourself
A quick Honda Accord quiz: every answer comes with an explanation and a link to the manual page.