Cylinder Head Disassembly
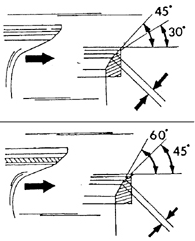
Valve Seats
Upper illustration: intake valve seats.
Lower illustration: exhaust valve seats.
Measure the valve seat contact width between both arrows
PROCEDURE
1. Inspect all cylinder head components for wear. Clean the cylinder head surfaces (use a scraper to remove old gasket residue, taking care not to scratch the cylinder head material). Perform inspections and checks in accordance with the following instructions.
Valve Springs
2. A valve spring tester must be used to inspect the valve springs. If one is not available, a used spring can be compared with a new spring. To do so, clamp both springs, placed one behind the other, together in a vise and slowly tighten the vise. If both springs compress by the same amount, this indicates that they have approximately the same tension. However, if the old spring compresses considerably more than the new spring, this indicates fatigue; the springs must be replaced as a set.

3. The free length of the spring can be measured with a vernier caliper as shown in the illustration. Place each spring in turn on a smooth surface (glass plate) with the closed coil facing down. Place a steel square next to the spring. Measure the gap between the spring and the square, and the angle at the top. The permissible value depends on the engine type. If the tolerance is exceeded, the spring is distorted.
Valve Guides
4. Clean the guides by pulling a rag soaked in gasoline through them. It is preferable to clean valve stems with a rotating wire brush chucked in an electric drill, holding the valve stem next to it. Insert the valves into their guide bores one at a time. To check valve stem-to-guide clearance, a dial indicator and a vernier caliper are required. The procedure has already been described for gasoline engines, but on the diesel engine the inside diameter of the valve guides must be between 8.01 and 8.03 mm. Valve stem diameter is 7.975–7.990 mm for intake valves and 7.960–7.975 mm for exhaust valves.
5. Subtract the valve stem diameter from the valve guide inside diameter. The result is the valve stem-to-guide clearance, which must not exceed 0.1 mm for intake valves and 0.12 mm for exhaust valves.
6. Before replacing a valve guide, check the general condition of the cylinder head. Cylinder heads with small cracks between the valve seats, or between a valve seat and the first thread of the spark plug hole, may be reused and reworked provided the cracks are no wider than 0.5 mm. Also check the cylinder head surface for distortion, as described below.
7. To replace a valve guide, drive the old guide out from the top side of the cylinder head using a drift. Before driving out the guides, follow the instructions below.
8. Measure with a depth gauge or steel rule how far the valve guide protrudes above the top surface of the cylinder head.
9. Heat the cylinder head to 80–100°C and drive the old valve guide out from the top side toward the combustion chamber. The drift must have an end recess matching the inside diameter of the valve guide.
10. Using a dial indicator, measure the inside diameter of the guide bore in the cylinder head. If the size is between 13.0 mm and 13.027 mm, a guide with standard outside diameter may be installed. If the diameter exceeds 13.027 mm, a guide with oversize outside diameter must be installed. This means the guide bores must be machined in a workshop.
11. Do not attempt to simply drive oversize guides into the bores. If you have experience with a reamer, the bores may be reamed to 13.050–13.077 mm to accommodate oversize guides.
12. If valve guides are replaced, the valves must also be replaced and the valve seats must be lapped.

13. Clean the inside surfaces of the guide bores. Lubricate the new guides and drive them into the cylinder head from the camshaft side, with the head heated to 90°C, so that the upper end protrudes above the top surface of the cylinder head by the dimension measured before removing the old guides.
14. After pressing in, ream the valve guides with an 8.0 mm reamer. Intake valves must have a clearance of 0.02–0.055 mm; exhaust valves must have a clearance of 0.035–0.070 mm.
15. After replacing the valve guides, the valve seats must be milled. If the seats can no longer be machined, there is no point in replacing the guides.
Valve Seats
16. Check the valve seats (see figure Valve Seats) for wear and pitting. Minor signs of wear can be removed with a 45° cutter. However, if the seat is severely worn, the valve seats must be re-cut. The specified angles are shown in figure Valve Seats. A correction angle must also be used to correct the height of the valve seat chamfer, i.e., use a 30° cutter (intake valves) or a 60° cutter (exhaust valves). As mentioned, valve seats can be finish-cut if new valve guides are installed.
17. First cut the 45° angle, then lightly machine the upper and lower edges of the seat with a 30° and 60° or 75° cutter to reduce the seat width and center the seat face. The working seat width must be 1.2–1.6 mm for intake valves and 1.6–2.0 mm for exhaust valves. Stop cutting as soon as the seat width is within tolerance.
18. Reworked seats must be lapped. To do this, apply lapping compound to the valve face, insert the valve into the corresponding seat, attach a suction cup to the valve, and rotate the valve in both directions. After lapping, thoroughly clean all parts to remove compound and dirt, and check the valve seat contact with the valve face and seat chamfer.
19. A continuous matte ring shows the valve seat width and must be visible on both the seat and the valve face. Mark several short pencil lines on the “ring” on the valve face, evenly spaced around the circumference at 1 mm intervals. Carefully insert the valve into the guide and seat, rotate the valve 90° while applying light pressure (use the suction cup). Remove the valve and check whether the pencil marks have been removed from the seat. If the valve seat widths are within specified tolerances, the head may be reinstalled. Otherwise, machine the valve seats or, in the worst case, replace the cylinder head.
Valves
20. The valve description for gasoline engines also applies to valves for diesel engines. The valve margin must be at least 0.9 mm for intake valves and 1.0 mm for exhaust valves. If not, install new valves. Valve measurements are performed in accordance with the specifications and adjustments table.
Cylinder Head
21. Clean the mating surfaces of the cylinder head and cylinder block, and check the cylinder head surface for distortion. To do this, place a straightedge on the head and use a feeler gauge set to measure the gap lengthwise, crosswise, and diagonally across the cylinder head surface. If a feeler gauge thicker than 0.20 mm can be inserted, the cylinder head must be replaced. Perform the same check on the surface that mates with the manifold. A gap of 0.20 mm is also the limit here.
Valve Seats
22. Valve seats in the cylinder head can be replaced. Drive the old seats out from the top side of the cylinder head into the combustion chamber. A compensating shim may be installed under the seat. Drive new seats in with a plastic hammer. The pin on the side of the seat and the notch in the cylinder head must be aligned.
23. After installation, check how far the seats protrude above the cylinder head mating surface. To do this, mount a dial indicator on a suitable stand on the clean cylinder head and place the probe on the cylinder head surface next to the first seat to be measured. Set the indicator to zero. Then move the probe onto the edge of the seat. The difference in readings must be from –0.03 mm to +0.03 mm. If not, remove the seat again and install a compensating shim under it. Shims are available in thicknesses from 0.05 to 0.10 mm, so the correct shim can easily be selected based on the measurement. Drive the seat in with the shim installed and repeat the measurement. Measure all replaced seats in the same way.
Camshafts
24. Place the camshaft journals of both end bearings in V-blocks or clamp the camshaft between the centers of a lathe, and install a dial indicator against one of the center journals. Slowly rotate the camshaft and read the indicator. If the runout exceeds 0.06 mm per revolution, the camshaft must be replaced, as it cannot be straightened. Next, check the bearing journals and camshaft surfaces for visible damage. If they are still in good condition, measure the cam lobe height and bearing clearance.
25. Use a micrometer to measure the cam lobe height. Specified dimensions and wear limits are given in the specifications and adjustments tables.
26. Before checking bearing clearance, inspect the bearing metal for flaking or cracks. If the caps are damaged, replace the caps, camshafts, and cylinder head.
27. Clean the bearing caps and camshaft journals, and arrange the caps in order according to bearing numbers.
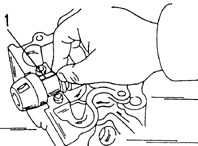
28. Measure bearing clearance using Plastigage (1). Place a piece of Plastigage along the full length of each journal, then install the caps in order. The arrows on all caps must point forward, and the cap numbers must match.
29. Tap the caps lightly with a hammer and install the bolts. Tighten the bolts in sequence from the center outward to a torque of 18 N·m. After this, do not rotate the camshaft.
30. Remove the bearing caps again and immediately check whether the Plastigage stayed on the cap. If it did not, it may have stuck to the journal instead.
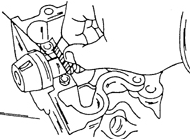
31. Using the plastic gauge supplied with Plastigage, measure the width of the compressed plastic strip at its widest point. This indicates the minimum bearing clearance. If the clearance is greater than 0.10 mm, replace the cylinder head and/or camshaft to bring the clearances within tolerance.
32. To measure camshaft end play, clean the bearing bores in the cylinder head and the bearing caps, and install the camshaft as described above. Tighten the bearing cap bolts in two or three passes.
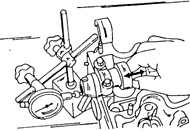
33. Install a dial indicator as shown in Figure 5.23, and move the camshaft back and forth while reading the gauge. The reading is the camshaft end play, which must not exceed 0.25 mm. If the end play is greater, replace the camshaft. In some cases, both components may be worn.
Timing Belt and Gears
34. A belt with broken teeth must always be replaced. Other defects include cracks, worn side surfaces, or rounded edges on some or all of the teeth. In this case, also inspect the teeth of the gears. Hold the belt tensioner with one hand and turn the roller with the other. If the roller binds when turning, replace the tensioner assembly.
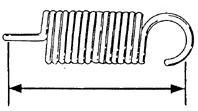
35. The tensioner return spring must have a specified length. Measure the length between the inner surfaces of the spring hooks, as shown in the figure. If the spring is shorter than 51.93 mm, install a new spring.
Valve Lifters
36. Measure the inside diameter of the lifter bores in the cylinder head and the outside diameter of the lifters. Use an inside micrometer and an outside micrometer for this. The difference must not exceed 0.10 mm. Otherwise, replace the lifters, and in the worst case, the cylinder head.
Test yourself
A quick Toyota Corolla quiz: every answer comes with an explanation and a link to the manual page.