Timing Belt Replacement
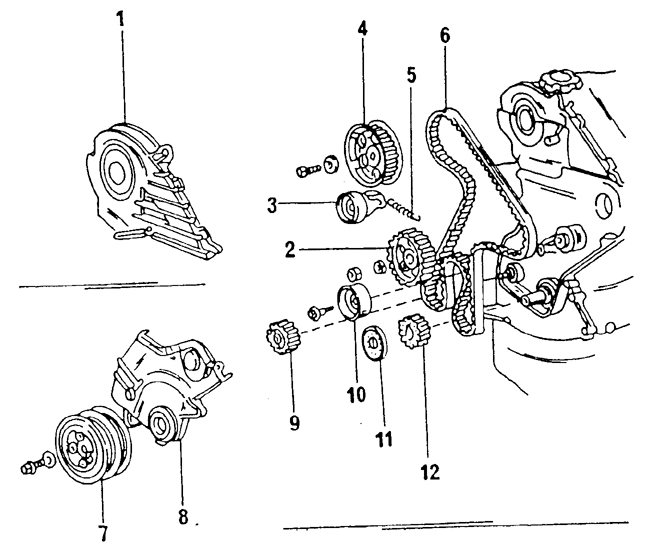
Diesel Engine Valve Timing Drive Components 1. Timing belt upper cover
2. High-pressure fuel pump drive gear
3. Timing belt tensioner
4. Camshaft timing gear
5. Timing belt tensioner spring
6. Timing belt
7. Crankshaft pulley
8. Timing belt lower cover
9. Water pump drive sprocket
10. Timing belt idler pulley
11. Timing belt idler pulley
12. Crankshaft timing gear

Removing the Crankshaft Pulley with Puller
The illustration of Diesel Engine Valve Timing Drive Components shows the valve timing drive parts. The illustration can be used when replacing or removing parts. The timing belt must be replaced every 100,000 km. At this point it has reached its normal service life. Even when the engine runs normally, it is never certain exactly when the timing belt may break. The following procedure covers removal and installation of all valve timing drive components. When only the timing belt is being replaced, follow the instructions below.
Removal
PROCEDURE
1. Remove the drive belts from the individual components on the front of the engine. If equipped with power steering, also remove the power steering pump pulley.
2. Remove the fluid coupling and water pump pulley together with the radiator fan. To do this, remove the four coupling nuts and remove the coupling with the pulley and fan attached.
3. Remove the crankshaft pulley bolt. To prevent the crankshaft from turning, engage a gear and apply the parking brake. Loosen the bolt using a socket wrench. To remove the pulley, a puller is normally used, installed on the pulley as shown in the illustration Removing the Crankshaft Pulley with Puller.
Otherwise, two pry bars can be placed under the pulley on opposite sides and used to remove the pulley. Perform this work under the vehicle.
4. Remove the timing belt upper cover from the front of the engine. To do this, remove three clips and five bolts. Remove the gasket. The timing belt lower cover is removed later.
5. Raise the engine using chains or cables of the lifting device and remove the right engine mount beam.
6. Disconnect the connectors from the four glow plugs and disconnect the power supply wire. Then remove the glow plugs.

7. Turn the engine crankshaft until the No. 1 cylinder piston is at top dead center on the compression stroke. To turn the crankshaft, temporarily reinstall the crankshaft pulley. If the gear is still engaged, disengage it. Turn the crankshaft until the camshaft timing gear mark is in line with the cylinder head surface (arrow).
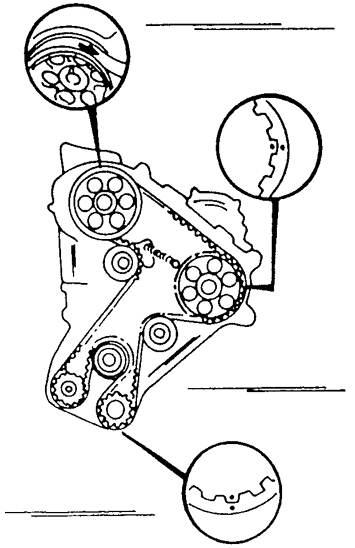
8. If the timing belt is to be reinstalled, mark the direction of travel on it with a felt-tip marker (the belt can otherwise be installed backwards). It is best to mark an arrow pointing in the direction of engine rotation. To restore the belt to its original position, mark the three timing gears and the timing belt.
9. Use tweezers to disconnect the timing belt tensioner return spring. Loosen the two timing belt tensioner bolts. While doing so, press the belt toward the outside so that it is loose enough to be removed. Do not handle the belt with greasy hands and do not allow it to contact oil, grease, or similar substances.
If no further work is required, the timing belt can be installed. Otherwise, follow the instructions below for removing or inspecting the remaining valve timing drive components (for example, when the engine has high mileage).
PROCEDURE
1. Remove the two timing belt tensioner mounting bolts and remove the tensioner.
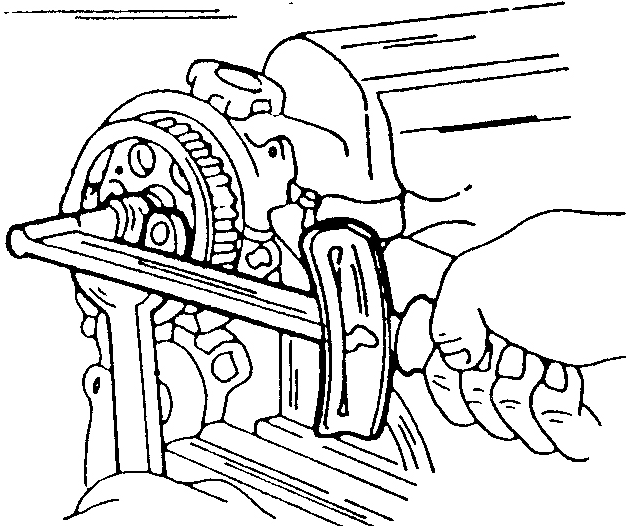
2. Loosen the camshaft gear mounting bolt. Hold the gear while doing so. Use a heavy metal rod inserted into the gear hole and resting against the cylinder head, or hold the gear as shown in the illustration.
3. Remove the gear from the camshaft. The gear is located on the shaft by a dowel pin, so it is not necessary to mark its position on the shaft. After removing the gear, do not rotate the camshaft.
4. In the same way, hold the high-pressure fuel pump drive gear and loosen the nut. A puller, shown in the illustration, is required to remove the drive gear. Remove the crankshaft pulley with the puller. Screw the puller bolts into the two threaded holes in the gear. The oil pump drive gear is removed in the same way.
5. Remove the timing belt idler pulley (one bolt).
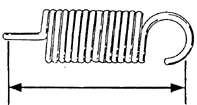
6. Inspect all removed parts for wear and damage. If the tensioner binds in any place, replace it. Measure the length of the return spring. A reinstalled spring must measure 51.93 mm between the inner sides of both spring hooks, as shown in the illustration.
Installation
Install the valve timing drive in the reverse order of removal. The description assumes that all valve timing drive components were removed.
PROCEDURE
1. Install the crankshaft gear onto the end of the shaft, align the key and the keyway in the gear, and drive the gear onto the shaft using a pipe of suitable diameter. Make sure the key does not move.
2. In the same way, install the oil pump drive gear, but insert the tab on the drive gear into the slot on the drive shaft. Install the nut and tighten it to 47 N·m. Hold the drive gear from rotating while tightening.
3. Install the timing belt idler pulley. Tighten the bolt to 37 N·m.
Make sure the pulley rotates freely after tightening.
4. Install the high-pressure fuel pump drive gear onto the shaft, aligning the key with the slot. Tap the gear lightly and install the nut. Hold the gear from rotating and tighten the nut to 65 N·m.
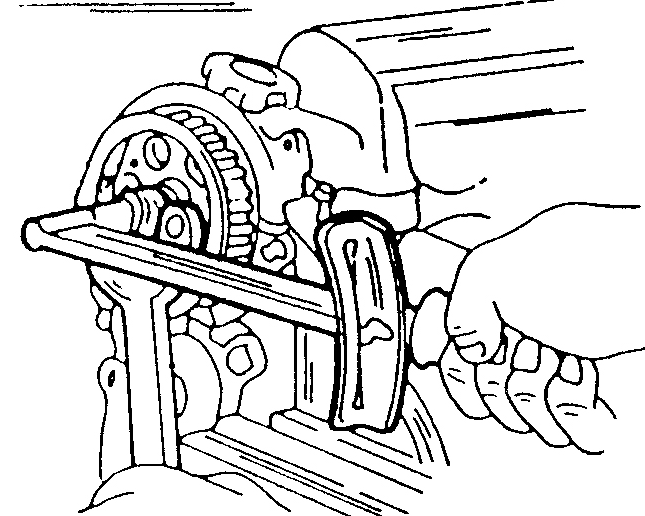
5. Install the camshaft gear onto the camshaft. The gear has a hole that must engage the camshaft dowel pin. Install the bolt with a large washer. Hold the shaft as shown in the illustration and tighten the bolt to 100 N·m.
Do not rotate the camshaft while tightening the bolt, as the valves may strike the piston crowns.
6. Install the two tensioner mounting bolts without fully tightening them. Tighten the center bolt with the roller to 7.5 N·m. Make sure the roller rotates freely in both directions after tightening.

7. Check that the No. 1 piston is still at TDC. The mark on the crankshaft pulley must be at the top. The mark on the camshaft gear must be aligned as shown in the illustration, and the mark on the high-pressure fuel pump drive gear must be aligned with the mark on the water pump.
8. When installing a new timing belt, position it so that the letters and numbers on the back of the belt are visible from the rear of the engine.
9. First place the belt on the camshaft gear.
Hold the high-pressure fuel pump drive gear with an open-end wrench and place the belt on the gear. Check that the belt teeth are engaged correctly; the belt must be taut between the camshaft gear and the oil pump gear.
10. Keep holding the high-pressure fuel pump drive gear, install the belt on the water pump gear and the crankshaft gear. Check the belt tooth engagement again.
11. Install the belt on the idler pulley and the oil pump drive gear, in that order. Check that the belt is not overtightened. All marks must align.
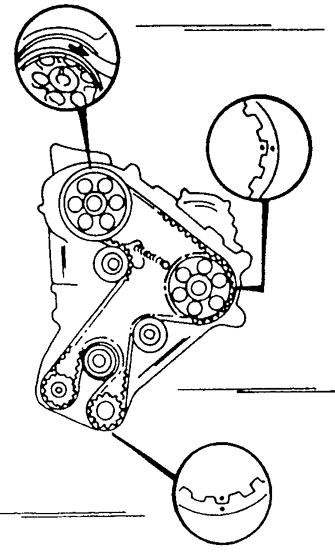
12. When installing the old timing belt, install it using the method described above, making sure all marks made with the felt-tip marker during removal align. The arrow must also point in the correct direction. The illustration shows how the marks should align. If the belt has shifted by one tooth, reinstall it.
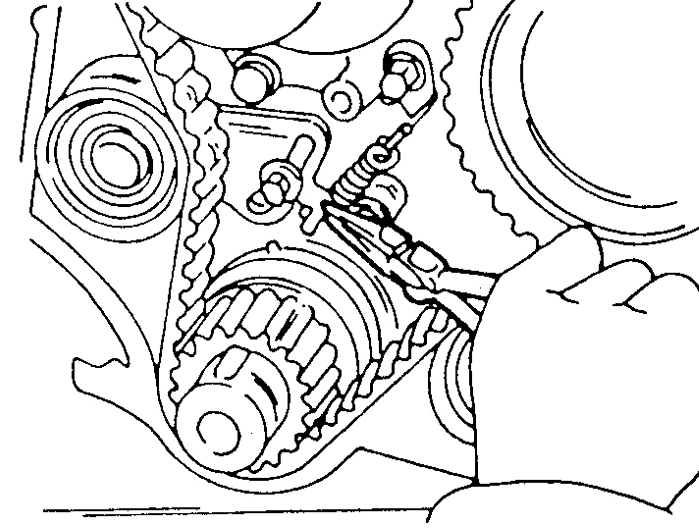
13. Connect the return spring to the tensioner as shown in the illustration. After connecting the spring, loosen the two tensioner bolts. The idler roller is then pulled inward and tensions the timing belt.

14. Tighten the bolt on the front end of the crankshaft before rotating the crankshaft. Turn the crankshaft exactly two revolutions and check that all marks are aligned as shown in the illustration. If necessary, remove and reinstall the belt.
15. Tighten the tensioner pulley bolts to 37 N·m without moving the mounting plate.
16. Install the right engine mount bracket. Tighten the smaller bolts to 37 N·m and the larger bolts to 65 N·m.
17. If power steering is installed, do not fully tighten the large bolts yet.
18. Screw in the four glow plugs and tighten them to 13 N·m. Connect the wiring connectors to the glow plugs, install the current bus bar with insulating washers, washers and nuts, and fit the four rubber caps.

19. Install the timing belt guide washer on the end of the crankshaft. Align the wedge guide with the key. The bent edge of the guide washer must face outward, as shown in the illustration. Install the lower timing belt cover with the gasket and evenly tighten the five bolts.
20. Install the crankshaft pulley (pay attention to the key and the notch). Use a piece of pipe to press it on. Screw in and tighten the bolt to 100 N·m. The transmission must be engaged to keep the shaft from turning.
21. Install the upper timing belt cover with a new gasket and secure it with five bolts and three clips.
22. Secure the power steering pump with three bolts. Tighten the bolts to 40 N·m. Install the pump pulley temporarily for now.
23. Install the power steering pump and
alternator drive belt and adjust the belt tension as described in the appropriate chapter and for the power steering pump. Now the temporarily installed power steering pump pulley can be tightened. To do this, press the belt with your thumb and alternately tighten the nuts with a socket and torque wrench to a torque of 45 N·m.
Test yourself
A quick Toyota Corolla quiz: every answer comes with an explanation and a link to the manual page.