Installation of Pistons and Connecting Rods
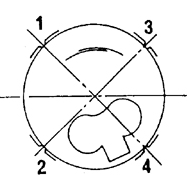
Piston Ring End Gap Positions around the Piston Circumference 1. Top compression ring
2. Lower side rail of oil control ring
3. Upper side rail of oil control ring
4. Second compression ring
PROCEDURE
1. Lubricate the cylinder bores.
2. Arrange all connecting rods by cylinder number. The "VORN" mark on the connecting rod and on the piston crown must face the engine pulley side (front).
3. Distribute the piston ring end gaps around the piston circumference as shown in the illustration. Install the three-piece oil control ring so that the end gaps are not aligned with each other.
4. Apply a piston ring compressor to the piston ring area and press the rings into the grooves. Check that they seat correctly.
5. Install short pieces of rubber or plastic hose over the connecting rod bolts to avoid scratching the cylinder bores. Connecting rod nuts must always be replaced, as previously installed nuts lose their clamping capability.
6. Rotate the crankshaft until two crankpins are at bottom dead center.
7. Insert the connecting rod into the bore from the top. To do this, lay the engine on its side so that the connecting rod can be guided over the bearing journals without scratching the cylinder bore or the crankpin. The connecting rod bearing shells must already be in the connecting rod, with the tabs seated in the notches.
8. When inserting, check again that the "VORN" marks are correctly aligned with each other.
9. Push the piston in until the piston rings enter the cylinder bore in sequence and the connecting rod big end seats on the crankpin.
10. Place the second bearing shell into the bearing cap, and lubricate the shell. Install the cap onto the connecting rod bolts and tap lightly. The pieces of rubber hose must be removed beforehand.
11. Lubricate the surfaces of the connecting rod bearing cap nuts.
12. Alternately tighten the new connecting rod nuts to a torque of 65 N·m.
13. After installing the connecting rod, turn the crankshaft several times to detect any binding immediately.
14. Rotate the crankshaft so that the two other crankpins are at bottom dead center, and install the remaining pistons and connecting rods in the same way.
15. Check the position of all markings once more and verify that the pistons are installed correctly.
16. Mount a dial indicator on the cylinder block and measure the side clearance between the connecting rod and the crankshaft by moving the connecting rod bearing back and forth on the crankpin by hand. The connecting rod bearing side clearance must not exceed 0.40 mm.
17. To complete assembly, install the oil pump, gears, front cover, and oil pan.
Test yourself
A quick Toyota Corolla quiz: every answer comes with an explanation and a link to the manual page.