Instrument Panel

Instrument Panel and Related Components – Exploded View 1. Front Pillar Trim
2. Front Pillar Lower Trim
3. Front Door Scuff Plate
4. Heater Duct to Ventilator Grille N4
5. Passenger Airbag
6. Instrument Panel
7. Instrument Cluster Finish Panel
8. Connector Cover
9. Lower Panel
10. Glove Box Door
11. Clock
12. Radio
13. Center Instrument Panel Finish Panel
14. Center Instrument Panel Finish Panel Lower
15. Ashtray
16. Console Upper Panel
17. Shift Lever Hole Bezel
18. Console Rear Box
19. Center Panel Lower Trim
20. Heater Control Assembly
21. Brace N2
22. Brace N1
23. Lower Finish Panel
24. Heater to Ventilator Duct
25. Steering Column Cover
26. Steering Column
27. Steering Wheel
28. Combination Switch
29. Center Panel Finish Assembly
30. Instrument Panel
31. Heater Duct Side Outlet
32. Heater to Ventilator Duct N3
33. Instrument Panel Reinforcement
34. Heater Duct Center Outlet
35. Bracket
36. Heater Duct Side Outlet N2
Removal
PROCEDURE
1. Disconnect the ground cable from the battery.
2. Remove the driver airbag module and steering wheel (see subsection 10.16).

3. Remove the glove box (see subsection 11.20), disconnect the passenger airbag module electrical connector, and remove the airbag module.
* Store airbags in a safe place with the front (trim) side facing up.
4. Remove the instrument panel trim (see subsection 11.19) and remove the instrument panel.
5. Remove the center trim panel (see subsection 11.21), remove the audio system (see subsection 12.11) and the heater and air conditioning control panel (see subsection 4.10).
6. Remove the steering column covers (see subsection 11.22) and the lower trim panel (see subsection 11.23).
7. Remove the front and rear console panels (see subsection 11.24).
8. Remove the front door scuff plates and the front pillar decorative moldings on both sides.
9. Remove the ignition lock cylinder (see subsection 12.8). Unscrew the bolts securing the steering column to the instrument panel and reinforcement brace, then lower the steering column.
10. Using a lever, carefully remove the left ventilation duct, disconnect the electrical connectors, and unscrew the instrument panel mounting bolt behind the duct.
11. The main instrument panel wire harness remains attached to the panel when removing it. Disconnect all remaining connectors. Release the fuse block from the body and remove it together with the panel and wiring. Disconnect the electrical connectors from the heater housing and disconnect the ground wire terminals from the center brace.
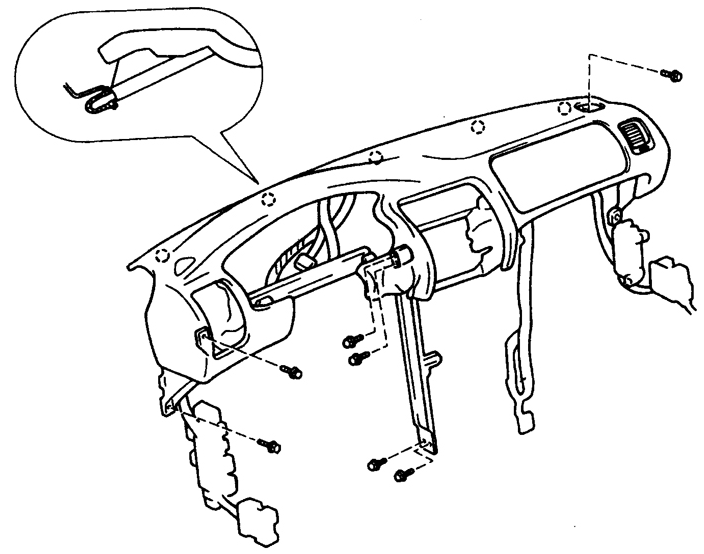
12. Unscrew the remaining instrument panel mounting bolts, firmly hold the panel and pull it straight toward the rear of the vehicle to release the five clips located along the base of the windshield. Remove the instrument panel from the vehicle.
Installation
PROCEDURE
1. Carefully disconnect the ventilation and heater wires and ducts and transfer them to the new instrument panel.
2. Place the instrument panel in position, press it down so that the five clips engage the tabs, and tighten the mounting bolts.
3. Perform the remainder of the installation in the reverse order.
Test yourself
A quick Toyota Corolla quiz: every answer comes with an explanation and a link to the manual page.