Door Latch, Lock Cylinder and Handles
Remove the door trim panel and the plastic water shield protecting the door from moisture (see subsection 11.12).
DOOR LATCH
Removal and installation
PROCEDURE
1. Behind the door panel, disconnect the control rods from the latch.
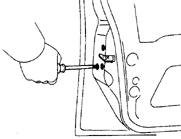
2. Unscrew the latch mounting bolts from the door edge.
3. Disconnect the door latch and the door lock solenoid (if equipped).
4. Installation is performed in the reverse order.
LOCK CYLINDER AND OUTSIDE HANDLE
Removal and installation
PROCEDURE
1. Disconnect the control rod from the lock cylinder and the outside handle.
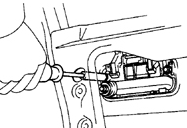
2. Unscrew the outside handle mounting bolts and remove the handle and lock cylinder from the door. Access to the bolts is available through the access hole in the door frame.
3. Using a screwdriver, release the clip and remove the cylinder from the door.
4. Installation is performed in the reverse order.
INSIDE HANDLE
Removal and installation
PROCEDURE
1. Unscrew the inside handle mounting bolt.
2. Turn the handle to access the rod.
3. Gently pull the handle while using a small screwdriver to disconnect the rod from the inside handle control unit, then remove it from the door.
4. Installation is performed in the reverse order.
Test yourself
A quick Toyota Corolla quiz: every answer comes with an explanation and a link to the manual page.