Spark Plug Inspection and Replacement
GENERAL INFORMATION EVERY 60,000 KM (37,000 MILES)
ATTENZIONE
Replace spark plugs only on a cold or slightly warm engine. If spark plugs are removed from a hot engine, the threads in the light-alloy cylinder head may be damaged.PROCEDURA
1. Before starting work, prepare all necessary tools. Some spark plug manufacturers supply special tools for measuring the spark plug gap.
You will need the following for this work:
– 16 mm spark plug socket, for example HAZET 900AKF. Audi service centers use spark plug wrench 3122B for this. – Optionally, it is recommended to purchase special spark plug pliers, for example HAZET 1849, which make removing spark plugs easier. Audi uses installation wrench 3277A for this. – 4 spark plugs. The required spark plugs are listed in the Specifications.
2. The best method for replacing spark plugs is to first purchase new spark plugs, adjust their gap, and replace each spark plug one at a time. When buying spark plugs, it is very important to select the ones specified for your vehicle's engine. Information about them can be found in the Specifications for the Engine Electrical System chapter.
3. With the new spark plugs at hand, allow the engine to cool down completely before removing the old ones. During this time, inspect the new spark plugs for defects and check the spark plug gaps.
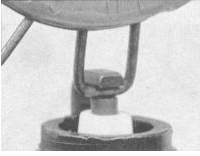
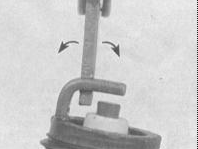
4. Check the spark plug gap by inserting a feeler gauge of the correct thickness between the electrodes at the tip of the spark plug. The gap must match the value listed in the Specifications. The gauge should only lightly touch each electrode. If the gap is not within specification, carefully bend the curved part of the electrode using the notched gap tool until the required gap is obtained.
ATTENZIONE
When adjusting the gap of a new spark plug, bend only the base of the ground electrode, without touching its tip. If the ground electrode is misaligned with the center electrode, align them using the notched gap tool. Check the porcelain insulator for cracks, which indicate that the spark plug must be replaced.5. Switch off the ignition.
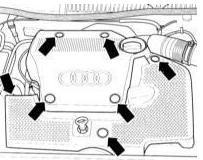
6. Engine 1.6 L: Remove the mounting bolts and remove the engine cover.
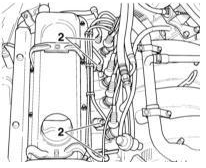
7. Engines up to 125 L hp: Disconnect the electrical connectors –2– from the spark plugs. Note: The illustration shows the engine of another vehicle.
8. If possible, blow out the spark plug wells with compressed air so that dirt does not enter the spark plug bores after the spark plugs are removed.
9. Engine 1.8 L/150 L hp: Remove the mounting bolts and remove the engine cover.
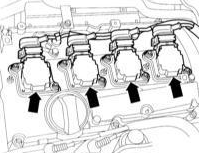
10. Disconnect the electrical connectors of the ignition coils. To do this, pull up the locking clips.
11. Remove the bolts securing the ignition coils to the cylinder head and lift the coils off the spark plugs.
ATTENZIONE
Visually check the seals between the ignition coils and the cylinder head. If damaged, replace the parts.All engines:
12. Unscrew the spark plugs using the appropriate spark plug wrench. Take care
ATTENZIONE
to ensure the spark plug wrench does not tilt, which may crack the ceramic insulator. Use a suitable socket, for example HAZET 900AKF. Audi service centers use spark plug wrench 3122B for this. Inspection13. Compare the removed spark plug with the illustrations in Chapter 5; this will provide useful information about the general condition of the engine.
14. Check the electrode gap with a feeler gauge. The AUDI A3 uses spark plugs with three ground electrodes. The required gap value is listed in the Specifications.
ATTENZIONE
New spark plugs usually have the correct electrode gap set. If the spark plug thread is damaged, it must be replaced. Suitable tools and a repair kit are available for this, for example from BERU. The old threaded hole can be bored out using a special drill. The cylinder head does not need to be removed for this. Afterwards, a new thread can be cut in the cylinder head and the spark plug installed using a special threaded insert. Threaded inserts seat securely and seal properly.15. To set the gap, bend the corresponding ground electrode. To do this, tap the side of the ground electrode. When bending, rest a small screwdriver against the edge of the thread. Never rest against the center electrode, as it may be damaged.
16. Apply a small amount of copper-based anti-seize compound to the threads of the new spark plug. Install the spark plug into the cylinder head and screw it in by hand until it seats, then tighten it using the spark plug socket. If possible, use a torque wrench to tighten the spark plug to ensure it is installed correctly. The spark plug tightening torque is listed in the Specifications.
ATTENZIONE
To prevent the spark plug from being threaded in crosswise, slide a short piece of rubber hose or plastic tube over its shank. The flexible tube works as a universal joint, allowing the spark plug to align with the plug bore. If the spark plug begins to tilt, the hose will slip on it, preventing the threads from being stripped.17. Before connecting the high-voltage (HV) lead to the spark plug, carefully inspect it.
18. Collegare il cavo alla candela nuova installata, di nuovo con un movimento rotatorio e tenendo il connettore, finché non si inserisce completamente sulla candela.
19. Ripetere la procedura sopra descritta per le restanti candele di accensione in sequenza, per evitare di collegare erroneamente i cavi delle candele.
20. Motore 1.8 L 150 L: Installare le bobine di accensione e serrare con una coppia di 10 N·m. Collegare i connettori.
21. Installare e serrare il coperchio.
Mettiti alla prova
Un breve quiz sulla Audi A3: ogni risposta ha una spiegazione e un link alla pagina del manuale.