Mirrors
Interior rear-view mirror
Adjust the mirror so that you have a view of the center of the rear window.
Make this adjustment before driving.
WARNING - Rear VisibilityDo not place any objects on the rear seat that could block your view through the rear window.
WARNINGDo not adjust the mirror while driving. You could lose control of the vehicle and have an accident that could result in death, serious injury or property damage.
WARNINGDo not modify the mirror or install a wider mirror. You could be injured in an accident or in the event of airbag deployment.
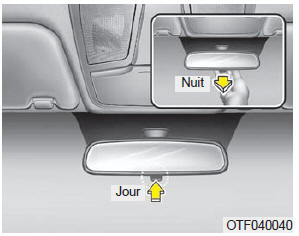
Day/Night Mirror
Make this adjustment before driving and with the day/night lever in the day position.
Pull the day/night lever toward you to reduce glare from the headlights of vehicles behind you when driving at night.
Keep in mind that you will lose some clarity when using the night position.
Electrochromic Mirror ("ECM") with Compass and HomeLink System (if equipped)
Your new vehicle is equipped with a Gentex automatic day/night mirror with Z-NAVMD electronic compass and an integrated HomeLink wireless control system. When driving in the dark, this safety device automatically detects and eliminates dangerous glare in the mirror, while the compass shows the direction the vehicle is traveling. The HomeLink remote control allows you to operate your garage door, driveway gate, house lighting, and more.
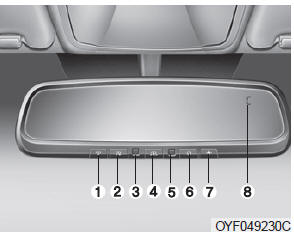
- Channel 1 button
- Channel 2 button
- Status LED
- Channel 3 button
- Photosensor
- Day/night switch
- Compass button
- Display
Night Vision Safety (NVS) Automatic Day/Night Mirror
The NVS mirror in your vehicle is the most advanced way to eliminate annoying and dangerous glare in the mirror, regardless of road conditions. To learn more about NVS mirrors and other applications, visit the Gentex website at: www.gentex.com
CAUTIONThe NVS mirror automatically reduces glare while driving by monitoring the light level in front of and behind the vehicle. The photosensors are visible through the openings on the front and rear of the mirror housing. Any object that blocks the photosensor will interfere with the proper operation of the automatic light level control.
Automatic Dimming
To protect your vision when driving in the dark, the mirror automatically dims as soon as it detects the glare of headlights from vehicles behind your vehicle.
Automatic dimming is controlled by the day/night switch:
- Press
 Off
automatic dimming. The green status LED turns off. - Press again

to turn on automatic dimming. The green status LED turns on.
✽ NOTE
Automatic dimming is turned on each time the vehicle is started.
Z-NavMD Compass Display
The NVS mirror also includes a Z-NavMD compass that shows the direction the vehicle is traveling. The display shows one of 8 compass points (N, NE, E, SE, etc.).
Compass Function
The compass can be turned on or off and will retain its last status when the vehicle is started. To turn the compass on or off:
- Press the button to turn the compass off.
- Press again to turn the compass on.
Other settings can be made by holding the button down to scroll through the sequences explained below.
There is a difference between magnetic north and geographic north. The mirror compass compensates for this difference once it knows which magnetic zone it is being used in.
This setting can be made by the dealer or the user. The zone numbers for North America are shown on the right.

To set the zone:
- Determine the number of the desired zone based on your location on the map.
- Hold the button (
 )
down for more than 3 but less than 6 seconds. The current zone number is displayed. - Hold ( ) down again to change the number (Note: the sequence repeats ...13, 14, 15, 1, 2, ...). Release the button when the desired zone number is displayed. The new zone is set.
- Within about 5 seconds, the compass will display the compass point again.
Certain conditions can affect the vehicle's magnets, such as having a ski rack or a CB antenna.
Body repair work can also change the vehicle's magnetic field. In this case, the compass must be recalibrated to correct these changes. To recalibrate the compass:
- Hold the button (
 )
down for more than 6 seconds. The compass memory will be erased, which is indicated by a "C" on the display. - To calibrate the compass, drive the vehicle in two complete circles at a speed below 8 km/h.
HomeLink Remote Control
The HomeLink remote control is a convenient way to replace up to three radio frequency (RF) remote controls with a single integrated device. This innovative device stores the RF codes of most common remote controls used to operate gate openers, garage door openers, door locks, alarm systems and even household lighting. The procedures given below allow you to program both fixed code and rolling code devices. For more information about HomeLink, visit www.homelink.com or call 1 800 355-3515.
CAUTIONBefore programming a garage door or gate opener, make sure that no people or objects are nearby to avoid the risk of damage or injury. Do not use HomeLink to operate a garage door that is not equipped with an emergency stop and reversing mechanism, as required by United States federal safety standards (this includes any garage door opener manufactured before April 1, 1982).
A garage door that cannot detect the presence of an object, which signals the door to stop and reverse its movement, does not meet these safety standards. Using a garage door opener without such protection increases the risk of serious injury or even death.
Keep the original remote control you are programming. You can use it in another vehicle and to reprogram HomeLink. For safety reasons, it is also recommended that you erase the programmed HomeLink buttons if you sell the vehicle.
Programming HomeLink
✽ NOTE
- When programming a garage door opener, it is recommended to park the vehicle outside the garage.
- It is recommended to install a new battery in the remote control used for HomeLink programming to speed up learning and improve the accuracy of the radio frequency signal transmission.
- On some vehicles, the ignition switch must be set to the second position (accessory) to program and use the HomeLink remote control.
- If you have difficulty programming or have questions after following the programming steps, contact HomeLink at: www.homelink.com or 1 800 355-3515.
Standard Programming
Follow these steps for most devices:
- For initial programming, press and hold the two outer buttons (HomeLink channel 1 and channel 3) until the indicator light flashes (approximately 20 seconds). Release both buttons. Do not hold the buttons for more than 30 seconds.
- Hold the remote control to be programmed 2 to 8 cm (1 to 3 in) from the HomeLink buttons, in line with the indicator light.
- Press and hold the HomeLink button and the device button at the same time.
Programming a Rolling Code Device
Rolling code devices are code-protected and have been manufactured since 1996. They can be identified as follows:
- Refer to the device's owner's manual.
- The transmitter appears to program to the HomeLink remote control, but the device cannot be operated.
- Press and hold the programmed HomeLink button. If it is a rolling code device, the indicator light will flash rapidly and then stay on steadily after 2 seconds.
Follow these steps to program a rolling code device:
- In the garage, on the receiver of the garage door opener motor unit, locate the learn button.
It is usually located near the antenna input point on the motor unit.
The location and color of the button may vary depending on the manufacturer. If you have difficulty locating it, refer to the owner's manual or visit the website www.homelink.com.NOTICE You have 30 seconds to begin step 3.
- Return to the vehicle, press and hold the desired HomeLink button for two seconds, then release it.
Gate Operator and Programming in Canada
The remote control may automatically stop transmitting the signal during programming. Always keep the HomeLink remote control button pressed (steps 2 to 4 of standard code programming) while pressing the transmitter button every two seconds until the signal has been learned. The indicator light will flash slowly and then quickly after a few seconds if programming is successful.
Using the HomeLink Remote Control
To use the HomeLink remote control, simply press the programmed button. The programmed device should then operate (garage door, gate, security system, door lock, lighting, etc.). For convenience, the original remote control can still be used.
Reprogramming a Single HomeLink Button
To program a new device to an already programmed HomeLink button, follow these steps:
- Press and hold the desired HomeLink button. Do NOT release it until step 4 is complete.
- When the indicator light starts flashing slowly (after 20 seconds), hold the remote control 2 to 8 cm (1 to 3 in) from the HomeLink remote control.
- Hold the button on the remote down. The HomeLink indicator light will blink, slowly at first, then rapidly.
- Once the indicator light is blinking rapidly, release both buttons.
- Hold the newly programmed HomeLink button down and observe the red status LED. If it stays on, programming is complete and the new device should operate.
Clearing Stored Codes from HomeLink
The buttons cannot be erased individually. However, you can erase all three buttons at the same time:
- Hold down the two outer HomeLink buttons until the indicator light begins to blink - approximately 20 seconds.
- Release both buttons. Do not hold them down for more than 30 seconds.
The integrated HomeLink remote is now in learning mode and can be programmed at any time by following the appropriate steps described above.
N FCC : NZLZTVHL3 CI : 4112A-ZTVHL3
This device complies with Industry Canada RSS-210.
Operation is subject to the following two conditions:
- this device may not cause harmful interference; and
- this device must accept any interference received, including interference that may cause undesired operation.
Tests have shown that the transceiver complies with FCC and Industry Canada regulations. Any change or modification not expressly approved by the party responsible for compliance may void the user's authority to operate this equipment.
NVS is a registered trademark and ZNav MD a trademark of Gentex Corporation, Zeeland, Michigan.
HomeLink is a registered trademark owned by Johnson Controls, Incorporated, Milwaukee, Wisconsin.
Outside Rearview Mirror
Be sure to adjust the mirror positions before driving.
Your vehicle is equipped with left and right outside rearview mirrors. The mirrors can be adjusted using the remote control (if equipped). The outside mirrors can fold toward the vehicle to prevent damage in a car wash or on a narrow street.
WARNING - Mirrors- The right outside mirror has a convex mirror. Objects are closer than they appear.
- Use the inside rearview mirror or direct observation to judge the actual distance of vehicles behind you when changing lanes.
Do not scrape ice off the mirror surface. You could damage the glass. If ice prevents the mirror from adjusting, do not force the mirror. To remove ice, use an aerosol de-icer, or a sponge or cloth with very hot water.
CAUTIONIf the mirror is frozen in place, do not force it to adjust. Use an approved de-icer (not engine coolant antifreeze) to free the mechanism, or park the vehicle in a warm place and let the ice melt.
WARNINGDo not adjust or fold the outside mirrors while driving. You could lose control and cause an accident that could result in death, serious injury, or property damage.
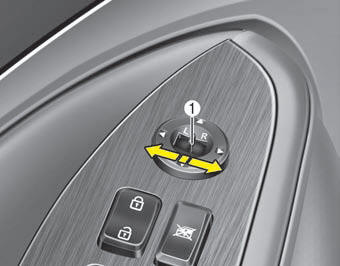
Remote Control
Electric Type (if equipped)
The electric remote mirror control allows you to adjust the left and right outside mirror positions. To adjust a mirror, the ignition switch must be in ACC. Move the lever (1) to R or L to select the right or left mirror. Then press the corresponding point on the control to adjust the mirror up, down, left, or right.
Once adjustment is complete, move the switch to the neutral (center) position to prevent unintentional adjustment.
CAUTION- The mirrors stop when they reach the maximum adjustment angle, but the motor keeps running as long as you press the switch. Do not press the switch longer than necessary, or you may damage the motor.
- Do not attempt to adjust the outside mirror by hand; you could damage the internal parts.
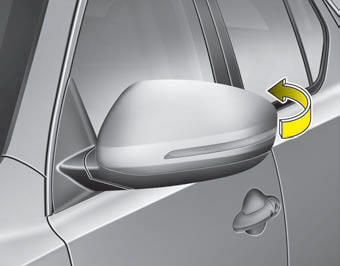
Folding the Outside Mirror
To fold the outside mirror, grasp the mirror housing and fold it toward the rear of the vehicle.
Test yourself
A quick Kia Optima DL3 quiz: every answer comes with an explanation and a link to the manual page.