Engine does not start
DESCRIPTION
When the electronic key transmitter sub-assembly is inside the cabin and the engine switch is pressed, the certification ECU (smart key ECU assembly) receives a signal and changes the power supply mode. In addition, when the shift lever is in P and the brake pedal is depressed, the engine can be started by pressing the engine switch. When the steering lock is released, the engine can also be started by pressing the engine switch while the shift lever is in N and the brake pedal is depressed.
Related Data List and Active Test ItemsProblem Symptoms | Data List and Active Test |
|---|---|
Engine does not start |
Power source control
|
WIRING DIAGRAM
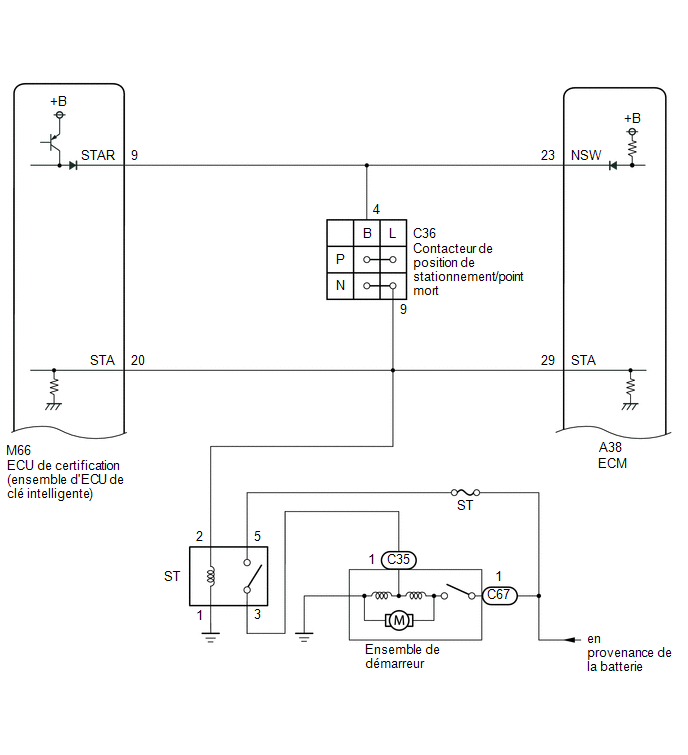
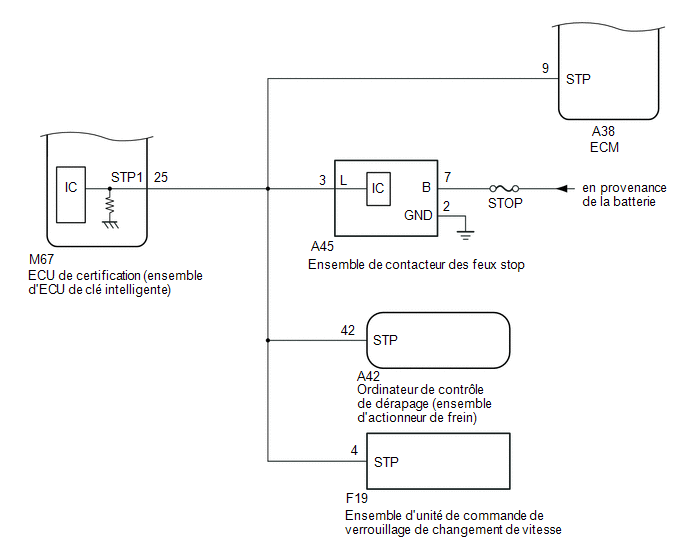
PRECAUTION / NOTICE / HINT
NOTICE:
- While using the Techstream with the vehicle engine switch OFF, connect the Techstream to the DLC3 and turn a welcome light switch ON and OFF at intervals of no more than 1.5 seconds until communication between the Techstream and the vehicle starts. Then select the vehicle type in manual mode and enter the following menus: Body Electrical / Smart Key. While using the Techstream, regularly switch a welcome light switch between ON and OFF at intervals of no more than 1.5 seconds to maintain communication between the Techstream and the vehicle.
- The smart key system (for engine start function) uses the LIN communication system and the CAN communication system. Check the communication function by following the procedure in the HOW TO USE TROUBLESHOOTING section. Troubleshoot the smart key system (for entry function) only after confirming that the communication systems are operating properly.
Click here

- If the smart key system (for start function) has been disabled, enable the system before performing troubleshooting.
Click here
- Check the fuses for the circuits related to this system before performing the following procedure.
- Before replacing the certification ECU (smart key ECU assembly) or an electronic key transmitter sub-assembly, refer to the precautions for the smart key system (for start function).
Click here
- After completing the repairs, make sure the problem does not recur.
HINT:
- When the cable is disconnected and then reconnected to the negative (-) battery terminal, the power source mode does not return to the state selected before the cable was disconnected.
- If the engine switch is changed from ON (IG) to ON (ACC) with the shift lever in a position other than P, then the shift lever is moved to P and the engine switch is pressed while the brake pedal is depressed, the engine switch is turned to OFF.
- If the brake pedal is depressed repeatedly while the engine is off, the brake booster pressure is released and the force required to depress the brake pedal and illuminate the stop lights increases.
- The certification ECU (smart key ECU assembly) records the operation history of the smart key system, which can be read using the Techstream.
Operation History
Radio Wave Interference (RF Signal Received)Parameter Name | Content |
|---|---|
Engine switch / RF wave interference signal |
When the engine switch was activated, the electronic key transmitter sub-assembly could not be confirmed due to wave interference. |
PROCEDURE
CHECK ELECTRONIC KEY TRANSMITTER ASSEMBLY
(a) Press a switch on the electronic key transmitter sub-assembly.
OK:
The LED on the electronic key transmitter subassembly lights up.
| NG |  |
GO TO STEP 14 |
|

READ VALUE USING TECHSTREAM (KEY LOW BATTERY)
(a) Connect the Techstream to the DLC3.
(b) Turn the engine switch to ON (IG).
(c) Turn on the Techstream.
(d) Select the following menu items: Body Electrical / Smart Key / Data List.
(e) Read the Data List by following the instructions on the Techstream.
Body Electrical > Smart Key > Data ListTester display | Item | Range | Normal Condition | Diagnostic Note |
|---|---|---|---|---|
Key Low Battery |
Transmitter Battery Discharged |
NO or YES |
No: Transmitter battery not discharged Yes: Transmitter battery discharged |
The electronic key transmitter sub-assembly sends voltage information to the certification ECU (smart key ECU assembly) when it transmits. "Yes" is displayed for the "Key Low Battery" Data List item when the voltage information indicates a value of 2.2 V or less. This Data List item must be checked when the electronic key transmitter sub-assembly is at cabin temperature (for example, at -20°C (-4°F), "Yes" may be displayed even if the transmitter battery is new). |
Key Low Battery
Result:
Result | Proceed to |
|---|---|
"No" is displayed on the Techstream screen |
A |
"Yes" is displayed on the Techstream screen |
B |
| B | |
REPLACE TRANSMITTER BATTERY |
|
CHECK ENGINE START
(a) Get into the vehicle while carrying the electronic key transmitter.
(b) Place the shift lever in the P position.
(c) Depress the brake pedal.
(d) Push the engine switch and check whether the engine starts.
Result:
Result | Proceed to |
|---|---|
The engine is cranked by the starter, but there is no initial combustion or the engine is difficult to start |
A |
The engine is not cranked by the starter |
B |
| B | |
GO TO STEP 6 |
|
CHECK WIRE HARNESS AND CONNECTOR (CERTIFICATION ECU (SMART KEY ECU ASSEMBLY) - ECM)
(a) Disconnect the M66 connector from the certification ECU (smart key ECU assembly).
(b) Disconnect the A38 ECM connector.
(c) Disconnect the C36 connector from the park/neutral position switch.
(d) Remove the ST relay.
(e) Measure the resistance according to the value(s) in the table below.
Standard resistance:
Tester Connection | Condition | Specified Condition |
|---|---|---|
M66-20 (STA) - A38-29 (STA) |
Always |
Below 1 Ω |
M66-20 (STA) or A38-29 (STA) - Body ground |
Always |
10 kΩ minimum |
| NG | |
REPAIR OR REPLACE HARNESS OR CONNECTOR |
|
CHECK CONNECTOR CONNECTION CONDITION
(a) Disconnect the M66 connector from the certification ECU (smart key ECU assembly).
(b) Connect the M66 connector of the certification ECU (smart key ECU assembly).
(c) Push the engine switch and check whether the engine starts.
OK:
The engine starts.
| OK | |
CONNECT PROPERLY |
| NG | |
GO TO IMMOBILIZER SYSTEM |
CHECK WHETHER DTCs ARE OUTPUT
(a) Using the Techstream, check the DTCs of the certification ECU (smart key ECU assembly).
Body Electrical > Smart Key > Trouble Codes Body Electrical > Starting Control > Trouble Codes Body Electrical > Power Source Control > Trouble CodesResult:
Result | Proceed to |
|---|---|
No DTCs are output |
A |
DTCs for the smart key system (for start function) are output. |
B |
| B | |
GO TO DIAGNOSTIC TROUBLE CODE CHART |
|
CHECK ENGINE SWITCH POSITION
(a) Get into the vehicle while carrying the electronic key transmitter subassembly.
(b) Place the shift lever in the P position.
(c) With the brake pedal released, check whether pushing the engine switch changes the power source mode.
Result:
Result | Proceed to |
|---|---|
The power source mode changes: Off → ON (ACC) → ON (IG) → OFF |
A |
The power source mode does not change to ON (ACC) or ON (IG) |
B |
The power source mode changes to ON (IG) but not to ON (ACC) |
C |
The power source mode changes to ON (ACC) but not to ON (IG) |
D |
| B | |
GO TO STEP "THE POWER SOURCE MODE DOES NOT CHANGE TO ON (IG AND ACC)" |
| C | |
GO TO STEP "THE POWER SOURCE MODE DOES NOT CHANGE TO ON (ACC)" |
| D | |
GO TO STEP "THE POWER SOURCE MODE DOES NOT CHANGE TO ON (IG)" |
|
READ VALUE USING TECHSTREAM (STOP LIGHT SWITCH1)
(a) Connect the Techstream to the DLC3.
(b) Turn the engine switch to ON (IG).
(c) Turn on the Techstream.
(d) Select the following menu items: Body Electrical / Power Source Control / Data List.
(e) Depending on the Techstream display, record the Data List.
Body Electrical > Power Source Control > Data ListTester display | Item | Range | Normal Condition | Diagnostic Note |
|---|---|---|---|---|
Stop Light Switch1 |
Brake Pedal Status |
OFF or ON |
OFF: Brake pedal released ON: Brake pedal depressed |
|
Stop Light Switch1
OK:
The Data List item changes when the brake pedal is depressed and then released.
| NG | |
GO TO STEP 28 |
|
READ VALUE USING TECHSTREAM (NEUTRAL / CLUTCH SWITCH, P OR N RANGE)
(a) Connect the Techstream to the DLC3.
(b) Turn the engine switch to ON (IG).
(c) Turn on the Techstream.
(d) Select the following menu items: Body Electrical / Power Source Control or Starting Control / Data List.
(e) Depending on the Techstream display, record the Data List.
Body Electrical > Power Source Control > Data ListTester display | Item | Range | Normal Condition | Diagnostic Note |
|---|---|---|---|---|
Neutral SW/ Clutch SW |
Shift position engaged (P and N) |
OFF or ON |
OFF: Shift lever in a position other than P or N ON: Shift lever in P or N position |
|
Neutral SW/ Clutch SW
Body Electrical > Starting Control > Data ListTester display | Item | Range | Normal Condition | Diagnostic Note |
|---|---|---|---|---|
Shift Position P or N |
Park/Neutral Position Switch Status |
OFF or ON |
OFF: Shift lever in a position other than P or N ON: Shift lever in P or N position |
When OFF is displayed, the engine is not being cranked. |
Shift Position P or N
OK:
The Data List item changes depending on the shift lever position.
| NG | |
GO TO STEP 26 |
|
READ VALUE USING TECHSTREAM (STARTER REQUEST SIGNAL)
(a) Connect the Techstream to the DLC3.
(b) Turn the engine switch to ON (IG).
(c) Turn on the Techstream.
(d) Select the following menu items: Body Electrical / Power Source Control / Data List.
(e) Depending on the Techstream display, record the Data List.
Body Electrical > Power Source Control > Data ListTester display | Item | Range | Normal Condition | Diagnostic Note |
|---|---|---|---|---|
Starter Request Signal |
Status of the engine start request signal |
OFF or ON |
OFF: Engine switch not pressed ON: With the shift lever in P and the brake pedal depressed, the engine switch is pressed and held down |
|
Starter Request Signal
NOTICE:
Make sure the key reminder warning light illuminates in green on the combination meter assembly, then push the engine switch.
OK:
The display changes in response to operating the engine switch.
| NG | |
GO TO STEP 24 |
|
READ VALUE USING TECHSTREAM (STARTER SW)
(a) Connect the Techstream to the DLC3.
(b) Turn the engine switch to ON (IG).
(c) Turn on the Techstream.
(d) Select the following menu items: Body Electrical / Starting Control / Data List.
(e) Get into the vehicle while carrying the electronic key transmitter subassembly, move the shift lever to the P position, push the engine switch while depressing the brake pedal, and make sure the Data List item changes.
Body Electrical > Starting Control > Data ListTester display | Item | Range | Normal Condition | Diagnostic Note |
|---|---|---|---|---|
Starter SW |
Starter Operation Request |
OFF or ON |
OFF: Starter activation not requested ON: Starter activation requested |
When OFF is displayed, the engine is not being cranked. |
Starter SW
OK:
The Data List item changes.
| NG | |
REPLACE CERTIFICATION ECU (SMART KEY ECU ASSY) |
|
READ VALUE USING TECHSTREAM (STARTER RELAY)
(a) Connect the Techstream to the DLC3.
(b) Turn the engine switch to ON (IG).
(c) Turn on the Techstream.
(d) Select the following menu items: Body Electrical / Starting Control / Data List.
(e) Depending on the Techstream display, record the Data List.
Body Electrical > Starting Control > Data ListTester display | Item | Range | Normal Condition | Diagnostic Note |
|---|---|---|---|---|
Starter Relay |
Starter Relay Voltage Check |
OFF or ON |
OFF: ST relay in OFF position ON: ST relay in ON position |
When OFF is displayed, the engine cannot be cranked. |
Starter Relay
| NG | |
GO TO STEP 15 |
|
CHECK CONNECTOR CONNECTION CONDITION
(a) Disconnect the M66 connector from the certification ECU (smart key ECU assembly).
(b) Connect the M66 connector of the certification ECU (smart key ECU assembly).
(c) Push the engine switch and check whether the engine starts.
OK:
The engine starts.
| OK | |
CONNECT PROPERLY |
| NG | |
REPLACE CERTIFICATION ECU (SMART KEY ECU ASSY) |
CHECK TRANSMITTER BATTERY
(a) Check the transmitter battery.
Click here
NOTICE:
Do not wrap the ground cable around a terminal, wedge it between terminals, or solder it. The terminal may be deformed or damaged, and the transmitter battery will not be installed correctly.
| OK | |
CHECK ELECTRONIC KEY TRANSMITTER ASSEMBLY |
| NG | |
REPLACE TRANSMITTER BATTERY |
CHECK ST RELAY
(a) Remove the ST relay.
(b) Inspect the ST relay.
Click here
| NG | |
REPLACE ST RELAY |
|
CHECK HARNESS AND CONNECTOR (CERTIFICATION ECU (SMART KEY ECU ASSEMBLY) - BODY GROUND)
(a) Disconnect the M66 connector from the certification ECU (smart key ECU assembly). |
|
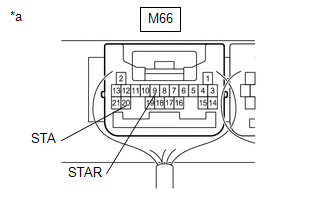
(b) Disconnect the A38 ECM connector.
(c) Place the shift lever in the P or N position.
(d) Measure the resistance according to the value(s) in the table below.
Standard resistance:
Tester Connection | Condition | Specified Condition |
|---|---|---|
M66-20 (STA) - Body ground |
20 °C |
101,69 à 153,84 Ω |
M66-9 (STAR) - Body ground |
| NG | |
GO TO STEP 19 |
|
CHECK STARTER ASSEMBLY
(a) Remove the starter assembly.
Click here
(b) Inspect the starter assembly.
Click here
| NG | |
REPLACE STARTER ASSEMBLY |
|
CHECK HARNESS AND CONNECTOR (BATTERY - STARTER AND ST RELAY)
(a) Remove the starter assembly from the vehicle to perform the inspection.
Click here
(b) Remove the ST relay.
(c) Measure the voltage according to the value(s) shown in the table below.
Standard voltage:
Tester Connection | Condition | Specified Condition |
|---|---|---|
C67-1 - Body ground |
Always |
11 à 14 V |
ST relay terminal 5 - Body ground |
Always |
11 à 14 V |
(d) Measure the resistance according to the value(s) in the table below.
Standard resistance:
Tester Connection | Condition | Specified Condition |
|---|---|---|
Terminal 3 - C35-1 of ST relay |
Always |
Below 1 Ω |
Terminal 3 or C35-1 of ST relay - Body ground |
Always |
10 kΩ minimum |
| OK | |
REPLACE CERTIFICATION ECU (SMART KEY ECU ASSY) |
| NG | |
REPAIR OR REPLACE HARNESS OR CONNECTOR |
CHECK HARNESS AND CONNECTOR (CERTIFICATION ECU (SMART KEY ECU ASSEMBLY) - PARK/NEUTRAL POSITION SWITCH)
(a) Disconnect the M66 connector from the certification ECU (smart key ECU assembly).
(b) Disconnect the C36 connector from the park/neutral position switch.
(c) Disconnect the A38 ECM connector.
(d) Measure the resistance according to the value(s) in the table below.
Standard resistance:
Tester Connection | Condition | Specified Condition |
|---|---|---|
M66-9 (STAR) - C36-4 (B) |
Always |
Below 1 Ω |
M66-9 (STAR) or C36-4 (B) |
Always |
10 kΩ minimum |
| NG | |
REPAIR OR REPLACE HARNESS OR CONNECTOR |
|
CHECK HARNESS AND CONNECTOR (PARK/NEUTRAL POSITION SWITCH - ST RELAY)
(a) Disconnect the C36 connector from the park/neutral position switch.
(b) Remove the ST relay.
(c) Disconnect the M66 connector from the certification ECU (smart key ECU assembly).
(d) Disconnect the A38 ECM connector.
(e) Measure the resistance according to the value(s) in the table below.
Standard resistance:
Tester Connection | Condition | Specified Condition |
|---|---|---|
C36-9 (L) - ST relay terminal 2 |
Always |
Below 1 Ω |
C36-9 (L) or ST relay terminal 2 - Body ground |
Always |
10 kΩ minimum |
| NG | |
REPAIR OR REPLACE HARNESS OR CONNECTOR |
|
CHECK HARNESS AND CONNECTOR (CERTIFICATION ECU (SMART KEY ECU ASSEMBLY) - ST RELAY)
(a) Disconnect the M66 connector from the certification ECU (smart key ECU assembly).
(b) Disconnect the A38 ECM connector.
(c) Disconnect the C36 connector from the park/neutral position switch.
(d) Remove the ST relay.
(e) Measure the resistance according to the value(s) in the table below.
Standard resistance:
Tester Connection | Condition | Specified Condition |
|---|---|---|
M66-20 (STA) - ST relay terminal 2 |
Always |
Below 1 Ω |
M66-20 (STA) or ST relay terminal 2 - Body ground |
Always |
10 kΩ minimum |
| NG | |
REPAIR OR REPLACE HARNESS OR CONNECTOR |
|
CHECK HARNESS AND CONNECTOR (ST RELAY - BODY GROUND)
(a) Remove the ST relay.
(b) Measure the resistance according to the value(s) in the table below.
Standard resistance:
Tester Connection | Condition | Specified Condition |
|---|---|---|
ST relay terminal 1 - Body ground |
Always |
Below 1 Ω |
| NG | |
REPAIR OR REPLACE HARNESS OR CONNECTOR |
|
CHECK CONNECTOR CONNECTION CONDITION
(a) Disconnect the M66 connector from the certification ECU (smart key ECU assembly).
(b) Connect the M66 connector of the certification ECU (smart key ECU assembly).
(c) Push the engine switch and check whether the engine starts.
OK:
The engine starts.
| OK | |
CONNECT PROPERLY |
| NG | |
REPLACE CERTIFICATION ECU (SMART KEY ECU ASSY) |
CHECK THE STEERING LOCK SYSTEM
(a) Check that the steering unlocks when the engine switch is set to ON (ACC).
OK:
The steering unlocks.
| NG | |
GO TO STEERING LOCK SYSTEM (SYMPTOM TROUBLESHOOTING TABLE) |
|
CHECK SECURITY INDICATOR (IMMOBILIZER SYSTEM NOT ACTIVATED)
(a) Get into the vehicle while carrying the electronic key transmitter subassembly.
(b) Place the shift lever in the P position.
(c) Push the engine switch with the brake pedal released and make sure the flashing security indicator turns OFF when the power source mode changes to ON (ACC).
HINT:
If the flashing security indicator turns OFF when the power source mode changes to ON (ACC), the engine immobiliser function is operating normally.
OK:
The flashing security indicator turns OFF when the power source mode changes to ON (ACC).
| OK | |
REPLACE CERTIFICATION ECU (SMART KEY ECU ASSY) |
| NG | |
GO TO IMMOBILISER SYSTEM (SYMPTOM TROUBLESHOOTING TABLE) |
INSPECT PARK / NEUTRAL POSITION SWITCH
(a) Remove the park / neutral position switch.
Click here
(b) Inspect the park / neutral position switch.
Click here
| NG | |
REPLACE PARK/NEUTRAL POSITION SWITCH |
|
CHECK HARNESS AND CONNECTOR (CERTIFICATION ECU (SMART KEY ECU ASSEMBLY) - PARK/NEUTRAL POSITION SWITCH)
(a) Disconnect the M66 connector from the certification ECU (smart key ECU assembly).
(b) Disconnect the C36 connector from the park/neutral position switch.
(c) Disconnect the A38 ECM connector.
(d) Measure the resistance according to the value(s) in the table below.
Standard resistance:
Tester Connection | Condition | Specified Condition |
|---|---|---|
M66-9 (STAR) - C36-4 (B) |
Always |
Below 1 Ω |
M66-9 (STAR) or C36-4 (B) |
Always |
10 kΩ minimum |
| OK | |
REPLACE CERTIFICATION ECU (SMART KEY ECU ASSY) |
| NG | |
REPAIR OR REPLACE HARNESS OR CONNECTOR |
CHECK STOP LIGHT SWITCH ASSEMBLY
(a) Remove the stop light switch assembly.
Click here
(b) Inspect the stop light switch assembly.
Click here
| NG | |
REPLACE STOP LIGHT SWITCH ASSEMBLY |
|
INSPECT WIRE HARNESS AND CONNECTOR (STOP LIGHT SWITCH ASSEMBLY - POWER SOURCE AND BODY GROUND)
(a) Disconnect the stop light switch assembly connector. |
|
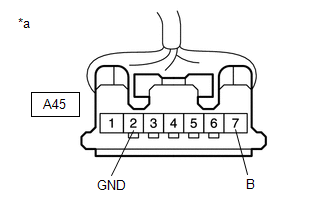
(b) Measure the voltage according to the value(s) in the table below.
Standard voltage:
Tester Connection | Condition | Specified Condition |
|---|---|---|
A45-7 (B) - Body ground |
Always |
11 à 14 V |
(c) Measure the resistance according to the value(s) in the table below.
Standard resistance:
Tester Connection | Condition | Specified Condition |
|---|---|---|
A45-2 (GND) - Body ground |
Always |
Below 1 Ω |
| NG | |
REPAIR OR REPLACE HARNESS OR CONNECTOR |
|
CHECK HARNESS AND CONNECTOR (CERTIFICATION ECU (SMART KEY ECU ASSEMBLY) - STOP LIGHT SWITCH ASSEMBLY)
(a) Disconnect connector M67 from the certification ECU (smart key ECU assembly).
(b) Disconnect the A38 ECM connector.
(c) Disconnect the A42 skid control ECU connector (brake actuator assembly).
(d) Disconnect the F19 connector from the shift lock control unit assembly.
(e) Measure the resistance according to the value(s) in the table below.
Standard resistance:
Tester Connection | Condition | Specified Condition |
|---|---|---|
M67-25 (STP1) - A45-3 (L) |
Always |
Below 1 Ω |
M67-25 (STP1) or A45-3 (L) - Body Ground |
Always |
10 kΩ minimum |
| OK | |
REPLACE CERTIFICATION ECU (SMART KEY ECU ASSY) |
| NG | |
REPAIR OR REPLACE HARNESS OR CONNECTOR |