Removal and Installation of Front Fender
* Observe the safety precautions when performing body work, see the corresponding subsection.
REMOVAL
1. Using a wide plastic trim tool, pry the retaining clip on the fender.
2. Remove the front side marker lamps, refer to Bulb Replacement.
3. Remove the headlamp cover. To do this, disconnect the cover from the inside, press down out of both retainers and remove from the hook.
4. Remove the flange protection upward.
5. Mark the position of the front wheel relative to the hub. This will allow the balanced wheel to be installed in its original position. Loosen the wheel mounting bolts with the vehicle standing on its wheels. Raise the vehicle and support it on stands.
6. Remove the mounting bolts and remove the front wheel arch cover (1) sideways.
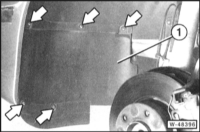
7. Remove the mounting bolts of the inner fender. Remove the clips after driving out the pins inward with a drift. If the pins have a cap, first remove the pins with a screwdriver, then remove the clip. Remove the inner fender.
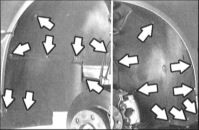
8. Unbolt the fender from the A-pillar.

9. Disconnect the inner fender from the vehicle body.
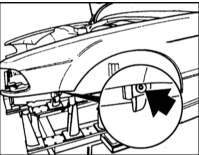
10. Open the door and through the gap remove the bolt securing the body pillar.
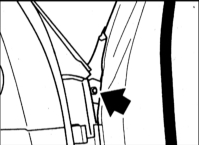
11. Remove the upper rear bolt (arrow in the accompanying illustration).
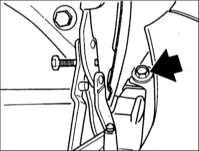
12. Remove the upper mounting bolts (arrows in the accompanying illustration) of the fender.

13. Mark the position of the hood hinge with a felt-tip pen.
14. Secure the hood so that, after unscrewing the fender mounting bolts, adjacent body parts and the windshield are not damaged.
15. Loosen bolt (1), remove bolt (2).
* Make sure not to lose the washers under the mounting bolt.
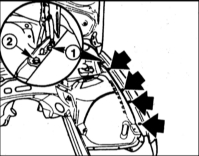
16. The fender is firmly attached due to the anti-corrosion coating on the underbody. Therefore, a heat gun producing a temperature of at least +400°C is required for its removal.
17. Soften the upper and lower areas of the underbody with a heat gun fitted with a flat nozzle. Then remove the protective coating from below in the front area where the fender fits. It is especially important to do this in this area, since otherwise the fender may be deformed during removal.
18. Remove the fender.
INSTALLATION
1. Clean the mating surfaces of the fender. If necessary, straighten the fender.
2. Apply standard fender sealing tape to the mating surfaces.
3. If necessary, restore the paint finish.
4. Position the fender, align it approximately and tighten the mounting bolts without fully tightening them.
5. Install the hood and secure it with bolts, refer to Hood Removal and Installation.
6. Adjust the fender. Make sure the seal fits tightly in the headlamp area. Make sure the gap relative to the door and hood is even, refer to Body Gaps.
7. Tighten all fender mounting bolts.
8. Apply corrosion protection to the inner side of the fender.
9. Secure the bumper brackets.
10. Secure the inner fender and the wheel arch cover. Install the clips and insert the pins.
11. Secure the front wheel with bolts. Do not lubricate the bolts with oil or grease. Install the wheel so that the marks made during removal align. Lower the vehicle onto its wheels. Tighten the wheel mounting bolts in a crosswise sequence to 100 N·m.
12. Install the upper fender seal.
13. Install the upper edge protection.
14. Secure the headlamp cover from above.
15. Install the side marker lamps, refer to Bulb Replacement.
16. Install the trim panel on the fender.
Test yourself
A quick BMW 1 quiz: every answer comes with an explanation and a link to the manual page.