Parcel Shelf Removal and Installation
* This describes removal of the parcel shelf together with the rear window louvre.
REMOVAL
1. Press the upper parts of both C-pillar trim panels and disengage them from the two clips.
2. Disconnect the interior light plug connector and set the lamp cover aside.
3. Disconnect the seat belt at the bottom.
4. Remove the seatback. On the seatback with the cargo pass-through, fold the seatback forward.
5. From the luggage compartment, unscrew the three nuts securing the rear window louvre. Mark the nut positions beforehand. To do this, outline the washer with a marker.
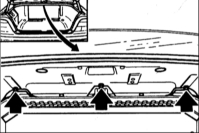
6. Disconnect the electrical connector of the rear window shade drive on the right side inside the cabin.
7. Remove the outer head restraints. To do this, pull them fully upward, press lightly forward and backward, and pull them out upward.
Second variant
REMOVAL
1. Remove the head restraint visor. To do this, lift the visor, pull it back and up at an angle, and pull it out forward.
2. Unlock the head restraint and extend it upward. To do this, use a finger through the hole in the hat rack to press the release lever and slide it forward, overcoming the spring force. The locking lever is located on the inner side of the outer guide rod.
3. Disconnect the receiving part of the center head restraint.
4. Remove the belt visors from the hat rack and disconnect them together with the belts.
5. Disconnect the four hat rack mounting clips by unscrewing the plastic Phillips-head screw.
* If equipped with a cargo pass-through device, disconnect six clips.
6. Pull the hat rack slightly forward. At the same time, ask an assistant to press through the holes on the rear window shade mounting screws in the luggage compartment. From the cabin, pull the shade upward by the side holes while pulling the cover forward. This raises the shade mounting fingers above the speaker resonator.
* Otherwise, the fingers may catch and the hat rack cannot be pulled forward.
INSTALLATION
1. Insert the hat rack and slide it back. The four hat rack supports must engage the body guides.
2. Secure the luggage compartment shelf with three nuts and washers in accordance with the markings (6 N·m).
3. Install four or six clips, as applicable. Tighten the plastic screws.
4. Insert the belts with visors into the hat rack. Secure the visors.
5. Install the receiving part of the center head restraint on the seat back.
6. Install the head restraint visor, if removed.
7. Install the outer head restraints and lock them.
8. Connect the electrical connector of the rear seat shade, or fold it back.
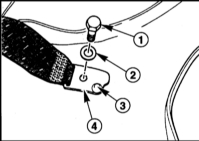
9. Secure the belts (4) at the bottom with bolt (1) and washer (2), and tighten to a torque of 50 N·m. Refer to the supporting illustration.
* During installation, tab (3) must be positioned on top.
10. Connect the electrical connector of the cabin lamp and secure the C-pillar trim.
Test yourself
A quick BMW 1 quiz: every answer comes with an explanation and a link to the manual page.