Removal, Installation and Adjustment of Door
Installation and removal of front and rear doors are performed in the same way.
REMOVAL
1. Remove the bolt (1) from each hinge using a 10 mm socket. See the accompanying illustration.
2. Pry the stopper (2) off the pin (3) from the side with a screwdriver.
3. Drive the door check pin (3) upward using a drift.
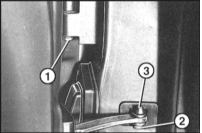
4. Remove the door from the hinges and place it on a stand. The stand height must be such that the electrical wires are not stretched.
* Do not damage the paint of the door and front panel. To protect the surfaces, they can be covered with tape.
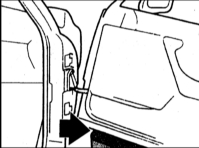
5. Disconnect the connector holder (arrows in the accompanying illustration). Disconnect the plug connector.
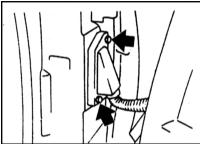
6. Lift the lock tab. This disengages the plug connector.
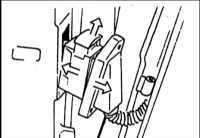
INSTALLATION
1. Mate the plug connector and lock it. Insert the connector into the door pillar. Secure the holder.
2. Place the door onto the upper and lower hinges. An assistant is required. The door is guided by the pin (3). Shims (5) can be used to adjust the door height. When reinstalling the old door, adjustment is generally not required.
3. Screw a bolt (1) into each hinge.
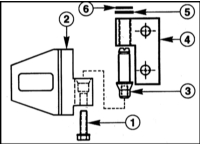
1 — bolt
2 — body hinge, upper
3 — hinge pin
4 — door hinge, upper
5 — washer
6 — lock washer
4. Using a hammer, insert the door check pin and secure it.
5. Close the door and check that the gap between the door and the body is even. If the gap is uneven, loosen the hinge mounting bolts and adjust the door height using the upper bolts.
* When installing a new door, spacer washers are fitted under the hinge to allow the door to be shifted outward and inward.
* The door must be aligned (fitted) only together with attached components such as the window regulator, glass, etc., since the door offset depends on weight. When fitting, remove the door seals. If both the front and rear doors have been removed, align the rear door first, then the front door.
6. Loosen bolt -1- of the striker pin on pillar B using a TORX wrench, and loosen bolt -2- just enough so that the striker wedge can be moved. Do not change the depth position of striker wedge -3-.

7. Lift and hold the door handle. Close the door; this adjusts the height and angle of the striker wedge.
* A feeler gauge is used in the workshop to guide the striker wedge.
8. Carefully open the door and tighten the bolts to 30 N·m.
* The front edge of the door may be offset inward and the rear edge outward by no more than 1 mm. A worn striker must be replaced.
Test yourself
A quick BMW 1 quiz: every answer comes with an explanation and a link to the manual page.