Trunk Lid Removal and Installation
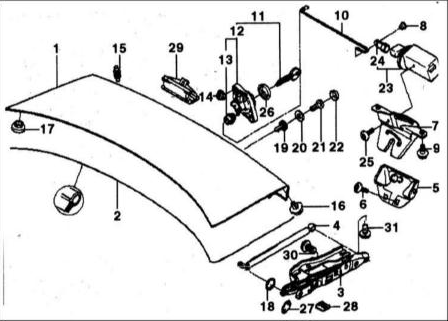
Trunk Lid
1 — trunk lid
2 — seal
3 — hinge
4 — gas-filled strut
5 — locking element
6 — Torx screw with washer
7 — lock
8 — bushing
9 — Torx screw with washer
10 — connecting rod
11 — lock with key
12 — lock with code
13 — stopper
14 — lock nut
15 — stop with ejector
16 — stop
17 — rubber plug
18 — lock washer
19 — nut
20 — washer
21 — self-tapping screw
22 — cap
23 — adjusting drive
24 — connecting element
25 — Torx screw for plastic
26 — seal
27 — stop
28 — stop
29 — push handle
30 — Torx screw with washer
31 — Torx screw with washer
REMOVAL
1. Detach the trim.
2. Pull the cable harness out of the trunk lid. To do this, disconnect the plug connector of the license plate lamp and the central lock. Attach a cord to the connectors.
* Leave the cord in the trunk lid to make it easier to install the harness.
3. Mark the position of the trunk lid at the hinges with a felt-tip pen (arrow in the accompanying illustration).
4. Place a secure support under the trunk lid or have an assistant hold it.
5. Loosen screws (1) on the left and right. Remove screws (2).
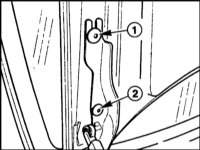
6. Remove the trunk lid with the help of an assistant.
INSTALLATION
1. Position the trunk lid with the help of an assistant. Install screws (1) without tightening them.
2. Align the lid according to the marks and secure it with the screws.
3. If a new lid is installed, adjust its position.
4. Pull the cord with the electrical wires of the license plate lamp and central lock into the lid and connect the plug connector.
5. Install the trim and replace any damaged clips.
Test yourself
A quick BMW 1 quiz: every answer comes with an explanation and a link to the manual page.