Draining and filling coolant
Warning: if the coolant is drained as part of a repair, collect it for reuse, as the coolant contains antifreeze and corrosion inhibitor. However, if the coolant pump, radiator or cylinder head is replaced, always renew the coolant. Only use the Fiat-approved coolant additive "Paraflu". Warning: when working on the cooling system, be sure to keep coolant away from the timing belt.
The glycol content of the coolant can damage the fabric of the timing belt so that the belt tears after some operating time, which can cause serious engine damage.Note: coolant is slightly toxic. Local and municipal authorities can advise on how to dispose of old coolant.
Cooling system capacity: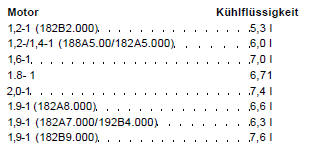
Draining
1.4/1.6 L engines: open cap - a - on the expansion tank, see the following illustration. The other engines have a separate expansion tank on the side of the wheel arch. Unscrew the cap.
Place a clean collection container under the radiator.
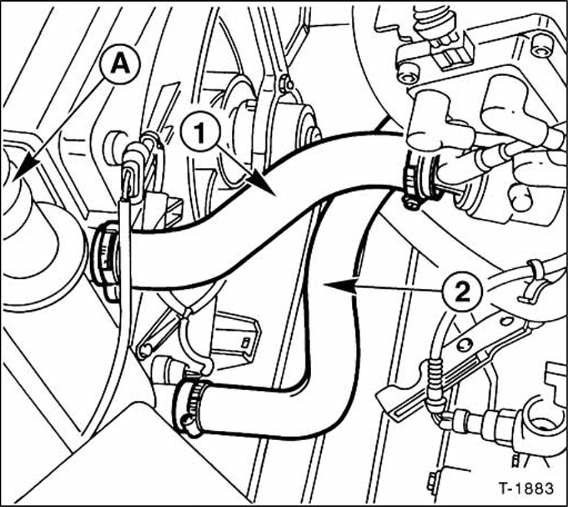
1.4/1.6 L engines: fully loosen the clamp for the lower coolant hose - 2 - at the radiator and slide it back.
Pull off the coolant hose and let the coolant drain. The upper hose - 1 - from the thermostat does not need to be disconnected.
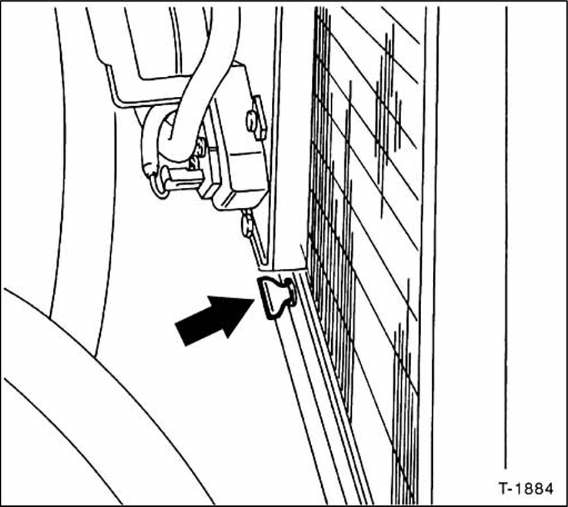
1.8/2.0 L petrol engines and diesel engine: unscrew the drain plug -arrow- at the lower left of the radiator. Let the coolant drain.
Warning: as the radiator and heat exchanger are made of aluminium, only Fiat "Paraflu" antifreeze may be used.
Mix the coolant from 50% low-lime water and 50% Fiat "Paraflu" antifreeze, see page 74.
Slide the lower coolant hose back onto the radiator and secure it with the screw clamp. On 1.8/2.0 L petrol engines and the diesel engine, close the drain plug.
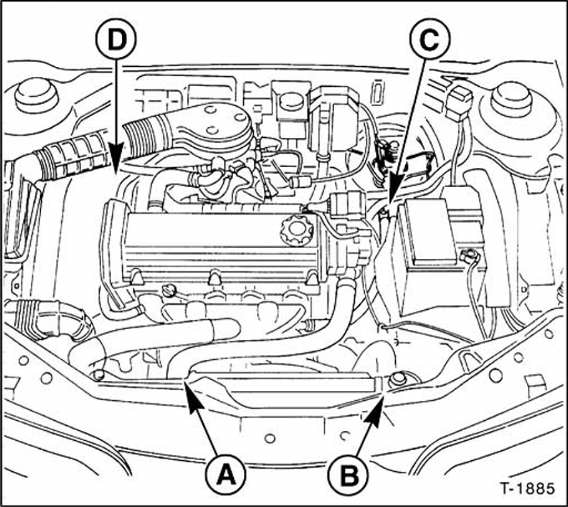
Open bleed screws - a -, -b-, -c-, - d - with a screwdriver, do not unscrew them completely.
The screw at position - d - is only fitted to vehicles with air conditioning. For a detailed view of the bleed screws, see the following illustrations.
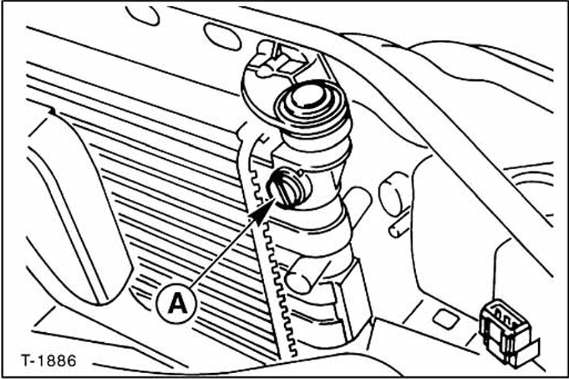
Upper right on the radiator (vehicles without air conditioning)

A and b - upper left and right on the radiator (vehicles with air conditioning)
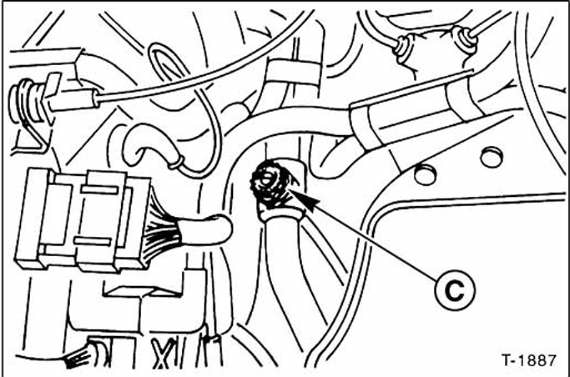
C - near the ignition coil, line to the heater

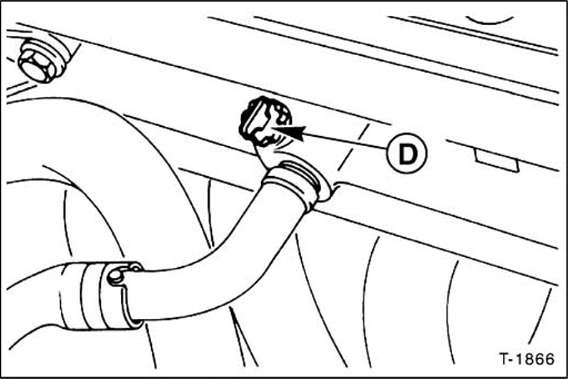
D - below the intake manifold, outlet of the intake manifold heater
Fill the cooling system via the expansion tank until coolant escapes at the radiator cap screws - a - and - b - (where fitted).
Tighten these sealing screws.
Continue filling the cooling system until coolant escapes at screw - c -. Tighten the sealing screw.
Continue filling the cooling system until coolant escapes at screw - d -. This ensures there is no air left in the cooling system. Tighten the sealing screw.

Open bleed screw - a - at the upper right of the radiator by hand.
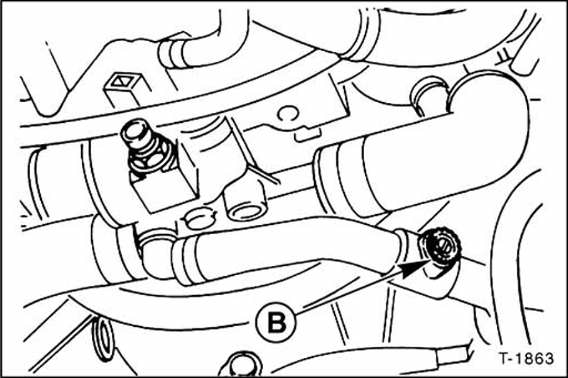
Open bleed screw - b - near the thermostat (line to the heater) with a screwdriver, do not unscrew it completely.
Fill the cooling system via the expansion tank until coolant escapes at screw - a -. Tighten the sealing screw.
Continue filling the cooling system until coolant escapes at screw - b -. This ensures there is no air left in the cooling system. Tighten the sealing screw.

Open bleed screws - a - and - b - (where fitted) at the top of the radiator by hand. The screw at position - b - is only fitted to vehicles with air conditioning.
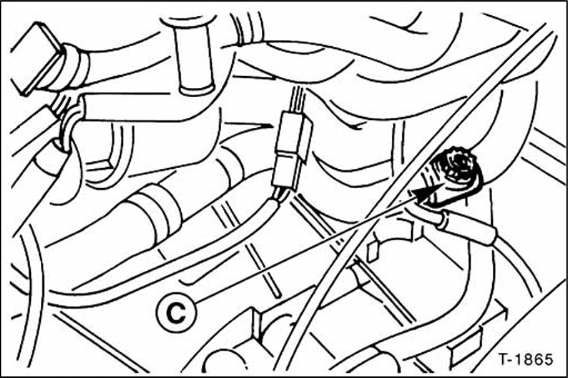
Open bleed screw - c - near the thermostat (line to the heater) with a screwdriver, do not unscrew it completely.
2.0 L engine: open bleed screw - d - by hand.
This screw is located on the front of the cylinder head, above the exhaust manifold.
Fill the cooling system via the expansion tank until coolant escapes at screws - a - and - b - (where fitted). Tighten the sealing screws.
Continue filling the cooling system until coolant escapes at screw - c -. Tighten the sealing screw.
2.0 L engine: continue filling the cooling system until coolant escapes at screw - d -. Tighten the sealing screw.
Continue adding coolant to the expansion tank until it is above the MAX mark.
Start the engine and let it idle for approx. 2 to 3 minutes.
Briefly open the throttle to above 4000 rpm approx. every 30 seconds to circulate the coolant. Continue until the radiator fan starts. Switch off the engine after a further 5 minutes.
Check the coolant level in the coolant expansion tank. The level must be between the MIN and MAX marks. If necessary, top up with coolant.
Caution: Before adding cold coolant, let the engine cool down for approx. 30 minutes.
Check the cooling system for leaks, especially the hose connections, drain plugs and coolant pump.
Fit the cap to the coolant expansion tank and tighten it.
Add coolant to the coolant expansion tank up to the MIN mark.
Start the engine and let it idle for approx. 2 to 3 minutes. Watch the coolant expansion tank and, if necessary, top up the coolant to the MIN mark.
Approx. every 30 seconds, briefly open the throttle above 4000 rpm to circulate the coolant. Between these steps, watch the coolant expansion tank and, if necessary, top up the coolant to the MIN mark.
Repeat this until the cooling fan starts.
Switch off the engine after a further 5 minutes.
Let the engine cool until the coolant has dropped to approx. +25 °C,
Check the coolant level in the coolant expansion tank. If necessary, top up to the middle between the MIN and MAX marks.
Check the cooling system for leaks, especially the hose connections, drain plugs and coolant pump.
Fit the cap to the coolant expansion tank and tighten it.
Test yourself
A quick Fiat Bravo quiz: every answer comes with an explanation and a link to the manual page.