Removing, installing and checking the coolant thermostat
As the engine warms up, the coolant thermostat opens the main coolant circuit. If the coolant thermostat remains closed due to a fault, the engine will overheat. This can be recognised when the temperature gauge is in the red zone while the radiator remains cold.
A faulty thermostat can, however, also remain open after the coolant has cooled down. This can be recognised by the engine no longer reaching or only slowly reaching its operating temperature, or by reduced heating performance in winter.
Caution: If the engine overheats after a short driving distance, this may also be caused by the radiator being clogged with limescale deposits, or by the drive belt for the coolant pump being torn. RemovalDisconnect the battery negative (-) cable. Warning: this erases electronic memories, such as engine operating values. Observe the notes in the chapter "Remove and install battery".
Drain the coolant and collect it.
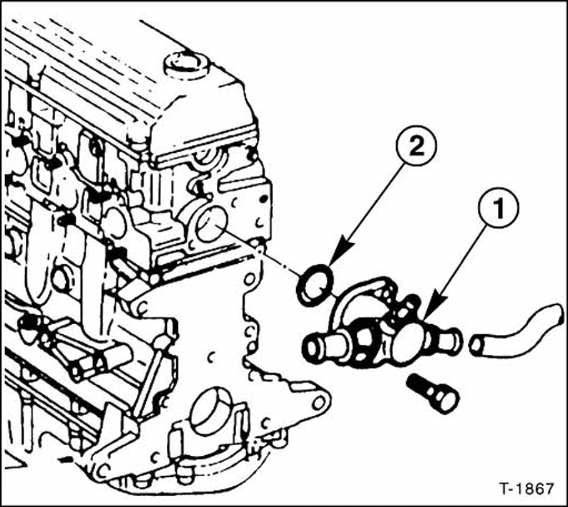
Thermostat housing
O-ring seal

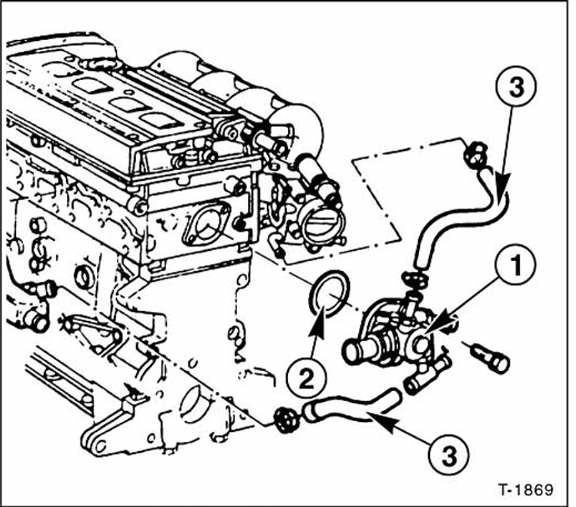
Thermostat housing
O-ring seal
Coolant hoses
Throttle body connection
Temperature sensor
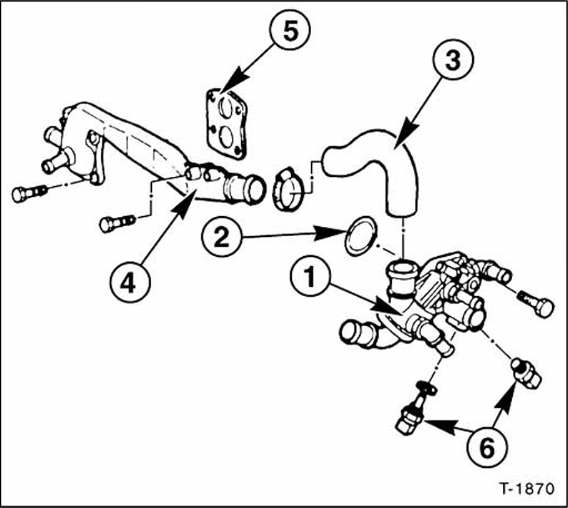
Thermostat housing
O-ring seal
Coolant hoses
Thermostat housing
O-ring seal
Coolant hose
Coolant pipe
Gasket
Temperature sensor
The coolant thermostat is located in the thermostat housing on the cylinder head, where the upper thick coolant hose to the radiator is connected. Further coolant hoses are connected to the thermostat housing.
Mark the coolant hoses and the corresponding connections on the thermostat housing with paint so that the connections are not swapped during installation.
Fully open the hose clamps on the housing and slide them back.
Pull off the coolant hoses and unscrew the thermostat housing from the cylinder head.
Remove the coolant thermostat from the housing and check it. Replace it if necessary.
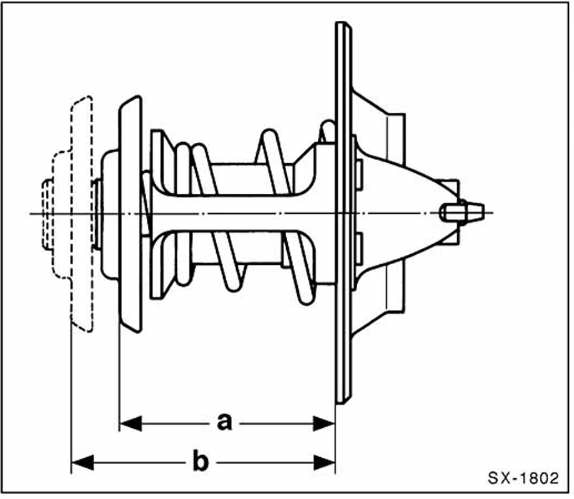
Measure dimension "a" on the thermostat, the distance from the control valve, and note it down. See figure SX-1802.
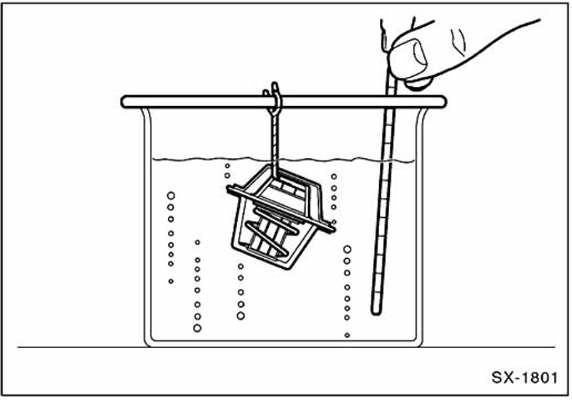
Slowly heat the coolant thermostat in a coolant bath.
The thermostat must not touch the walls of the container. The thermostat must be fully submerged. Check the temperature with a suitable thermometer.
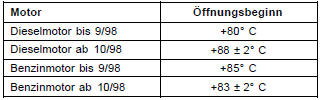
As soon as the opening temperature is reached, the thermostat begins to open the control valve.
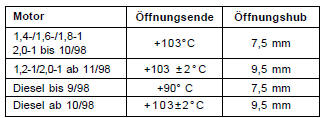
Continue to increase the temperature until the thermostat no longer expands. Measure dimension "b". Check the opening stroke by subtracting dimension "a" from dimension "b" and compare the result with the nominal value for the "opening stroke" in the table.
Then check whether the thermostat closes again as it cools. If not, replace the thermostat.
Insert the coolant thermostat into the thermostat housing.
Carefully clean the sealing surfaces on the cylinder head and thermostat housing. Always replace the O-ring seal.
Place a new gasket between the engine block and the connection piece, and tighten the bolts evenly to 15 N·m.
Push the coolant hoses back onto the connections as marked during removal and secure them with screw clamps.
Refill the coolant. See page 71.
Connect the battery earth cable (-). Set the clock.
Program the radio stations.
Test yourself
A quick Fiat Bravo quiz: every answer comes with an explanation and a link to the manual page.