Reading Diagnostic Trouble Codes
PROCEDURE
1. If a fault recurs on two consecutive trips, the PCM commands the Check Engine lamp on the instrument cluster to illuminate. This lamp is also called the malfunction indicator lamp (MIL). The lamp stays on until the diagnostic memory is cleared of stored trouble codes. Diagnostic trouble codes in OBD-II can be read in two ways. The first method requires connecting terminals No. 8 and 13 of the 16-pin Data Link Connector (DLC) with a jumper wire. The second method uses a special scan tool whose interface connects to the 16-pin OBD-II DLC. The method for reading codes with a jumper wire is described in detail below. If necessary, this procedure can be performed by an automotive service specialist.
2. Without starting the engine, turn the ignition on. The Check Engine lamp must illuminate. If it does not, replace the lamp. After confirming the lamp operates, turn the ignition off.
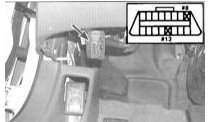
3. Locate the 16-pin Data Link Connector (DLC) on the left side under the instrument panel. Using a jumper wire, connect terminals No. 8 and 13 of the DLC.
Be careful not to damage the terminals.
4. Turn the ignition on by turning the key to the ON position. If trouble codes are stored in the processor memory, they will be displayed in sequence by the Check Engine lamp on the instrument cluster. The first digit of a two-digit code is shown by long flashes of the lamp, and the second digit by short flashes. For example, one long flash followed by six short flashes indicates code 16.
If more than one code is stored in the module memory, the codes will be displayed one after another, then after a pause the code sequence will repeat. If the system memory is clear, the Check Engine lamp will not illuminate.
Test yourself
A quick Honda Accord quiz: every answer comes with an explanation and a link to the manual page.