Electrical Load Detector (ELD) Inspection and Replacement
INSPECTION
PROCEDURE
1. The ELD system detects overloads in the electrical circuits of external lighting and signal devices, fuel injection, charging, etc. The first symptom of such an overload is unstable power supply at engine idle. A failure of the detector causes DTC P1297 or P1298 to be stored in the self-diagnostic system memory.
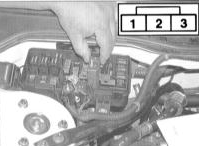
2. Remove the ELD (refer to paragraph 1 below) and disconnect the wiring from it. With the ignition on (do not start the engine), measure the voltage between terminal 1 (+) and ground at the harness-side connector. The specified value is equal to battery voltage. If there is no voltage, check the wiring between fuse No. 6 (15 A) and the detector.
3. With the ignition on (do not start the engine), measure the voltage between terminal 3 (+) and ground at the harness-side connector. The specified value is 4.5 to 5.0 V. If the specified result is not obtained, check the ELD wiring between the engine and the alternator.
4. Make sure there is continuity between terminal No. 2 and ground.
5. If the results of the above checks are negative, replace the ELD unit.
REPLACEMENT
PROCEDURE
1. The ELD unit is located inside the fuse/relay junction block in the engine compartment. Disconnect the negative battery cable.
If the vehicle's audio system is equipped with an anti-theft code, make sure you have the correct code to activate the audio system before disconnecting the battery!
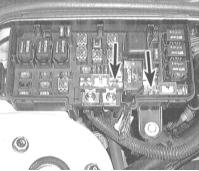
2. Remove the two mounting screws, take the ELD unit out of the center of the junction block, and disconnect the wiring from it.
3. Installation is performed in the reverse order of removal.
Test yourself
A quick Honda Accord quiz: every answer comes with an explanation and a link to the manual page.