Evaporative Emission Control System (EVAP) - Component Inspection
PROCEDURE
A complete inspection of the EVAP system is beyond the scope of an average do-it-yourself mechanic. Fortunately, the EVAP system, like other emission control systems, is covered by extended warranty obligations. EVAP system failures most often involve damaged charcoal canisters or failed vacuum hoses.
1. Always check the condition of the vacuum hoses first. Damage or disconnection of the hoses is the most common cause of system failure (refer to the vacuum hose routing diagram on the VECI label of your vehicle). Replace damaged hoses if necessary.
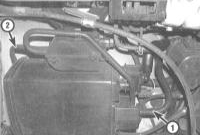
2. Disconnect the vacuum line from the charcoal canister and connect a vacuum gauge to the hose. With the engine cold (below 66°C) and running at idle, there should be no vacuum at this point. If there is vacuum, check the canister purge control solenoid valve. If there is no vacuum, increase engine speed to 3000 rpm and warm the engine to normal operating temperature (the cooling fan should operate). The gauge should now register vacuum. If it does not, check the purge control valve again (see step 7).
3. Disconnect the vacuum hose from the EVAP two-way valve (near the charcoal canister) and connect a hand vacuum pump to it. Make sure the pump is connected directly to the two-way valve. With the ignition on (do not start the engine), apply vacuum and verify that the valve holds it. Replace the valve if it leaks.
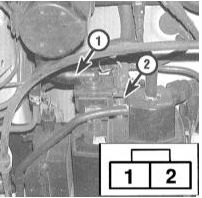
4. With the ignition ON (engine not running), disconnect the canister purge valve (see accompanying illustration) and verify that the two-way valve holds vacuum. If this condition is met, replace the canister purge valve together with the O-ring. Otherwise, check the wiring between the purge valve and the PCM.
5. Disconnect the vacuum hose from the canister purge valve, connect a hand-held vacuum pump, and with the ignition ON (do not start the engine), verify that the valve is free of leaks. If not, replace it.
6. Disconnect the wiring from the canister purge valve and, with the ignition ON (do not start the engine), verify battery voltage between terminal No. 1 of the connector and ground. If there is no voltage, check the wiring between the purge valve and the 15 A fuse No. 6.
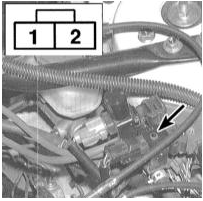
7. Disconnect the 2-pin connector of the canister purge solenoid valve and, with the ignition ON (do not start the engine), verify battery voltage at terminal No. 1 of the connector. If there is no power, check the wiring between the solenoid valve and the 15 A fuse No. 6.
The canister purge solenoid valve is located on the left side of the rear bulkhead of the engine compartment (on V6 models), or on the intake manifold (on 4-cylinder models).
8. Warm up the engine to normal operating temperature (the cooling fan should operate). Verify that vacuum returns from the canister purge solenoid valve to the intake manifold. If there is still no vacuum, disconnect the 2-pin electrical connector and repeat the vacuum check in the line. If there is still no vacuum, check the condition and routing of the vacuum hoses. If vacuum is present, check the wiring between the 2-pin connector and the PCM for a short circuit.
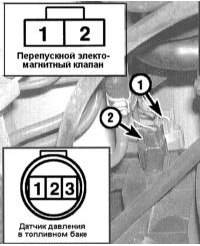
9. Disconnect the 2-pin connector on the EVAP bypass solenoid valve. With the ignition ON (do not start the engine), battery voltage should be present at terminal No. 1. If there is no power, check the wiring between the valve and the 15 A fuse No. 6.
10. Disconnect the 3-pin connector of the fuel tank pressure sensor wiring and, with the ignition ON (do not start the engine), measure the voltage between terminals No. 1 and No. 2 of the connector. Then measure the voltage between terminals No. 2 and No. 3. In both cases the meter should read approximately 5 V. If the test result is normal but the OBD again sets a sensor fault, replace the sensor.
11. Check the canister for signs of leaks. Remove the canister assembly and plug all of its vent lines. Connect a hand-held vacuum pump to the canister purge valve, apply vacuum, and verify there are no leaks. Replace the canister if necessary.
Test yourself
A quick Honda Accord quiz: every answer comes with an explanation and a link to the manual page.