Front trim panel

In this manual: Front trim panel
General information on preservation measures — 1Body cavity sealing — 1Body corrosion protection — 1Body repair instructions — 1Support members — 1Luggage compartment floor — 1Wheel wells — 1Side frame and door pillars — 1Roof outer skin — 1Dash cowl — 1Front trim panel — 1Rear trim panel — 1Side panels — 1Front side doors — 1Rear side doors — 1Front lid — 1Rear lid — 1Other flaps — 1Body special tools — 1General information — 1Handling brake fluids — 1Brake testing and bleeding — 1Front brakes — 1Rear brakes — 1Master brake cylinder — 1Brake lines — 1Brake booster — 1Electrical components/wear indicator — 1Parking brake — 1Mechanical/hydraulic components — 1Electronic components — 1Brakes — 1Front brake — 1Pedal mounting block — 1Brake pedal with linkage — 1Clutch pedal with linkage — 1Accelerator pedal actuation — 1Pedals — 1Specified grease — 1Propeller shaft, general — 1Propeller shaft assembly — 1Center console assembly — 1Front propeller shaft — 1Propeller shaft — 1Propeller shaft complete — 1Front axle repair instructions — 1Front axle suspension — 1Front sub-frame — 1Struts with rubber mounts — 1Wheel bearings and stub axle — 1Spring strut — 1Spring with suspension — 1Stabilizer bar — 1Front axle gearbox — 1Output shaft — 1Front axle — 1General information on high temperature multi-purpose grease — 1Rear axle repair instructions — 1Final drive with cover — 1Final drive mounting — 1Output shafts — 1Rear sub-frame — 1Control arms and struts — 1Axle mounting — 1Wheel bearings — 1Shock absorber — 1With suspension — 1Stabilizer bar — 1Rear axle — 1General information on final drive oil — 1Approved final drive oils for front and rear axle final drives with and without limited slip or viscous coupling — 1Final drive oil for bmw m1 motorsport coupe — 1Operating fluids as of 11/2015 — 1Brake pad replacement reminder — 1Emissions maintenance reminder — 1Maintenance service reminder — 1Tire pressure monitor system reminder — 1Description — 1Troubleshooting — 1Ignition wires, spark plugs — 1Ignition coil — 1Electronic switching or control units — 1Preheating relay — 1Preheater plugs — 1Alternator with drive and mounting — 1Controller — 1Starter with mounting — 1Starter lead — 1Engine wiring loom — 1Oil pressure/oil temperature/oil gauge — 1Switches and relays — 1Engine electrical system — 1Cabin air filter — 1Cabin air filter applications — 1Operating fluids - air conditioning and heating — 1Air conditioner refrigerant — 1Refrigeration oil — 1Note, overview components climate control — 1Heater with operation — 1Auxiliary. heater with control elements — 1Nozzles and outlets — 1Microfilter — 1Air conditioning, leak detection — 1Ac housing/evaporator, switching elements — 1Compressor — 1Condenser and dryer with lines — 1Heating and air conditioning — 1Front axle repair instructions — 1Front axle suspension — 1Front sub-frame — 1Struts with rubber mounts — 1Wheel bearings and stub axle — 1Spring strut — 1Spring with suspension — 1Stabilizer bar — 1Front axle gearbox — 1Front axle — 1General information on high temperature multi-purpose grease — 1Integrated suspension systems repair instructions — 1Front control and suspension elements — 1Rear control and suspension elements — 1Electrical components — 1Electronic damping force adjustment — 1Integrated suspension systems — 1Approved hydraulic fluids — 1Rear axle repair instructions — 1Final drive — 1Final drive with cover — 1Final drive mounting — 1Output shafts — 1Rear sub-frame — 1Control arms and struts — 1Axle mounting — 1Wheel bearings — 1Shock absorber — 1Springs with suspension — 1Stabilizer bar — 1Rear axle — 1General information on final drive oil — 1Approved final drive oils for front and rear axle final drives with and without limited slip or viscous coupling — 1Final drive oil for bmw m1 motorsport coupe — 1Operating fluids as of 11/2015 — 1Electronic chassis alignment — 1Mechanical steering gear — 1Steering gear with servo unit — 1Steering arms, tie rods, steer. damper — 1Steering column — 1Steering wheel — 1Steering wheel for airbag — 1Pump and oil supply — 1Steering and wheel alignment — 1Wheels — 1Disc wheels (rims) — 1Tires — 1Wheels with tires — 1Tire mounting paste — 1Engine mounting — 1Transmission suspension, automatic. transmission — 1Engine and gearbox suspension — 1Transmission in general — 1Transmission case, oil sump — 1Extension housing, bearings, seal — 1Mechanical attachments — 1Hydr/el control components/elements — 1Oil pump — 1Shift valves, parking lock — 1Torque converter — 1Automatic transmission — 1Automatic transmission fluid for zf-transmission GA8HP45Z / GA8HP50Z / GA8HP70Z / GA8HP90Z / GA8P70H / GA8P75H / GA8HP75Z — 1General information on automatic transmission fluids — 1Approved automatic transmission fluids for initial fillings and correcting fluid levels — 1Checking transmission fluid level — 1Transmission fluid change intervals (if applicable) — 1Transfer case, general — 1Transfer box — 1Transmission shafts — 1Transfer box special tools — 1Transfer box in general (atc 45l) — 1Transmission in general — 1Bearing in housing, sealing ring — 1SELF-DIAGNOSTICS DTCS — 1
~3min read

NOTES ON THE REPAIR TECHNIQUE USED IN THE MAIN GROUP 41

Two different repair techniques are used in body repair.

These are welding and bonding/riveting.

If the repair instructions do not specify a repair technique, then welding must always be used.

The bonding/riveting repair technique is always described in detail in the repair instructions.

Quality standards must be met.

  • Removing and installing front panel
  • Replacing front left or right side wall holder

Removing and installing front panel

Necessary preliminary tasks:

  • Remove FRONT BUMPER TRIM .

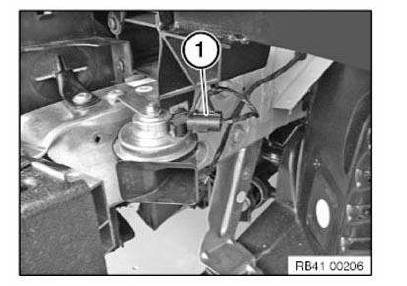
Unlock plug-in connector (1) for horn and disconnect.

Shown on left side, right side identical.
Body+and+Frame

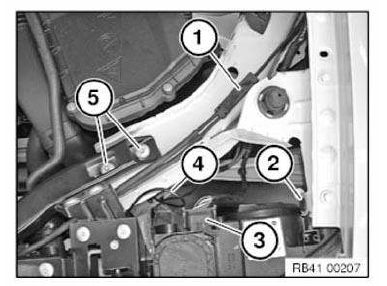
Open clutch (1) and detach Bowden cable for hood/bonnet release.

Release screw (2).

Unlock plug connection (3) for headlight and disconnect.

Unlock plug connection for wiring harness (4) and disconnect.

Release screws (5).
Body+and+Frame

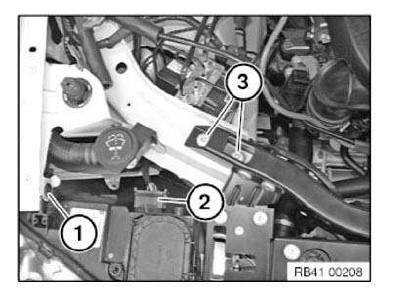
Release screw (1).

Unlock plug connection (2) for headlight and disconnect.

Release screws (3).
Body+and+Frame

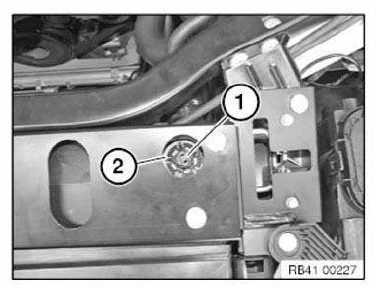
Pull out retainer (2) upwards.

Press the 5 latch mechanisms inward and remove bearing pin (2) upward.

Shown on left side, right side identical.

In case of damage during disassembly, replace bearing pin (plug).
Body+and+Frame

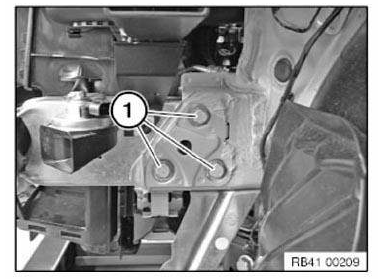
Release screws (1) on engine support on both sides and remove front panel.
Body+and+Frame

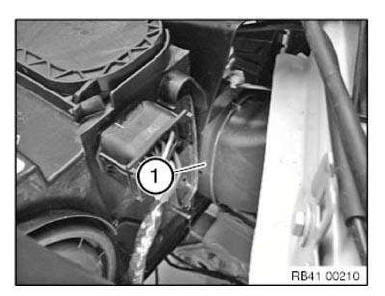
Installation note: When mounting the front panel, ensure that the intake air channel (1) is correctly positioned.
Body+and+Frame

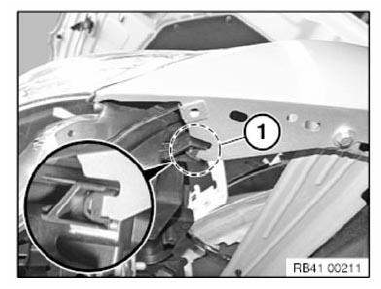
Installation note: In area (1), ensure that the side wall and headlight are correctly positioned.
Body+and+Frame

Replacing front left or right side wall holder

NOTE: Read contents of BODY, GENERAL.

Side wall removed.

Transfer the systematic diagram onto the respective holder version.

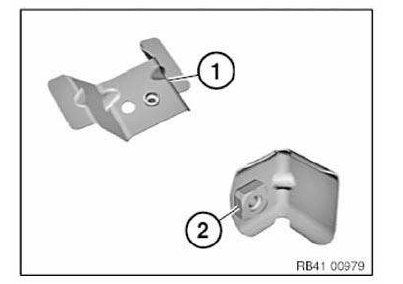
General information: Procedure OBSERVE repair stage 2! Following new body parts are required:

  • (1) Holder, side wall, front (variant 1)
  • (2) Holder, side wall, front (variant 2)

Following CONSUMABLES are required:
Body+and+Frame
Body+and+Frame

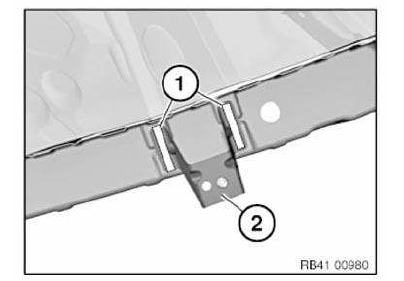
Removal of side wall holder (variant 1): Release welded connections in areas (1) and remove holder (2).
Body+and+Frame

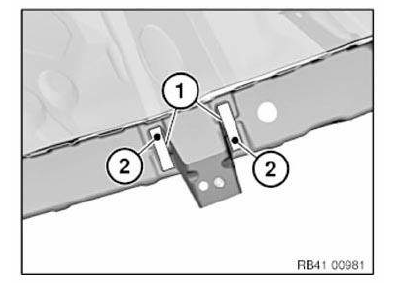
Preparation of new part: Adjust new part in conjunction with side panel in front to fit.

In area of bonding surfaces (1), set 2 4.2 mm dia. bore holes (2) for blind rivetsN3.

Remove new part and deburr holes.
Body+and+Frame

IMPORTANT: Do not grind bonding surfaces down or off.

Installation of side wall holder: Clean all bonding surfaces with cleaning agent R1.

Apply adhesive to bonding surfaces.

Install new part and rivet with blind rivets.

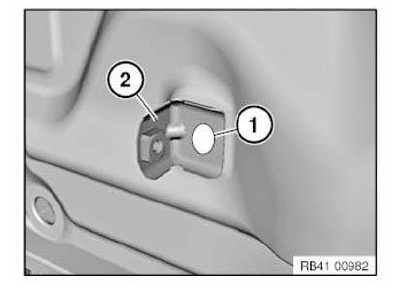
Removal of side wall holder (variant 2): Release welded connection in area (1) and remove holder (2).
Body+and+Frame

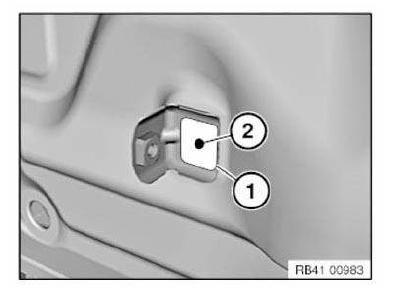
Preparation of new part: Fit in new part.

In area of adhesive surface (1), drill a 4.2 mm dia. bore hole (2) for blind rivet N3.

Remove new part and deburr holes.
Body+and+Frame

IMPORTANT: Do not grind bonding surfaces down or off.

Installation of side wall holder: Clean all bonding surfaces with cleaning agent R1.

Apply adhesive to bonding surface.

Install new part and rivet with blind rivet.

Test yourself

A quick BMW X3 quiz: every answer comes with an explanation and a link to the manual page.
