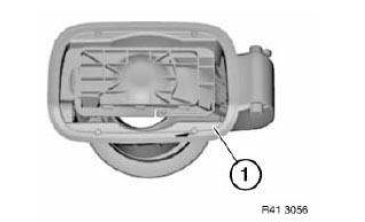
Other flaps

In this manual: Other flaps
General information on preservation measures — 1Body cavity sealing — 1Body corrosion protection — 1Body repair instructions — 1Support members — 1Luggage compartment floor — 1Wheel wells — 1Side frame and door pillars — 1Roof outer skin — 1Dash cowl — 1Front trim panel — 1Rear trim panel — 1Side panels — 1Front side doors — 1Rear side doors — 1Front lid — 1Rear lid — 1Other flaps — 1Body special tools — 1General information — 1Handling brake fluids — 1Brake testing and bleeding — 1Front brakes — 1Rear brakes — 1Master brake cylinder — 1Brake lines — 1Brake booster — 1Electrical components/wear indicator — 1Parking brake — 1Mechanical/hydraulic components — 1Electronic components — 1Brakes — 1Front brake — 1Pedal mounting block — 1Brake pedal with linkage — 1Clutch pedal with linkage — 1Accelerator pedal actuation — 1Pedals — 1Specified grease — 1Propeller shaft, general — 1Propeller shaft assembly — 1Center console assembly — 1Front propeller shaft — 1Propeller shaft — 1Propeller shaft complete — 1Front axle repair instructions — 1Front axle suspension — 1Front sub-frame — 1Struts with rubber mounts — 1Wheel bearings and stub axle — 1Spring strut — 1Spring with suspension — 1Stabilizer bar — 1Front axle gearbox — 1Output shaft — 1Front axle — 1General information on high temperature multi-purpose grease — 1Rear axle repair instructions — 1Final drive with cover — 1Final drive mounting — 1Output shafts — 1Rear sub-frame — 1Control arms and struts — 1Axle mounting — 1Wheel bearings — 1Shock absorber — 1With suspension — 1Stabilizer bar — 1Rear axle — 1General information on final drive oil — 1Approved final drive oils for front and rear axle final drives with and without limited slip or viscous coupling — 1Final drive oil for bmw m1 motorsport coupe — 1Operating fluids as of 11/2015 — 1Brake pad replacement reminder — 1Emissions maintenance reminder — 1Maintenance service reminder — 1Tire pressure monitor system reminder — 1Description — 1Troubleshooting — 1Ignition wires, spark plugs — 1Ignition coil — 1Electronic switching or control units — 1Preheating relay — 1Preheater plugs — 1Alternator with drive and mounting — 1Controller — 1Starter with mounting — 1Starter lead — 1Engine wiring loom — 1Oil pressure/oil temperature/oil gauge — 1Switches and relays — 1Engine electrical system — 1Cabin air filter — 1Cabin air filter applications — 1Operating fluids - air conditioning and heating — 1Air conditioner refrigerant — 1Refrigeration oil — 1Note, overview components climate control — 1Heater with operation — 1Auxiliary. heater with control elements — 1Nozzles and outlets — 1Microfilter — 1Air conditioning, leak detection — 1Ac housing/evaporator, switching elements — 1Compressor — 1Condenser and dryer with lines — 1Heating and air conditioning — 1Front axle repair instructions — 1Front axle suspension — 1Front sub-frame — 1Struts with rubber mounts — 1Wheel bearings and stub axle — 1Spring strut — 1Spring with suspension — 1Stabilizer bar — 1Front axle gearbox — 1Front axle — 1General information on high temperature multi-purpose grease — 1Integrated suspension systems repair instructions — 1Front control and suspension elements — 1Rear control and suspension elements — 1Electrical components — 1Electronic damping force adjustment — 1Integrated suspension systems — 1Approved hydraulic fluids — 1Rear axle repair instructions — 1Final drive — 1Final drive with cover — 1Final drive mounting — 1Output shafts — 1Rear sub-frame — 1Control arms and struts — 1Axle mounting — 1Wheel bearings — 1Shock absorber — 1Springs with suspension — 1Stabilizer bar — 1Rear axle — 1General information on final drive oil — 1Approved final drive oils for front and rear axle final drives with and without limited slip or viscous coupling — 1Final drive oil for bmw m1 motorsport coupe — 1Operating fluids as of 11/2015 — 1Electronic chassis alignment — 1Mechanical steering gear — 1Steering gear with servo unit — 1Steering arms, tie rods, steer. damper — 1Steering column — 1Steering wheel — 1Steering wheel for airbag — 1Pump and oil supply — 1Steering and wheel alignment — 1Wheels — 1Disc wheels (rims) — 1Tires — 1Wheels with tires — 1Tire mounting paste — 1Engine mounting — 1Transmission suspension, automatic. transmission — 1Engine and gearbox suspension — 1Transmission in general — 1Transmission case, oil sump — 1Extension housing, bearings, seal — 1Mechanical attachments — 1Hydr/el control components/elements — 1Oil pump — 1Shift valves, parking lock — 1Torque converter — 1Automatic transmission — 1Automatic transmission fluid for zf-transmission GA8HP45Z / GA8HP50Z / GA8HP70Z / GA8HP90Z / GA8P70H / GA8P75H / GA8HP75Z — 1General information on automatic transmission fluids — 1Approved automatic transmission fluids for initial fillings and correcting fluid levels — 1Checking transmission fluid level — 1Transmission fluid change intervals (if applicable) — 1Transfer case, general — 1Transfer box — 1Transmission shafts — 1Transfer box special tools — 1Transfer box in general (atc 45l) — 1Transmission in general — 1Bearing in housing, sealing ring — 1SELF-DIAGNOSTICS DTCS — 1
4steps
~24min
2/5difficulty
Done 0 of 4
  • Removing and installing flap for fuel filler neck
  • Replace cover bowl

Removing and installing flap for fuel filler neck

Open fuel filler flap.

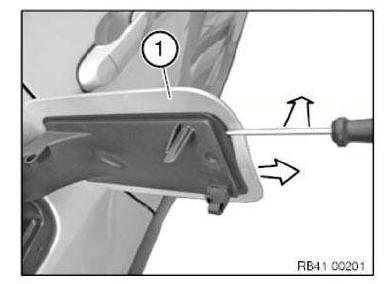
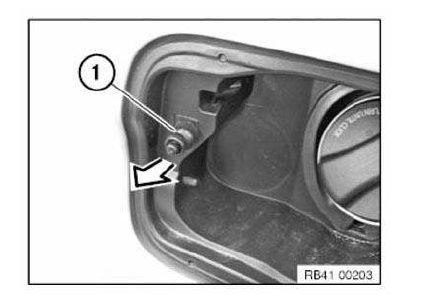
Use a suitable tool to lift the latch mechanism out toward the front in direction of arrow.

Detach fuel filler flap (1) in direction of arrow.
Body+and+Frame

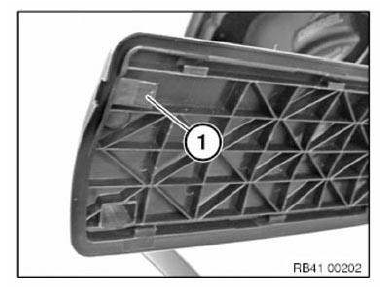
Installation note: The latch mechanism (1) must not be damaged.

If the latch mechanism is damaged, replace the COVER POT.
Body+and+Frame

Replace cover bowl

Special tools required:

  • 00 9 321
  • Remove FLAP FOR FUEL FILLER NECK
  • Close the central locking system with open cap

NOTE: Carry over schematic diagram to the relevant vehicle type.

IMPORTANT: Deformation of the sheet metal flanges in the side panel and the wheel arch results in permanent vehicle leakage. Carry out removal/installation with great care.

Following new body parts are required :

  • (1) Cover bowl
Body+and+Frame

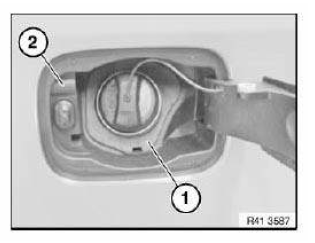
Release rubber collar (1) from cover bowl (2) by pressing inward.

NOTE: Rubber collar (1) remains attached to vehicle.
Body+and+Frame

Remove ejector (1) in direction of arrow.
Body+and+Frame

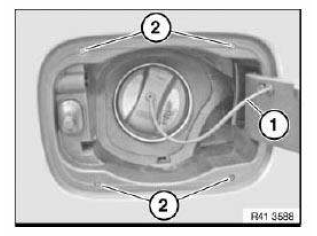
Lift out the retaining strap (1) and remove the lid.

Pierce markings (2) with a small screwdriver.
Body+and+Frame

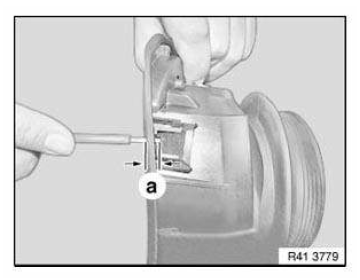
NOTE: For purposes of clarity, picture shows cover bowl removed.

Insert screwdriver to specified measurement a and unlock cover bowl catch.

Dimension a = approx. 10 mm
Body+and+Frame

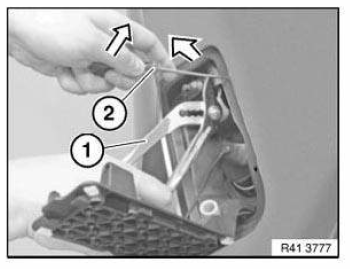
Keep cover bowl tensioned with pliers (1).

Unlock catches individually with screwdriver (2).

Unlock catches in following order:

  1. Top left
  2. Bottom left
  3. Top right
  4. Bottom right

Move screwdriver in opposite direction at both lower catches.
Body+and+Frame

Slightly pull the locking pin (1) forward in the direction of the arrow, if applicable.
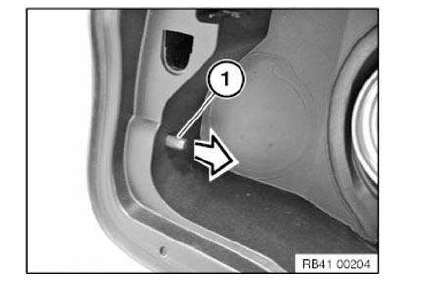
Body+and+Frame

Close hinge arm (1).

IMPORTANT: Do not damage sheet metal flange of side wall.

Carefully twist out cover bowl (2) at first at rear in direction of arrow from side panel and remove.
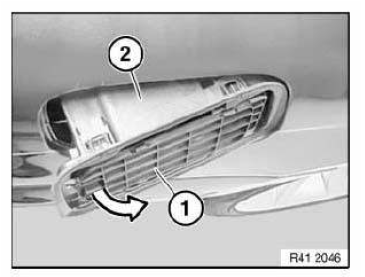
Body+and+Frame

Unlock and disconnect plug connection (1) for actuator drive.
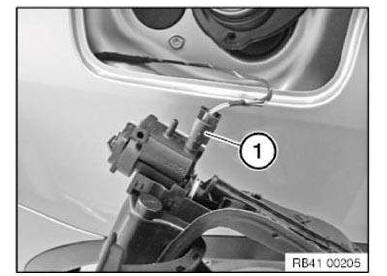
Body+and+Frame

Use a suitable tool to unlock the tabs (1) on the front and back.

Remove actuator drive (3) from cover pot (2).
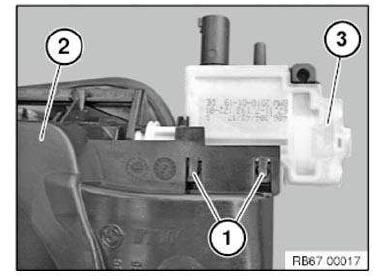
Body+and+Frame

Release the actuator drive (2) by simultaneously turning and pressing the locking pin (1).

Installation note: Make sure the setting for the actuator drive (2) for the fuel filler flap is correct. It must be possible to lock or unlock the fuel filler flap completely.
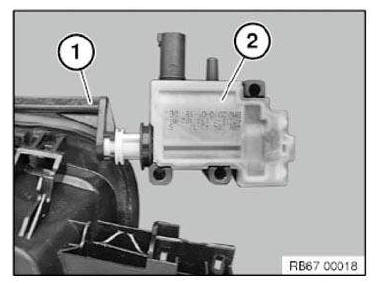
Body+and+Frame

Installing the cover bowl: Remove rubber collar (1) from new part.

Install and check the function of the actuator drive at the new part.

NOTE: When replacing rubber collar: Remove WHEEL ARCH COVER .
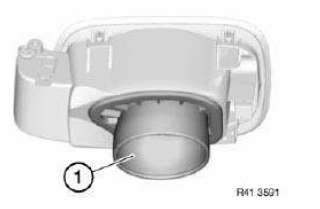
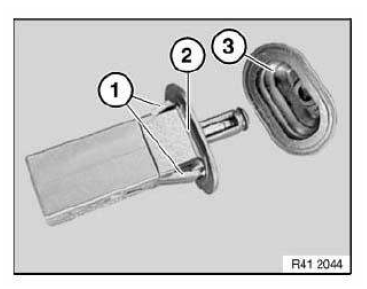
Body+and+Frame

Graphic similar.

Check protective cap (3) for correct seating.

Catches (1) on ejector (2) must not be damaged. (Watertightness!)
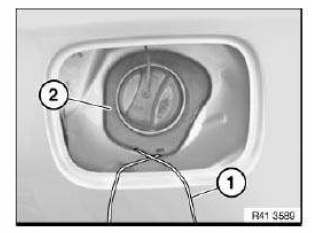
Body+and+Frame

Fit approx. 0.5 m long cable (1) in groove on rubber collar (2).
Body+and+Frame

Install cover bowl (1).

Thread ends of cable (2) outwards.

Cover bowl must snap into place 4 times.

Align bottom rubber cup (3) with recess (arrow).

Pull rubber collar (3) over the cover bowl by pulling the ends of cables (2).
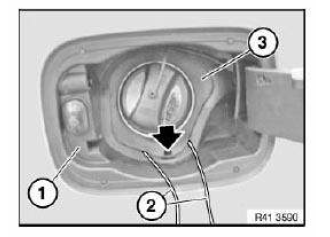
Body+and+Frame

Slowly pull out cable ends (2).

Press rubber cup (1) into groove with special tool 00 9 321.
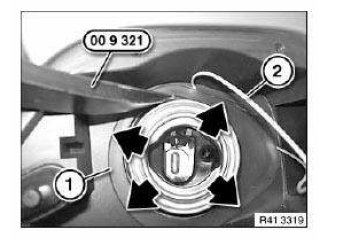
Body+and+Frame

Carefully check cover bowl (2) in area of latch mechanisms for proper seating.

There must be no discernible gap between the sealing lip of the cover bowl and the side wall in the area.

(watertightness).

Make sure rubber collar (1) is correctly seated (watertightness).

Perform function check of the lock/unlocking of the fuel filler cap.
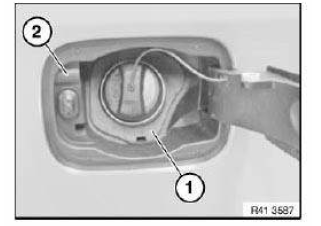
Body+and+Frame

Test yourself

A quick BMW X3 quiz: every answer comes with an explanation and a link to the manual page.