Roof outer skin

In this manual: Roof outer skin
General information on preservation measures — 1Body cavity sealing — 1Body corrosion protection — 1Body repair instructions — 1Support members — 1Luggage compartment floor — 1Wheel wells — 1Side frame and door pillars — 1Roof outer skin — 1Dash cowl — 1Front trim panel — 1Rear trim panel — 1Side panels — 1Front side doors — 1Rear side doors — 1Front lid — 1Rear lid — 1Other flaps — 1Body special tools — 1General information — 1Handling brake fluids — 1Brake testing and bleeding — 1Front brakes — 1Rear brakes — 1Master brake cylinder — 1Brake lines — 1Brake booster — 1Electrical components/wear indicator — 1Parking brake — 1Mechanical/hydraulic components — 1Electronic components — 1Brakes — 1Front brake — 1Pedal mounting block — 1Brake pedal with linkage — 1Clutch pedal with linkage — 1Accelerator pedal actuation — 1Pedals — 1Specified grease — 1Propeller shaft, general — 1Propeller shaft assembly — 1Center console assembly — 1Front propeller shaft — 1Propeller shaft — 1Propeller shaft complete — 1Front axle repair instructions — 1Front axle suspension — 1Front sub-frame — 1Struts with rubber mounts — 1Wheel bearings and stub axle — 1Spring strut — 1Spring with suspension — 1Stabilizer bar — 1Front axle gearbox — 1Output shaft — 1Front axle — 1General information on high temperature multi-purpose grease — 1Rear axle repair instructions — 1Final drive with cover — 1Final drive mounting — 1Output shafts — 1Rear sub-frame — 1Control arms and struts — 1Axle mounting — 1Wheel bearings — 1Shock absorber — 1With suspension — 1Stabilizer bar — 1Rear axle — 1General information on final drive oil — 1Approved final drive oils for front and rear axle final drives with and without limited slip or viscous coupling — 1Final drive oil for bmw m1 motorsport coupe — 1Operating fluids as of 11/2015 — 1Brake pad replacement reminder — 1Emissions maintenance reminder — 1Maintenance service reminder — 1Tire pressure monitor system reminder — 1Description — 1Troubleshooting — 1Ignition wires, spark plugs — 1Ignition coil — 1Electronic switching or control units — 1Preheating relay — 1Preheater plugs — 1Alternator with drive and mounting — 1Controller — 1Starter with mounting — 1Starter lead — 1Engine wiring loom — 1Oil pressure/oil temperature/oil gauge — 1Switches and relays — 1Engine electrical system — 1Cabin air filter — 1Cabin air filter applications — 1Operating fluids - air conditioning and heating — 1Air conditioner refrigerant — 1Refrigeration oil — 1Note, overview components climate control — 1Heater with operation — 1Auxiliary. heater with control elements — 1Nozzles and outlets — 1Microfilter — 1Air conditioning, leak detection — 1Ac housing/evaporator, switching elements — 1Compressor — 1Condenser and dryer with lines — 1Heating and air conditioning — 1Front axle repair instructions — 1Front axle suspension — 1Front sub-frame — 1Struts with rubber mounts — 1Wheel bearings and stub axle — 1Spring strut — 1Spring with suspension — 1Stabilizer bar — 1Front axle gearbox — 1Front axle — 1General information on high temperature multi-purpose grease — 1Integrated suspension systems repair instructions — 1Front control and suspension elements — 1Rear control and suspension elements — 1Electrical components — 1Electronic damping force adjustment — 1Integrated suspension systems — 1Approved hydraulic fluids — 1Rear axle repair instructions — 1Final drive — 1Final drive with cover — 1Final drive mounting — 1Output shafts — 1Rear sub-frame — 1Control arms and struts — 1Axle mounting — 1Wheel bearings — 1Shock absorber — 1Springs with suspension — 1Stabilizer bar — 1Rear axle — 1General information on final drive oil — 1Approved final drive oils for front and rear axle final drives with and without limited slip or viscous coupling — 1Final drive oil for bmw m1 motorsport coupe — 1Operating fluids as of 11/2015 — 1Electronic chassis alignment — 1Mechanical steering gear — 1Steering gear with servo unit — 1Steering arms, tie rods, steer. damper — 1Steering column — 1Steering wheel — 1Steering wheel for airbag — 1Pump and oil supply — 1Steering and wheel alignment — 1Wheels — 1Disc wheels (rims) — 1Tires — 1Wheels with tires — 1Tire mounting paste — 1Engine mounting — 1Transmission suspension, automatic. transmission — 1Engine and gearbox suspension — 1Transmission in general — 1Transmission case, oil sump — 1Extension housing, bearings, seal — 1Mechanical attachments — 1Hydr/el control components/elements — 1Oil pump — 1Shift valves, parking lock — 1Torque converter — 1Automatic transmission — 1Automatic transmission fluid for zf-transmission GA8HP45Z / GA8HP50Z / GA8HP70Z / GA8HP90Z / GA8P70H / GA8P75H / GA8HP75Z — 1General information on automatic transmission fluids — 1Approved automatic transmission fluids for initial fillings and correcting fluid levels — 1Checking transmission fluid level — 1Transmission fluid change intervals (if applicable) — 1Transfer case, general — 1Transfer box — 1Transmission shafts — 1Transfer box special tools — 1Transfer box in general (atc 45l) — 1Transmission in general — 1Bearing in housing, sealing ring — 1SELF-DIAGNOSTICS DTCS — 1
~4min read
  • Replace roof outer skin with slide/tilt sunroof
  • Replacing roof outer skin (normal roof)
  • Stripping operations - replacing roof outer skin (normal roof)
  • Stripping operations - replacing roof outer skin (version with panorama glass roof)

Replace roof outer skin with slide/tilt sunroof

Read contents of BODY, GENERAL.

STRIP DOWN VEHICLE

NOTE: Observe (REPAIR STAGE 2) procedure!

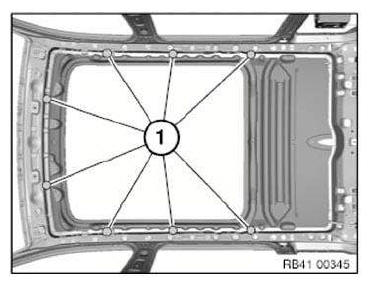
Following new body parts are required:

  • (1) Roof outer skin panel, panorama glass sunroof

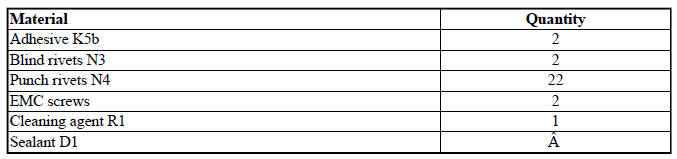
Following CONSUMABLES are required:
Body+and+Frame
Body+and+Frame

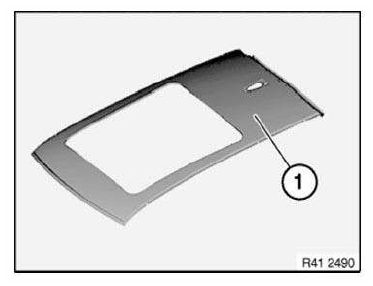
Removing roof outer skin: Open welded connections in area (1).
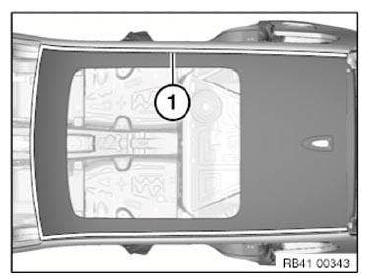
Body+and+Frame

Open brazed connections in areas (1) by grinding.

Open welded connections in areas (2).
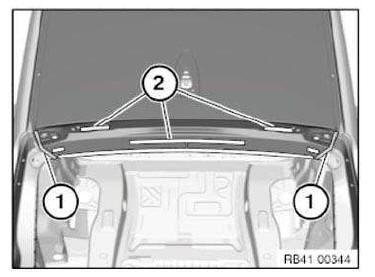
Body+and+Frame

Release screws (1).

Body+and+Frame

OPEN bonded connections in areas (1).

Take off roof outer skin.
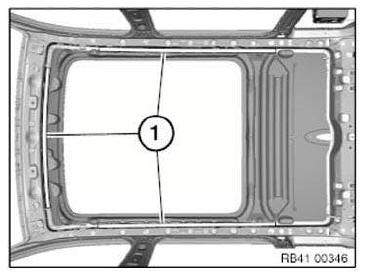
Body+and+Frame

Preparation of new part: Adjust roof outer skin to fit and secure.

In area (1) drill 1 Ø 4.2 mm hole for blind rivet.

Shown on left side, right side identical.

Remove new part again and deburr bore holes.
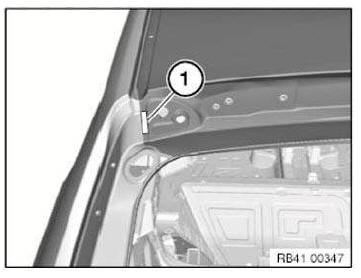
Body+and+Frame

IMPORTANT: Do not grind/sand new part in area of bonding surfaces.

Installing roof outer skin: Clean all bonding surfaces on vehicle and on new part with cleaning agent R1.
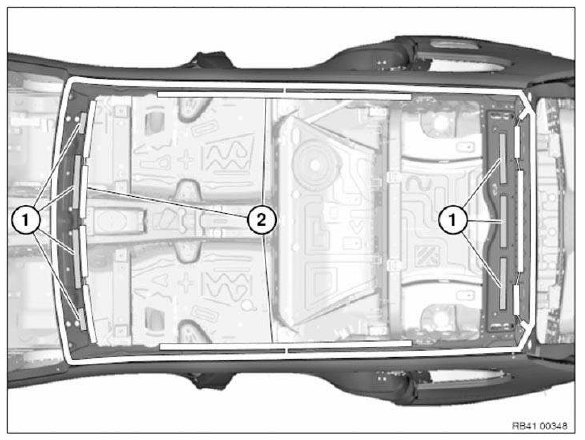
Body+and+Frame

In areas (1), apply sealant D1 in the same way as in series standard.

Apply adhesive in area (2).

Apply a little more adhesive to node of A-pillar.

NOTE: Excess material at the nodes is later used for spreading to side frame.

Place roof outer skin with helpers evenly and centrally on vehicle, adjust to fit and secure.

Rivet roof outer skin with blind rivets.

Insert screws (1) and tighten down.
Body+and+Frame

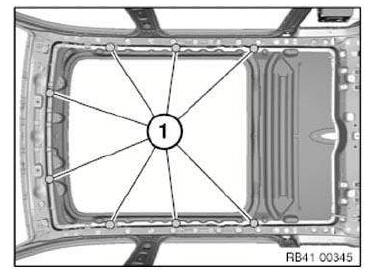
Secure roof outer skin with screws and nuts M6 at mounting holes (1) of roof rails.
Body+and+Frame

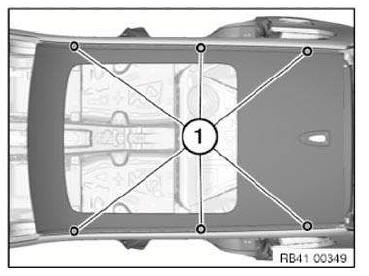
In area (1) rivet roof outer skin with 9 N4 punch rivets.
Body+and+Frame

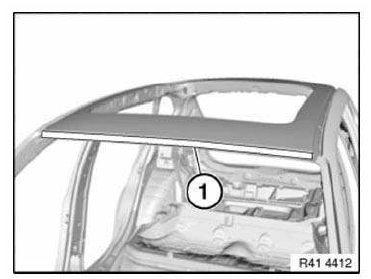
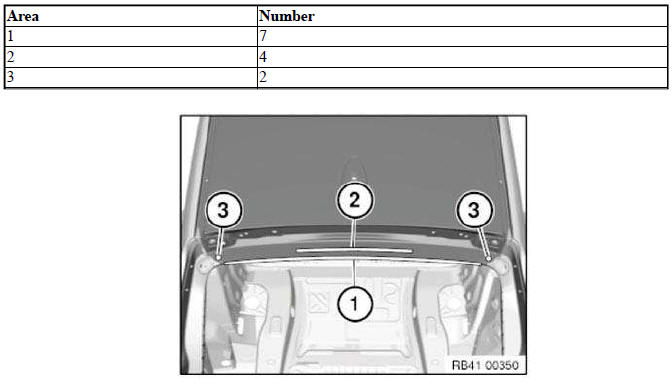
Use N4 punch rivets in areas (1) to (3).
Body+and+Frame

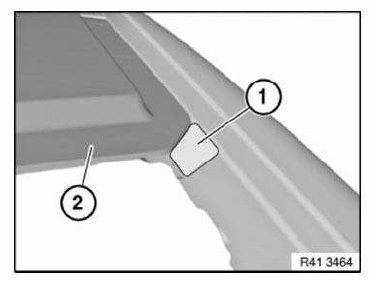
A-pillar nodes: Adapt step (1) between roof outer skin (2) and A-pillar with emerging adhesive. Remove excess adhesive.

IMPORTANT: Do not use any cleaning agents containing solvents.

Do not leave any traces of sharp edges as this could compromise the tightness of the subsequent bond.
Body+and+Frame

Install hinges for tailgate until the adhesive has hardened.

Avoid contact between emerging adhesive and hinges! Remove excess adhesive.

IMPORTANT: Do not use any cleaning agents containing solvents.

Seal adhesive areas and blind rivets with sealant D1.

IMPORTANT: Spread excess adhesive in roof trim strip channel. Mounting surfaces of clips for roof trim strips must not be moistened with adhesive.

Operation is described on the left side. Right side identical.

Graphic similar.

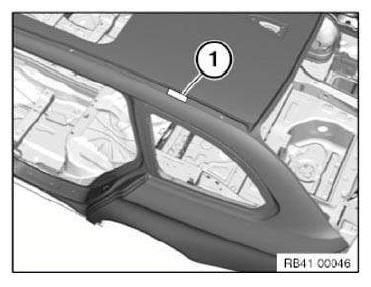
Fit an EMC SCREW after adhesive has hardened in area (1).

In so doing, bear in mind subsequent fitting of roof trim strip/roof rail!
Body+and+Frame

Replacing roof outer skin (normal roof)

Refer to repair instructions ROOF OUTER SKIN WITH SLIDE/TILT SUNROOF for procedure and carry over schematically to the vehicle.

STRIP DOWN VEHICLE

Installing roof outer skin

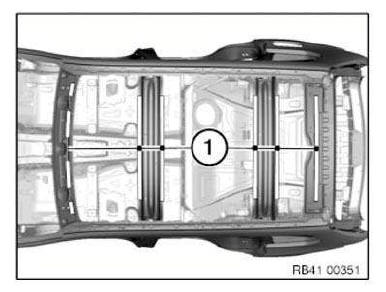
Apply sealant in areas (1) in the same way as in series standard.
Body+and+Frame

Stripping operations - replacing roof outer skin (normal roof)

NOTE: Owing to the different engine variants and equipment specifications, not all the components are taken into consideration.

The following list basically represents the removal sequence.

  • Disconnect battery
  • Remove cowl panel cover
  • Remove and install windscreen
  • Remove and install rear lid
  • Remove and install headlining.
  • Remove and install left roof trim strip
  • Remove and install right roof trim strip
  • Remove and install roof aerial
  • Remove both tailgate hinges
  • Partially release tailgate seal.

Stripping operations - replacing roof outer skin (version with panorama glass roof)

NOTE: Owing to the different engine variants and equipment specifications, not all the components are taken into consideration.

The following list basically represents the removal sequence.

  • Disconnect battery
  • Remove cowl panel cover
  • Remove and install windscreen
  • Remove and install rear lid
  • Remove and install headlining.
  • Remove and install panorama glass roof
  • Remove and install left roof trim strip
  • Remove and install right roof trim strip
  • Remove and install roof aerial
  • Remove both tailgate hinges
  • Slightly release tailgate seal

Test yourself

A quick BMW X3 quiz: every answer comes with an explanation and a link to the manual page.