Rear brakes
- Guideline for applying brake pad paste on brake pads and brake anchor plate
- Precision-turning both rear brake discs on both sides
- Removing and installing or replacing both rear brake discs
- Removing and installing or replacing brake pads on both rear disc brakes (trw floating caliper)
- Removing and installing or replacing rear left or right brake caliper (trw)
- Removing and installing/renewing a brake anchor plate/brake guard plate at rear
- Removing and installing/replacing vent valve for brake caliper
- Replacing rear left or right dust boot on brake caliper
Guideline for applying brake pad paste on brake pads and brake anchor plate
IMPORTANT: So as not to damage the surface coating, if possible do not mechanically clean the guide surfaces for the brake pads on the brake caliper mounting bracket. Instead, clean with brake cleaner BMW part no. 83 19 2 154 780 and apply a thin coating of brake pad paste BMW part no. 83 19 2 158 851 (3 g) or 83 19 2 158 852 (100 g).
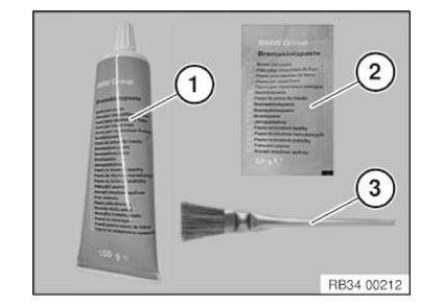
Spread brake pad paste onto the marked surfaces using a brush!
- Brake pad paste 100 gr. BMW part no. 83 19 2 158 852
- Brake pad paste 3 gr. BMW part no. 83 19 2 158 851
- Brush for spreading brake pad paste over the marked areas.
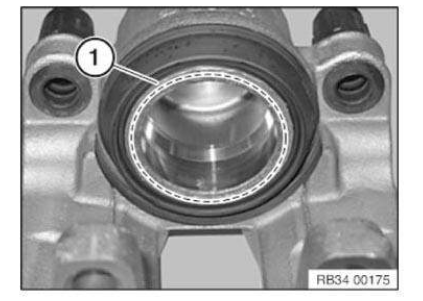
Brake IPS (CBI) 1-piston floating caliper brake (model ranges: 1-Series, 3-Series, 4-Series, X3)
Clean contact surface (1) of brake piston with brake cleaner and apply a thin coating of brake pad paste.
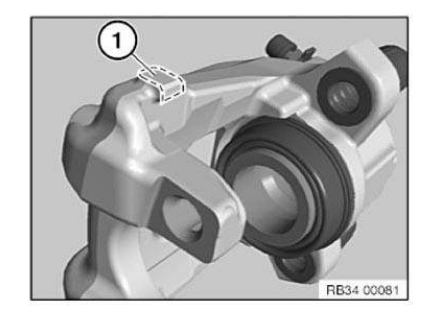
Clean contact surfaces (1) of T-heads/brake caliper housing with brake cleaner and apply a thin coating of brake pad paste.
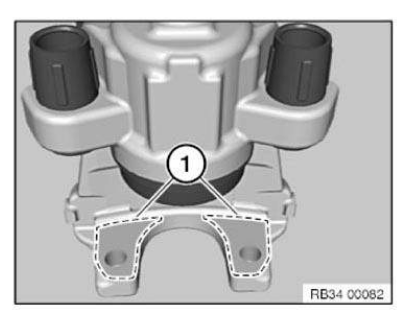
Clean contact surface (1) of brake caliper with brake cleaner and apply a thin coating of brake pad paste.
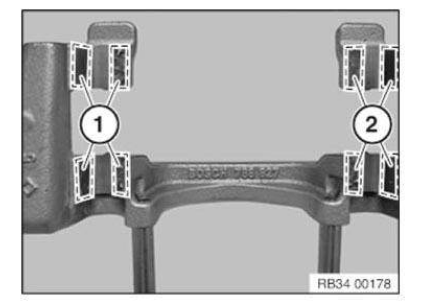
So as not to damage the surface coating, if possible do not mechanically clean the guide surfaces (1) for the brake pads on the brake caliper mounting bracket. Clean guide surfaces (1 and 2) with brake cleaner and apply a thin coating of brake pad paste.
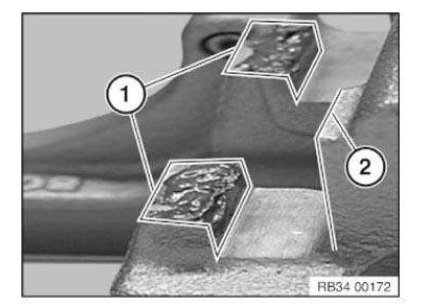
So as not to damage the surface coating, if possible do not mechanically clean the guide surfaces (1 and 2) for the brake pads on the brake caliper mounting bracket. Clean guide surfaces (1 and 2) with brake cleaner and apply a thin coating of brake pad paste.
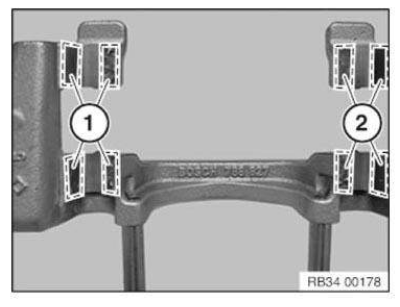
Apply a thin coating of brake pad paste to T-head of inner brake pad in area (1) and (2).
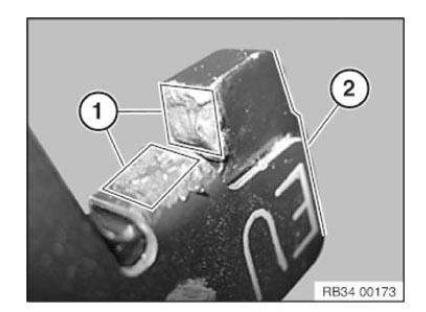
Apply a thin coating of brake pad paste to T-head of outer brake pad in area (1) and (2).
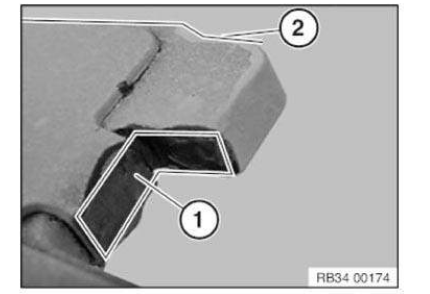
Brake FN (Continental Teves) 1-piston floating caliper brake (model ranges: 5-Series, 6-Series, 7-Series, 8-Series, X1, X3, X5, Z4, RR)
Clean contact surface (1) of brake piston with brake cleaner and apply a thin coating of brake pad paste.
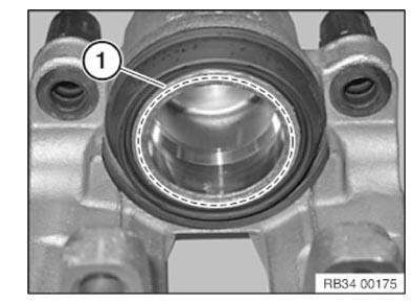
Clean contact surfaces (1) of T-heads/brake caliper housing with brake cleaner and apply a thin coating of brake pad paste.
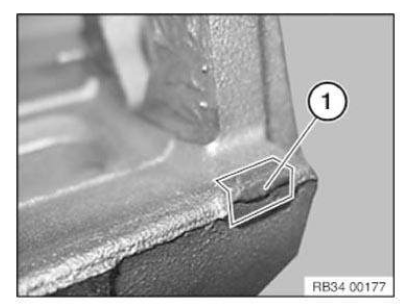
Clean contact surface (1) of brake caliper with brake cleaner and apply a thin coating of brake pad paste.
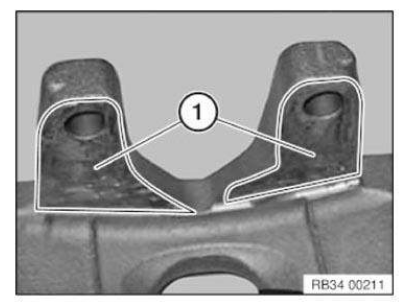
So as not to damage the surface coating, if possible do not mechanically clean the guide surfaces (1) for the brake pads on the brake caliper mounting bracket. Clean guide surfaces (1) with brake cleaner and apply a thin coating of brake pad paste.
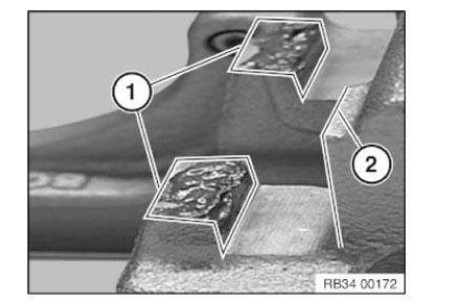
So as not to damage the surface coating, if possible do not mechanically clean the guide surfaces (1 and 2) for the brake pads on the brake caliper mounting bracket. Clean guide surfaces (1 and 2) with brake cleaner and apply a thin coating of brake pad paste.
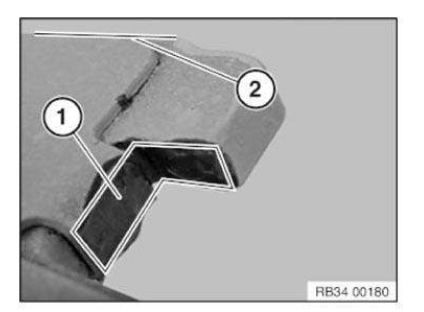
Lightly coat the T-head of the inner brake pad with brake pad paste in area (1 and 2).
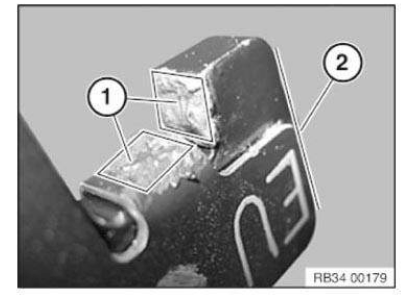
Lightly coat the T-head of the outer brake pad with brake pad paste in area (1 and 2).
Brake FN (Continental Teves) 2-piston floating caliper brake (model ranges: 5-Series, 6-Series, 7-Series, 8-Series, X5, RR)
Clean contact surface (2) of brake piston with brake cleaner and apply a thin coating of brake pad paste.
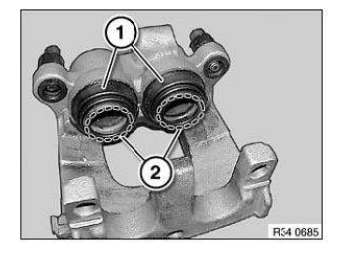
Clean contact surfaces (1) of T-heads/brake caliper housing with brake cleaner and apply a thin coating of brake pad paste.
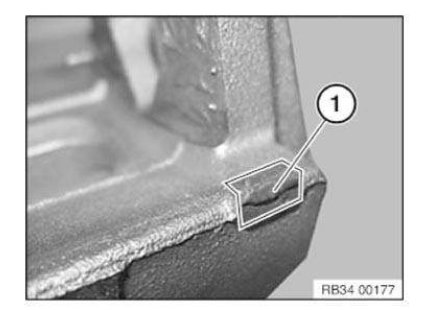
Clean contact surface (1) and brake caliper with brake cleaner and apply a thin coating of brake pad paste.
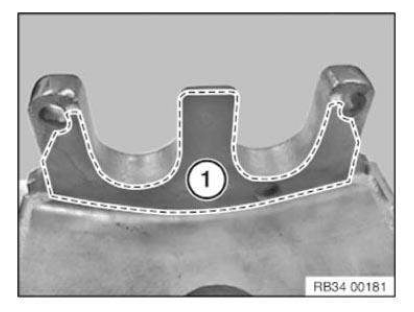
So as not to damage the surface coating, if possible do not mechanically clean the guide surfaces (1 and 2) for the brake pads on the brake caliper mounting bracket. Clean guide surfaces (1 and 2) with brake cleaner and apply a thin coating of brake pad paste.
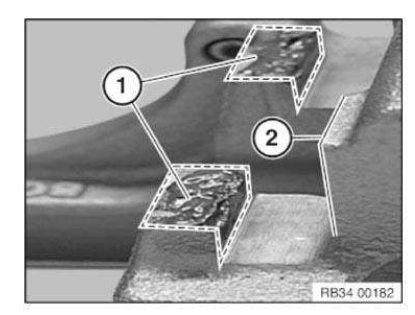
So as not to damage the surface coating, if possible do not mechanically clean the guide surfaces (1 and 2) for the brake pads on the brake caliper mounting bracket. Clean guide surfaces (1 and 2) with brake cleaner and apply a thin coating of brake pad paste.
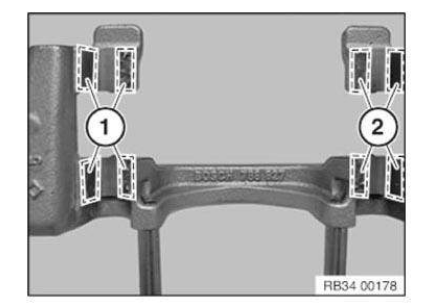
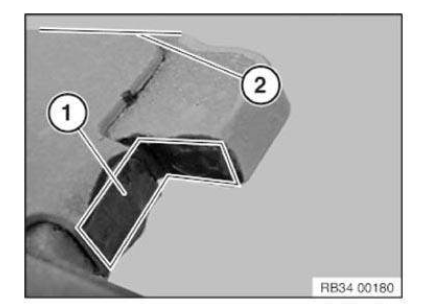
Lightly coat the T-head of the inner brake pad with brake pad paste in area (1 and 2).
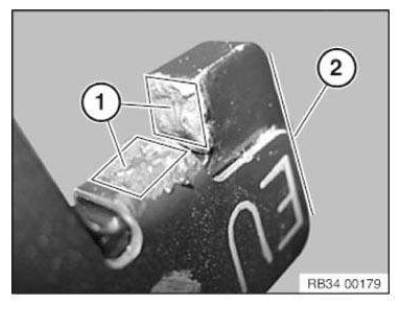
Lightly coat the T-head of the outer brake pad with brake pad paste in area (1 and 2).
Brake Collette (TRW) 1-piston brake caliper (model ranges: MINI, 1-Series, 5-Series, 6-Series, Z4)
Clean contact surface (1) of brake piston with brake cleaner and apply a thin coating of brake pad paste.
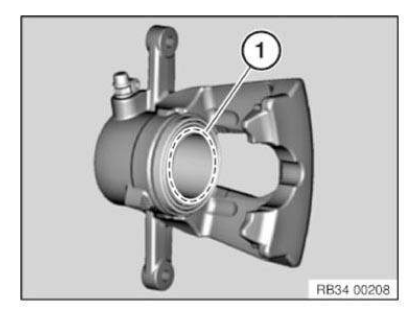
Clean contact surface (1) of brake caliper with brake cleaner and apply a thin coating of brake pad paste.
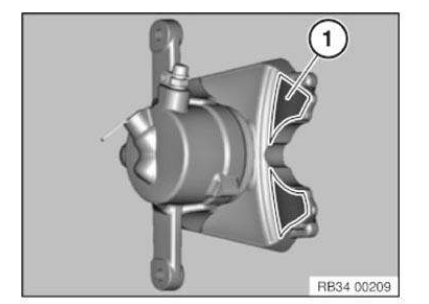
So as not to damage the surface coating, if possible do not mechanically clean the guide surface (1) for the brake pads on the brake caliper mounting bracket. Clean guide surface (1) with brake cleaner and apply a thin coating of brake pad paste.
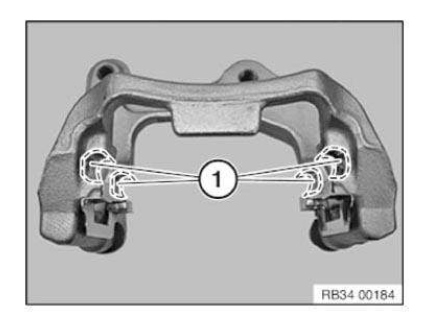
Apply a thin coating of brake pad paste to both sides of T-head of brake pad in area (1).
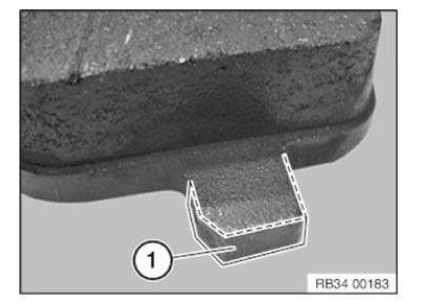
Brake P 4.40 (Brembo) 4-piston fixed caliper brake (model ranges: MINI, 1-Series, 3-Series, 4-Series, 5- Series, 6-Series, 7-Series, 8-Series, X5, RR)
Clean contact surface (1) of brake piston with brake cleaner and apply a thin coating of brake pad paste.
So as not to damage the surface coating, if possible do not mechanically clean the guide surfaces (2) for the brake pads on the brake caliper mounting bracket. Clean guide surface (2) with brake cleaner and apply a thin coating of brake pad paste.
Clean both inner and outer guide surfaces (2) and apply a thin coating of brake pad paste.
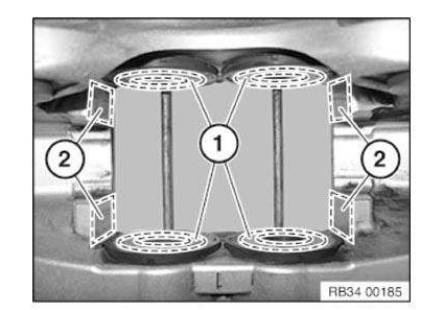
Lightly coat both sides of the contact surface in area (1 and 2) with brake pad paste.
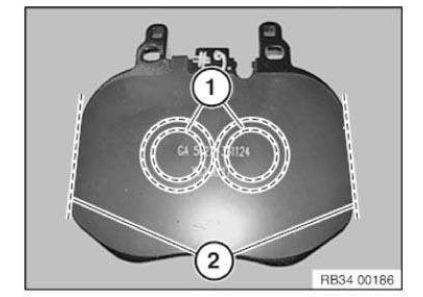
Lightly coat the brake pad contact surface on both sides in area (1) with brake pad paste.
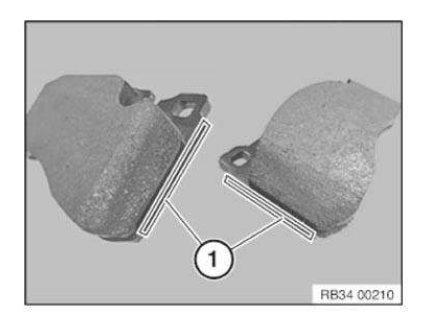
Brake P 4.40 (Brembo) 2-piston fixed caliper brake (model ranges: 1-Series, 3-Series)
Clean contact surface (1) of brake piston with brake cleaner and apply a thin coating of brake pad paste.
So as not to damage the surface coating, if possible do not mechanically clean the guide surfaces (2) for the brake pads on the brake caliper mounting bracket. Clean guide surface (2) with brake cleaner and apply a thin coating of brake pad paste.
Clean both inner and outer guide surfaces (2) and apply a thin coating of brake pad paste.
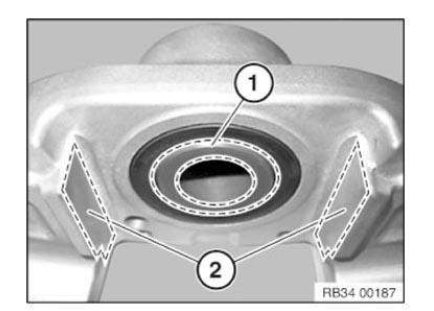
Lightly coat both sides of the contact surface in area (1 and 2) with brake pad paste.
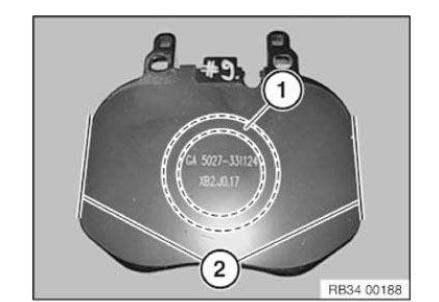
Lightly coat the brake pad contact surface on both sides in area (1) with brake pad paste.
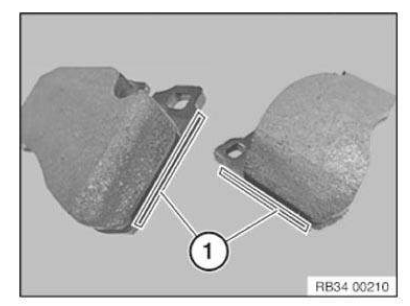
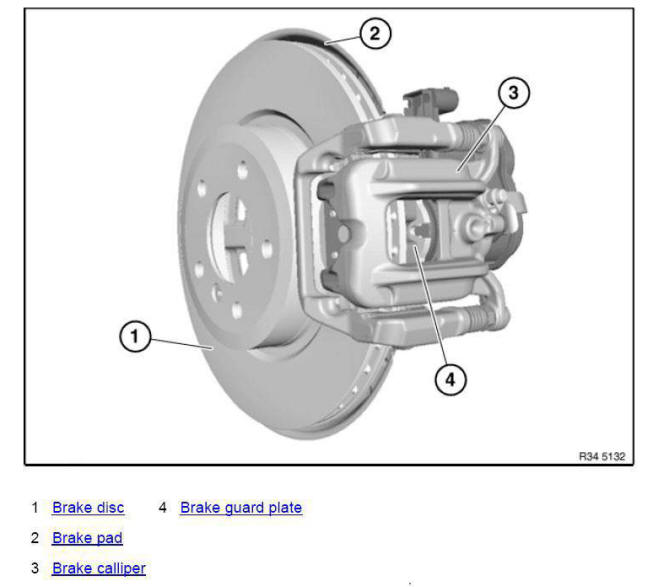
OVERVIEW OF REAR BRAKE
Precision-turning both rear brake discs on both sides
IMPORTANT: Always precision-turn both sides of both brake discs on one axle.
Maximum machining dimension per friction ring side is 0.8 mm! Observe MINIMUM BRAKE DISC THICKNESS (MIN TH).
Brake discs of M models (Compound brake discs) must not be machined! Only one brake pad set may be used up on brake discs which have been lathe-turned to minimum thickness (MIN TH).
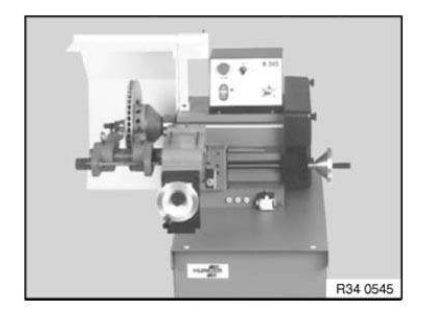
Stationary brake disc lathe:
IMPORTANT: Only BMW-approved brake disc lathes may be used!
In the case of stationary brake disc lathes, the BRAKE DISC must be removed.
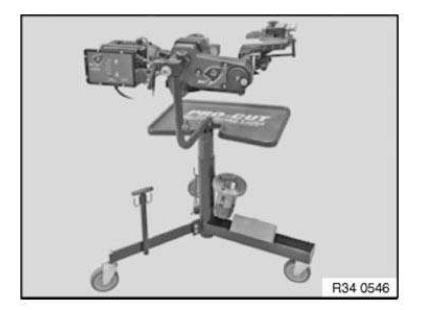
Mobile brake disc lathe:
IMPORTANT: Only BMW-approved brake disc lathes may be used!
In the case of mobile brake disc lathes, the brake calipers and brake anchor plates must be removed.
The brake discs remain on the vehicle.
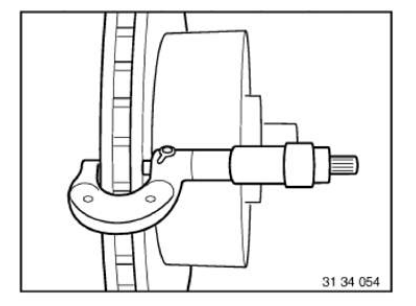
After fine-grinding the brake discs, measure the THICKNESS DIFFERENCE inside the braking surfaces at 8 points with an external caliper gauge.
Removing and installing or replacing both rear brake discs
Special tools required:
- 34 1 280
Necessary preliminary tasks:
- Remove WHEELS .
- Remove and clean BRAKE PADS.
After completing repair work:
- Adjust parking brake (not F10, F11, F12, F13, F18, F25).
- Read and comply with notes on breaking in new brake discs/brake pads.
Check minimum brake disc thickness:
- Position special tool 34 1 280 at three measuring points in area (1) and measure.
- Compare measuring result and lowest value with SETPOINT VALUE .
NOTE: If the brake discs are replaced, you must also fit new brake pads.
Always replace brake discs in pairs.
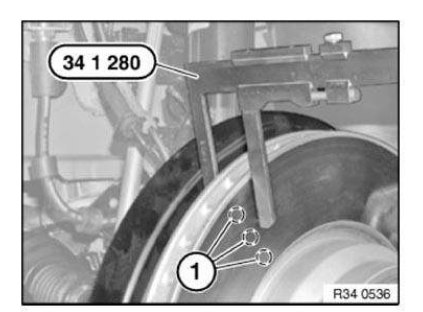
IMPORTANT: New brake pads may only be fitted if the brake disc thickness is greater than the MINIMUM BRAKE DISC THICKNESS (MIN TH).
Release screws (1). Detach brake-caliper support.
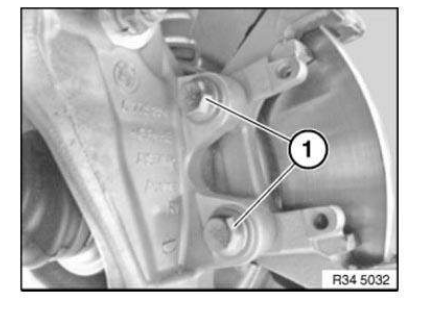
IMPORTANT: To release brake disc: Do not under any circumstances strike friction ring with a hammer or similar! If necessary, carefully tap on base of brake disc chamber with a rubber mallet.
Clean contact surface of brake disc at wheel hub thoroughly and remove traces of corrosion.
Unevenness on contact surface may result in distortion of brake disc!
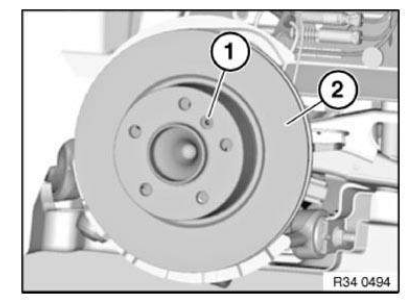
Release screw (1) and remove brake disc (2).
Installation note: Replace screw.
Removing and installing or replacing brake pads on both rear disc brakes (trw floating caliper)
Special tools required:
- 34 1 280
- 2 320 871
- 2 320 299
IMPORTANT:
- Brake pad wear sensor: after removal it must be replaced (brake pad wear sensor loses its retention capability in the break pad).
- Retaining pins and expanding spring: for vehicles older than 48 months it is recommended to replace the retaining spring!
So as not to damage the surface coating, if possible do not mechanically clean the guide surfaces for the brake pads on the brake caliper mounting bracket. Instead, clean with brake cleaner BMW part no. 83 19 2 154 780 and apply a thin coating of brake pad paste BMW part no. 83 19 2 158 851 (3 g) or 83 19 2 158 852 (100 g). Spread brake pad paste onto the marked surfaces using a brush! Observe REGULATION ON APPLYING BRAKE PAD PASTE TO BRAKE PADS AND BRAKE ANCHOR PLATES!
WARNING: During repair work on the rear brake it must be ensured that the push button for the electrical parking brake cannot be activated.
Necessary preliminary tasks:
- REMOVE WHEELS .
- Remove rear brake pad wear sensor.
When the repair work is complete, please pay attention to the following:
- Switch on ignition and, using electrical parking brake operating element, open parking brake once, close once and open again.
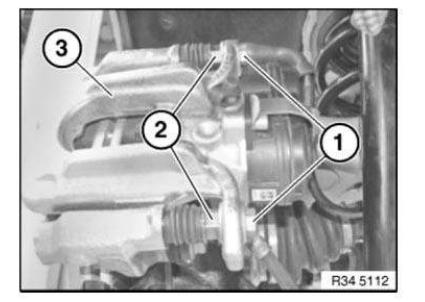
Unscrew guide bolts (1).
If necessary, grip at hexagon head (2).
Remove brake caliper (3).
Installation note: Replace guide bolts.
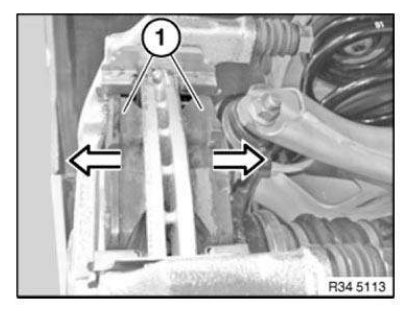
Remove brake pads (1) in direction of arrow from brake anchor plate.
IMPORTANT: Mark any worn brake pads.
In the event of one-sided brake pad wear, do not change brake pads round.
Observe MINIMUM THICKNESS OF BRAKE PADS .
Clean brake pads.
Do not apply grease to brake lining backplate.
Check minimum brake disc thickness:
- Position special tool 34 1 280 at three measuring points in area (1) and measure.
- Compare measuring result and lowest value with SETPOINT VALUE .
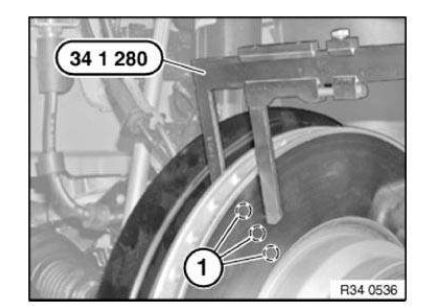
IMPORTANT: New brake pads may only be fitted if the brake disc thickness is greater than the MINIMUM BRAKE DISC THICKNESS (MIN TH).
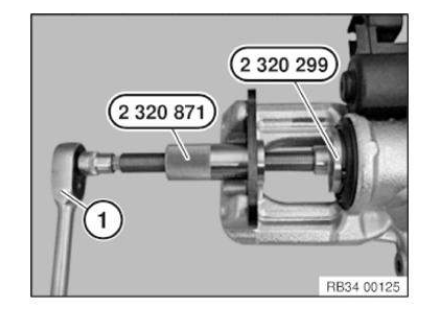
Place special tool 2 320 871 , 2 320 299 on brake piston.
Use reversible ratchet (1) to turn back brake piston up to limit position.
IMPORTANT: When pressing piston back, note brake fluid level in expansion tank.
Overflowing brake fluid will damage the paintwork.
IMPORTANT: Dust boot must not come into contact with brake pad paste as this may cause the dust boot to swell.
Check dust boot for damage and renew if necessary.
Clean contact surface (1) of brake piston with brake cleaner and apply a thin coating of brake pad paste.
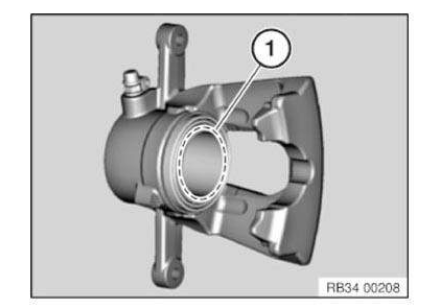
Clean contact surface (1) of brake caliper with brake cleaner and apply a thin coating of brake pad paste.
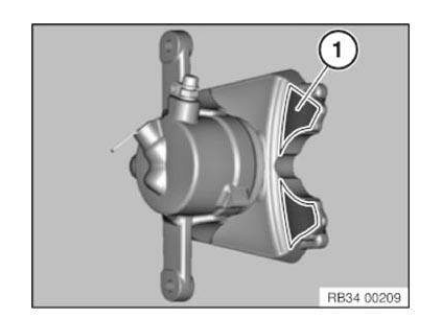
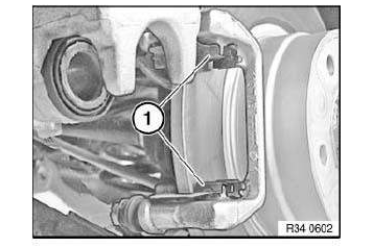
So as not to damage the surface coating, if possible do not mechanically clean the guide surface (1) for the brake pads on the brake caliper mounting bracket. Clean guide surface (1) with brake cleaner and apply a thin coating of brake pad paste.
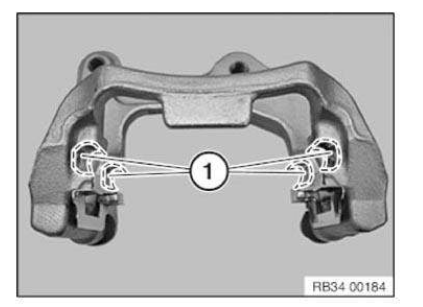
Apply a thin coating of brake pad paste to both sides of T-head of brake pad in area (1).
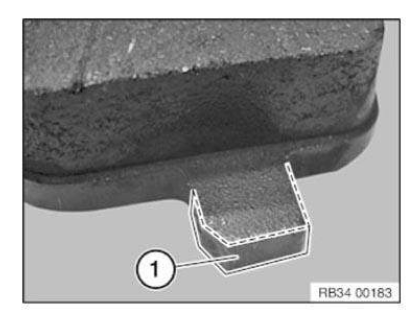
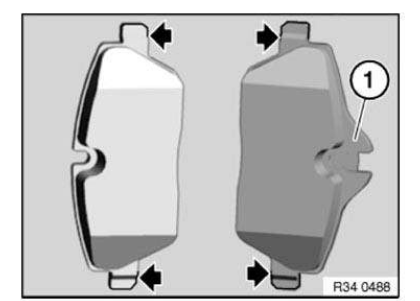
IMPORTANT: Brake pad with bulge (1) is intended for accommodating the brake pad wear sensor and must be fitted on the piston side.
NOTE: After completing repair work:
- Fully depress brake pedal several times so that brake pads contact brake discs.
- When installing new brake pads at front and rear axles, brake fluid level must be brought up to "MAX" mark.
- Read and comply with notes on breaking in new brake discs/brake pads.
- When replacing pads, reset CBS display in accordance with factory specification.
- The installation position of the actuators is automatically overridden by detecting a speed signal.
Replacement: Remove lining springs (1) and replace.
Installation note: So as not to damage the surface coating, if possible do not mechanically clean the guide surfaces (1) for the brake pads on the brake caliper mounting bracket. Instead, clean with brake cleaner and apply a thin coating of brake pad paste.
Removing and installing or replacing rear left or right brake caliper (trw)
Necessary preliminary tasks:
- Remove WHEEL .
- Read and comply with GENERAL INFORMATION.
- Switch off ignition.
After completing repair work: BLEED BRAKE SYSTEM.
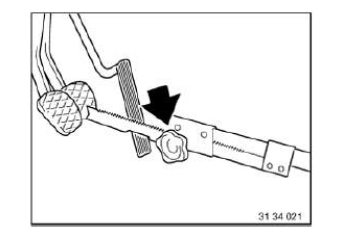
Press brake pedal down to floor and secure with pedal support.
NOTE: The pedal support may only be released when the brake lines are reconnected.
This prevents brake fluid from emerging from the expansion tank and air from entering the system when the brake lines are opened.
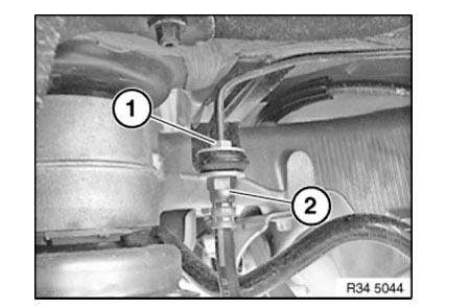
IMPORTANT: Grip brake hose at square head (2) so that connecting piece cannot rotate in retaining bracket.
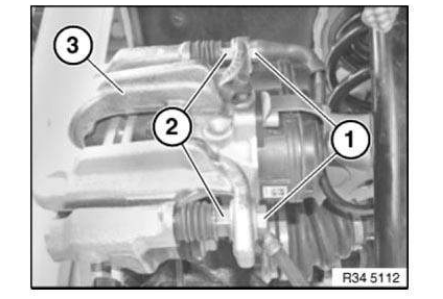
Disconnect brake hose from brake line (1).
Detach brake hose (1) from brake caliper.
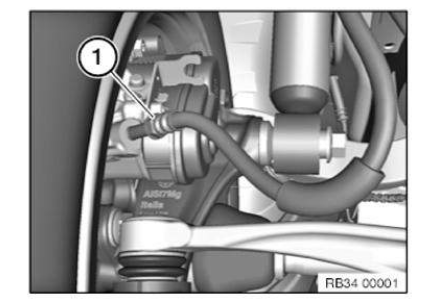
IMPORTANT: Never twist brake hose when installing it and avoid all contact with components attached rigidly to the body.
NOTE: First tighten brake hose on brake caliper.
Insert brake hose in bracket and screw onto brake pipe.
Disconnect plug connection on parking brake actuator.
IMPORTANT: Switch off ignition at least 30 s before disconnecting the plug connection!
Unscrew guide bolts (1).
If necessary, grip at hexagon head (2).
Remove brake caliper (3).
Installation note: Replace guide bolts.
The EMF actuator must be remounted if the brake caliper is replaced.
After installation, observe the following: switch on ignition and, using parking brake operating element, open parking brake once, close once and open again.
Removing and installing/renewing a brake anchor plate/brake guard plate at rear
Necessary preliminary tasks:
- Remove wheel bearing.
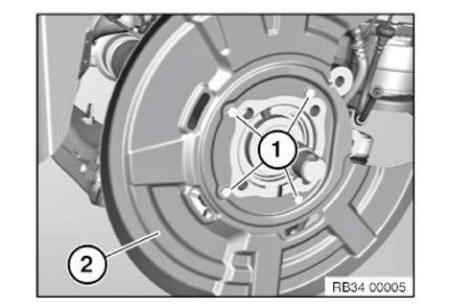
Unscrew bolts (1) and remove brake guard plate (2).
Installation note: Replace screws.
Remove retaining plate (2) in direction of arrow.
Feed out brake guard plate (3) over wheel hub.
Removing and installing/replacing vent valve for brake caliper
Necessary preliminary work:
- Raise vehicle.
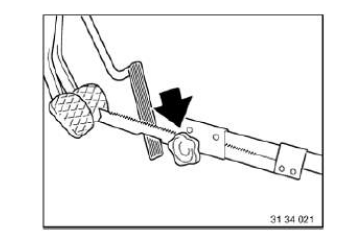
Removal: Press brake pedal down to floor and secure with pedal support.
NOTE: The pedal support may only be released when the brake lines are reconnected
This prevents brake fluid from emerging from the expansion tank and air from entering the system when the brake lines are opened.
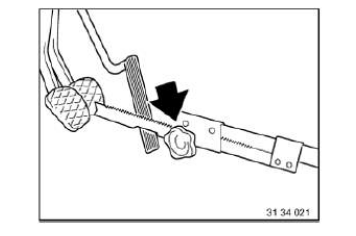
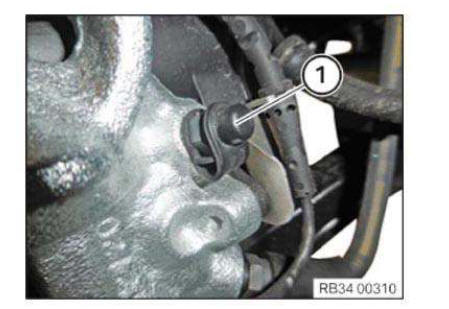
Remove dust cap (1).
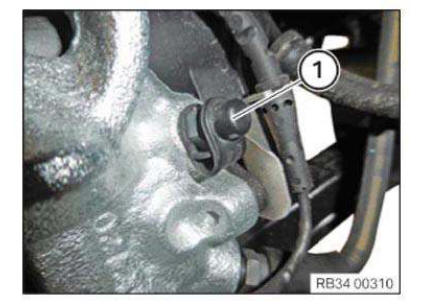
Remove vent valve (1).
IMPORTANT: Collect escaping brake fluid in a suitable collecting vessel.
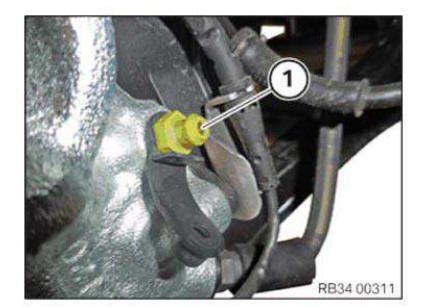
Installation:
IMPORTANT: The bore hole must be free of contamination!
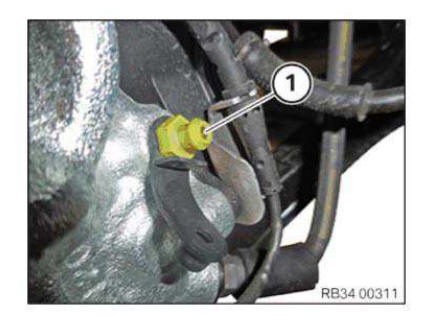
Mount dust cap (1).
Remove pedal support.
Required follow-up work:
- Bleed brake system.
Replacing rear left or right dust boot on brake caliper
Necessary preliminary tasks:
- Remove rear BRAKE PADS.
NOTE: Dust boot can be replaced without dismantling the brake caliper and without removing the piston.
Use original BMW repair kit.
When the repair work is complete, please pay attention to the following:
- Check brake pads and brake discs for wear.
- Perform brake test on test stand
- Perform test drive.
Remove dust boot (1) from brake caliper (2) in direction of arrow with a suitable tool.
IMPORTANT: Dust boot must not be re-used!
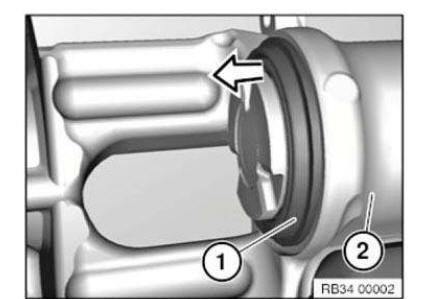
Clean contact surface of dust boot at brake caliper housing (1) and piston groove (2) with a lint-free cloth.
IMPORTANT: Carefully check brake caliper housing, cylinder bore and brake piston for damage and corrosion! Corroded or damaged components must be replaced! The contact surface on the brake caliper housing must be dry and free of grease before installing the dust boot!
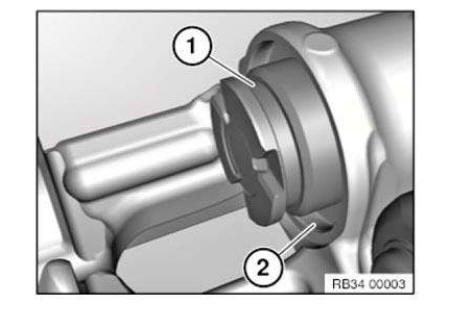
Pull sealing lip (1) of dust boot over the brake piston until the dust boot (2) is properly seated in the brake piston groove.
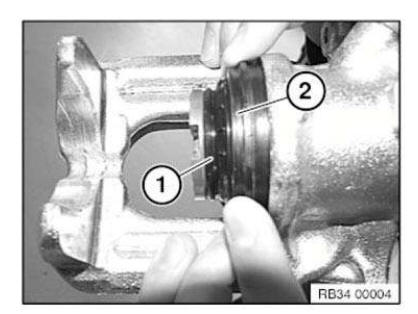
Put dust boot (2) uniformly onto contact surface of brake caliper housing and uniformly push in.
IMPORTANT: The dust boot must be correctly lying against the entire circumference of the brake caliper housing and the brake piston groove.
Test yourself
A quick BMW X3 quiz: every answer comes with an explanation and a link to the manual page.