Steering wheel for airbag
- Procedure after airbag deployment as result of an accident
- Removing and installing/replacing airbag unit
- Removing and installing/replacing airbag unit (sports steering wheel)
- Safety regulations for handling components with gas generators
Procedure after airbag deployment as result of an accident
Check and/or replace following components after airbag deployment:
Satellites (control unit + sensor)
- Components
- Satellite, A-/B-pillar, left/right
- Satellite, front door
- Satellite, rear seat
- Satellite, driver's/passenger's side
- Satellite, vehicle center
- Procedure
- Inspect visually for mechanical damage
- Read fault memory
- Disconnect battery and observe waiting period
- Rectify faults
- Connect battery and observe waiting period (at least 10 seconds)
- Delete fault memory
- Switch off ignition and wait at least 2 minutes (no consumers may be switched on during this period such as interior light, radio, etc.)
- Switch on ignition (wait at least 10 seconds)
- Clear fault memory and if necessary rectify faults
Cables and connectors
- Components and procedure
- Check cables and connectors for damage, replace if necessary.
(e.g. corrosion, correct engagement, bent pin)
- Check cables and connectors for damage, replace if necessary.
Seat belt system
- Components
- Automatic reel
- Belt buckle tensioner
- Seat belt height adjustment
- Anchor fitting tensioner
- Procedure
- Check components, replace if necessary
Seats
- Components
- Seat
- Airbag module
- Active head restraint
- Procedure
- Check seats (function check of seat mechanism), replace if necessary
- Check seat screw/bolt connections
- Replace gas generator of active head restraint If the severity of the crash has not caused any other damage to the seat, only the triggered gas generator needs to be replaced.
External feature: The triggered head restraint is folded forwards and engaged.
The repair work can be carried out in the vehicle with the rear panel removed. The entire system can be pushed back into its original position and the new gas generator installed.
The gas generator can be replaced up to 5 times.
- Replace airbag module and seat cover with upholstery
- Only I01: If one of the following criteria is fulfilled, the backrest frame must be replaced! (Part number of backrest frame: 52 10 7 388 646)
- Activated belt tensioner
- Activated end fitting pretensioner
- Outer cover unclipped by a side collision
- Outer cover ripped off by a side collision
- Faulty clip connection on outer cover caused by a side collision
Driver's airbag
- Components
- Airbag module
- Steering Wheel
- Steering column (if damaged)
- Procedure
- Check components, replace if necessary
- Replace steering wheel
Front-passenger airbag
- Components
- Airbag module
- Dashboard trim panel (must be replaced!)
- Supporting tube (if damaged)
- Procedure
- Check components, replace if necessary
Side airbag, front/rear
- Components
- Airbag module
- Door trim panel
- Door in white
- Seat
- Procedure
- Check components; replace if necessary
Head airbag
- Components
- Airbag module
- Cover, A-pillar
- Roofliner
- Cover, B-pillar (if damaged)
- Cover, C-pillar (if damaged)
- Connection/mount (on side frame)
- Procedure
- Check components, replace if necessary
Knee airbag
- Components
- Trim panel (driver's side)
- Lower section of glove box
- Knee protection (driver's and passenger's sides)
- Procedure
- Check components, replace if necessary
Passive knee protection
- Components
- Trim panel (driver's side)
- Glove box incl. knee protection (passenger's side)
- Procedure
- Check components for damage, replace if necessary
- Check retaining element
Removing and installing/replacing airbag unit
WARNING: Observe the following instructions to avoid any risk of injury by the airbag unit.
- Comply with safety regulations for handling components with gas generators.
- Do not exert any force on the airbag unit.
- Use only specified tools for releasing the airbag unit.
NOTE: Incorrect handling may result in triggering of the airbag unit and thereby cause serious injury.
IMPORTANT: STEERING WHEEL must be replaced if airbag unit has been triggered! Follow PROCEDURE AFTER AIRBAG DEPLOYMENT.
Necessary preliminary work:
- Disconnect BATTERY EARTH LEAD .
- If necessary, remove shift paddles.
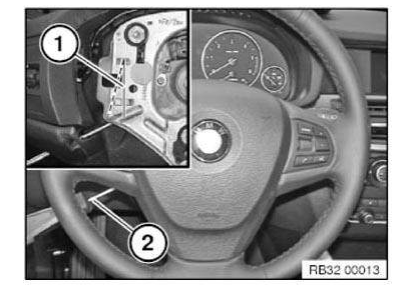
Insert Torx screwdriver T25 (2) at an angle into concealed opening on reverse side of steering wheel until a spring resistance is felt (approx. 1.5 cm).
Press spring leg (1) inward until airbag is unlocked.
Repeat procedure on other side.
Installation note:
Make sure electrical leads are correctly positioned.
Snap airbag unit with uniform pressing force plane-parallel in direction of steering column shaft into steering wheel.
WARNING: Danger of injury! Airbag unit may only be set down with the airbag itself facing upwards .
Tilt airbag unit forwards.
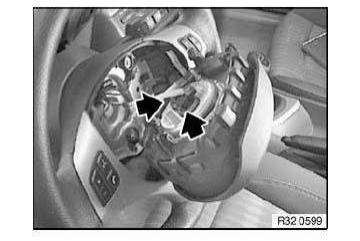
Disconnect plug connections and remove airbag unit.
Installation note: Connect plugs to connections of same color on airbag unit.
Removing and installing/replacing airbag unit (sports steering wheel)
WARNING: Observe the following instructions to avoid any risk of injury by the airbag unit.
- Comply with safety regulations for handling components with gas generators.
- Do not exert any force on the airbag unit.
- Use only specified release tool for the airbag unit.
NOTE: Incorrect handling may result in triggering of the airbag unit and thereby cause serious injury.
IMPORTANT: Steering wheel . Follow PROCEDURE AFTER AIRBAG DEPLOYMENT.
Necessary preliminary work:
- Disconnect BATTERY EARTH LEAD .
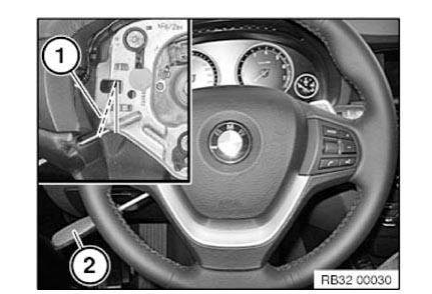
Insert Torx screwdriver (T25) (2) at an angle into concealed opening on reverse side of steering wheel until a spring resistance is felt (approx. 1.5 cm).
Press spring leg (1) inward until airbag is unlocked.
Repeat procedure on other side.
Installation note:
Make sure electrical leads are correctly positioned.
Snap airbag unit with uniform pressing force plane-parallel in direction of steering column shaft into steering wheel.
WARNING: Danger of injury! The airbag unit may only be set down with the airbag itself facing up .
Tilt airbag unit forwards.
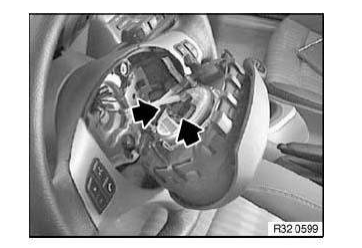
Disconnect plug connections and remove airbag unit.
Installation note: Connect plugs to connections of same color on airbag unit.
Safety regulations for handling components with gas generators
It is essential to comply with the regulations as specified in the law relating to the use of explosives when working on airbag units and seat belt tensioners.
Airbags, seat belt tensioners etc. are pyrotechnical objects. Pyrotechnical objects are assigned to different danger classes on the basis of the quantity of propellant that they contain. The assignment can be ascertained from the identification marking on the product:
IMPORTANT: Failure to comply with the warning notices and repair instructions for gas generator components can cause accidental deployment and result in injury and vehicle damage!
This applies in particular to the following components:
- Airbag modules (driver's/front passenger airbags, side airbags)
- Buckle/belt tensioner
- Head airbag
- Active knee protection
- Active head restraint
- Safety battery terminal
1. Regulations
The regulations quoted in the following refer to the Federal Republic of Germany.
In all other countries, the relevant legislation and regulations must be observed in each case. Country- specific legal regulations that go beyond this information or court decisions based thereon must be followed in each case or given precedence over these regulations.
The following components used by BMW:
- Pyrotechnical restraint systems are subject to danger class PT1
- Gas generators are pyrotechnical objects belonging to danger class T1
Handling, transporting and storing non-fired gas generators are subject to the "Explosive Materials Act" (law relating to the use of explosives dated 13/09/1976).
The relevant trade supervisory authority must be notified at least 2 weeks before pyrotechnical objects are handled for the first time. Here the relevant authority must be notified in writing of the person responsible (e.g. dealership owner, holder of general power of attorney or if necessary workshop supervisor). A certificate of qualification, i.e. specific training, is not required for the person responsible.
2. Dismantling and installation
- Inspection, testing and installation work may only be carried out by expert trained personnel in BMW Service.
- Work on components of the airbag system should only ever be carried out with the battery disconnected, the negative terminal post covered and the plug connection of the cable leading to the gas generator disconnected. If only the battery is disconnected, the following prescribed waiting period must be observed without fail:
- 30 min. for vehicles up to 9/93
- 1 min. for vehicles from 9/93 onward
- In the event of breaks in work, a component with a gas generator that has been removed must be secured against access by other persons.
- Individual components must never be repaired. Instead, always replace them.
- Do not treat airbag system components with cleaning agents or grease.
- Components of the airbag system must not be exposed to temperatures in excess of 75 ºC.
- Airbag system components, including electronic diagnostic components, which have been dropped from heights in excess of 0.5 m must not be reinstalled in the vehicles.
- Do not remove components of the airbag system from the original packaging until immediately before they are to be installed in the vehicle.
- Before installing, subject components such as housing, connector pins, etc. of the airbag system (including diagnosis electronics) to a visual inspection for damage and replace if necessary.
- Airbag system components may only be electrically tested while they are installed and only with the BMW ISTA.
- Danger of injury: The airbag module may only be set down with the airbag itself facing upwards .
Otherwise the alternator will be thrown upwards if it is ignited.
- Do not point the ignition squib of a gas generator at other persons.
- Components with gas generators must not be fired while they are removed. They must be disposed of by special disposal companies or returned to BMW in the packaging of the new components.
- When carrying out straightening and welding work with an electric welder:
- Disconnect battery
- Cover negative terminal (post)
- Avoid all contact with the skin when removing a fired airbag module - wear gloves. Wash with water after contact with the skin.
3. Transport
- Components with gas generators must be sent off in the packaging of the new components.
4. Storage
- Observe the regulations of the relevant trade supervisory authority and the applicable national regulations.
Test yourself
A quick BMW X3 quiz: every answer comes with an explanation and a link to the manual page.