Ignition wires, spark plugs
- Remove and install/replace all spark plugs (N52T)
- Removing and installing/renewing all spark plugs (N20, N26)
- Removing and installing/renewing all spark plugs (N55)
Remove and install/replace all spark plugs (N52T)
Special tools required:
- 12 1 171
Necessary preliminary tasks:
- Switch off ignition.
- Remove IGNITION COILS.
IMPORTANT: Wear safety goggles. Oil and dirt particles may get into your eyes!
Clean spark plug slot with compressed air.
1. Remove dirt contamination from the spark plug shaft. The plug shaft must be cleaned with compressed air after the ignition coils have been removed but before the spark plugs have been dismounted. After removing the spark plugs, check the sealing surface again for dirt contamination and if necessary, clean with a damp cloth or again with compressed air.
NOTE: Deposits that are not removed according to instructions may enter the combustion chamber and lead to uncontrolled combustion. Remaining deposits in the area of the spark plug seal can lead to leaks and to the spark plugs coming loose during engine operation.
2. Do not grease/oil thread or use any graphite or copper grease. Adhere to the torque values of the packaging information or regulation.
NOTE: If these instructions are not followed, especially with regard to greasing, this may result in mechanical damage to the spark plug housing/thread.
Spark plugs that are not tightened sufficiently lead to leaks and to the spark plugs coming loose during engine operation.
Unscrew spark plugs with special tool 12 1 171 and an extension with a joint.
Flexible ratchet extensions must always be used. If rigid mounting tools are used, there is a risk of insulator breakages.
NOTE: Also do not use a variable plug connection with locking capability as this also poses a risk of insulator breakages.
Installation note:
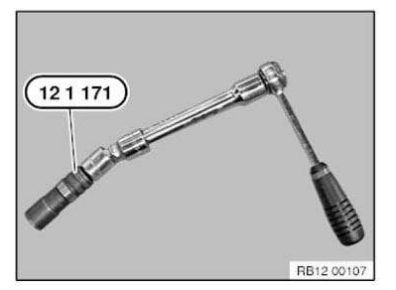
Do not let spark plugs fall into the spark plug shaft. This can lead to a reduction of the electrode gap and so impair the smooth running of the engine, especially in idle mode.
First, hand-tighten the spark plugs with special tool 12 1 171 and with an extension with a joint into the engine.
Then tighten the spark plugs using a torque wrench, special tool 12 1 171 and an extension with a joint.
Observe tightening torque.
Removing and installing/renewing all spark plugs (N20, N26)
Special tools required:
- 12 1 220
- 12 1 230
Necessary preliminary tasks:
- Switch off ignition.
- Remove IGNITION COILS.
- F20, F21, F22, F23, F30, F31, F32, F33, F34, F35, F36 only:
Remove tension struts.
IMPORTANT: Wear safety goggles.
Oil and dirt particles may get into your eyes!
Clean spark plug slot with compressed air.
1. Remove dirt contamination from the spark plug shaft. The plug shaft must be cleaned with compressed air after the ignition coils have been removed but before the spark plugs have been dismounted. After removing the spark plugs, check the sealing surface again for dirt contamination and if necessary, clean with a damp cloth or again with compressed air.
NOTE: Deposits that are not removed according to instructions may enter the combustion chamber and lead to uncontrolled combustion. Remaining deposits in the area of the spark plug seal can lead to leaks and to the spark plugs coming loose during engine operation.
2. Do not grease/oil thread or use any graphite or copper grease. Adhere to the torque values of the packaging information or regulation.
NOTE: If these instructions are not followed, especially with regard to greasing, this may result in mechanical damage to the spark plug housing/thread.
Spark plugs that are not tightened sufficiently lead to leaks and to the spark plugs coming loose during engine operation.
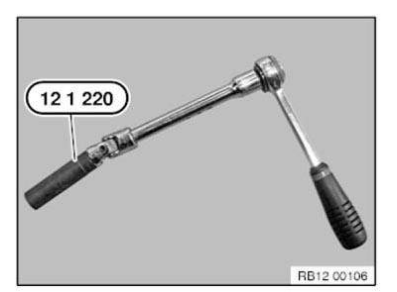
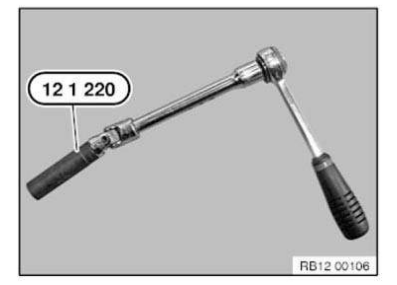
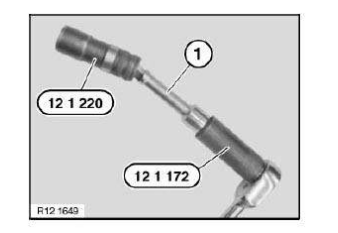
Unscrew spark plugs with special tool 12 1 220 and extension with min. 8º bend.
Flexible ratchet extensions must always be used. If rigid mounting tools are used, there is a risk of insulator breakages.
NOTE: Also do not use a variable plug connection with locking capability as this also poses a risk of insulator breakages.
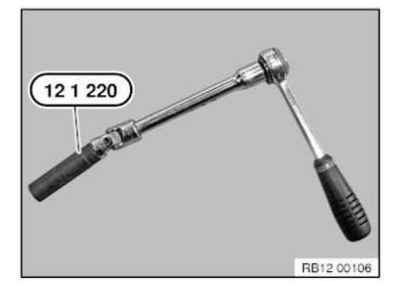
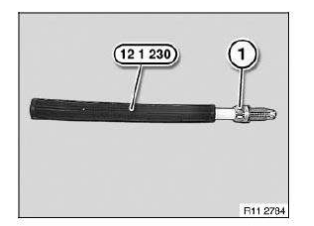
Attach new spark plug (1) to special tool 12 1 230 .
IMPORTANT: Do not let spark plugs fall into the spark plug shaft. This can lead to a reduction of the electrode gap and so impair the smooth running of the engine, especially in idle mode.
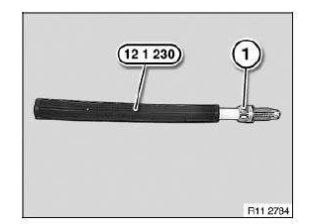
Screw spark plug into the plug thread hand-tight with special tool 12 1 230 until it reaches the limit position.
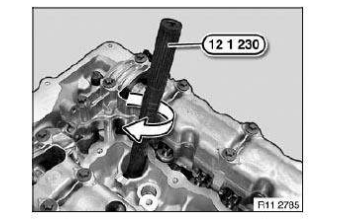
Installation note: Tighten spark plugs with torque wrench, special tool 12 1 220 and extension with min. 8º bend.
Flexible ratchet extensions must always be used. If rigid mounting tools are used, there is a risk of insulator breakages.
NOTE: Also do not use a variable plug connection with locking capability as this also poses a risk of insulator breakages.
Observe tightening torque.
Removing and installing/renewing all spark plugs (N55)
Special tools required:
- 12 1 220
- 12 1 230
Necessary preliminary tasks:
- Switch off ignition.
- Remove IGNITION COILS.
IMPORTANT: Wear safety goggles.
Oil and dirt particles may get into your eyes!
Clean spark plug slot with compressed air.
1. Remove dirt contamination from the spark plug shaft. The plug shaft must be cleaned with compressed air after the ignition coils have been removed but before the spark plugs have been dismounted. After removing the spark plugs, check the sealing surface again for dirt contamination and if necessary, clean with a damp cloth or again with compressed air.
NOTE: Deposits that are not removed according to instructions may enter the combustion chamber and lead to uncontrolled combustion. Remaining deposits in the area of the spark plug seal can lead to leaks and to the spark plugs coming loose during engine operation.
2. Do not grease/oil thread or use any graphite or copper grease. Adhere to the torque values of the packaging information or regulation.
NOTE: If these instructions are not followed, especially with regard to greasing, this may result in mechanical damage to the spark plug housing/thread.
Spark plugs that are not tightened sufficiently lead to leaks and to the spark plugs coming loose during engine operation.
Unscrew spark plugs with special tool 12 1 220 and extension with min. 8º bend.
Flexible ratchet extensions must always be used. If rigid mounting tools are used, there is a risk of insulator breakages.
NOTE: Also do not use a variable plug connection with locking capability as this also poses a risk of insulator breakages.
Attach new spark plug (1) to special tool 12 1 230 .
IMPORTANT: Do not let spark plugs fall into the spark plug shaft. This can lead to a reduction of the electrode gap and so impair the smooth running of the engine, especially in idle mode.
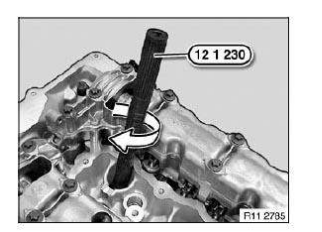
Screw spark plug with special tool 12 1 230 hand-tight into cylinder head plug thread as far as it will go.
Installation note: Tighten spark plugs with torque wrench, special tool 12 1 220 and extension with min. 8º bend.
Flexible ratchet extensions must always be used. If rigid mounting tools are used, there is a risk of insulator breakages.
NOTE: Also do not use a variable plug connection with locking capability as this also poses a risk of insulator breakages.
Observe tightening torque.
Test yourself
A quick BMW X3 quiz: every answer comes with an explanation and a link to the manual page.