Engine Mounts
GENERAL INFORMATION.
Warning.
To avoid injury, carefully check the correct installation and secure attachment of the engine to the engine hoist crossbar
installed above the engine compartment.
installed above the engine compartment.
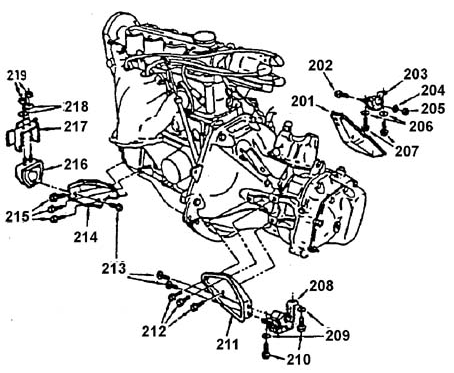
Engine assembly. Engine mounts
201. REAR MOUNT BRACKET.
202. REAR MOUNT BOLT (TORQUE 65 N·m).
203. REAR MOUNT.
204. WASHER.
205. NUT.
206. WASHER.
207. BOLT (TORQUE 25 N·m).
208. FRONT LEFT MOUNT.
209. WASHER.
210. BOLT (TORQUE 75 N·m).
211. FRONT LEFT MOUNT BRACKET.
212. BOLT (TORQUE 60 N·m).
213. BOLT (TORQUE 60 N·m).
214. FRONT RIGHT MOUNT BRACKET.
215. BOLT (TORQUE 65 N·m).
216. FRONT RIGHT MOUNT.
217. FRONT RIGHT MOUNT HOLDER.
218. WASHER.
219. NUT (TORQUE 40 N·m).

Engine mounting crossbar
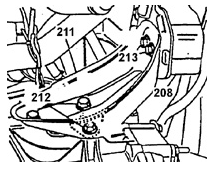
Front left engine mount.
208. FRONT LEFT MOUNT.
211. FRONT LEFT MOUNT BRACKET.
212. BRACKET-TO-TRANSMISSION CASE BOLT (TORQUE 60 N·m).
213. BRACKET-TO-MOUNT BOLT (TORQUE 60 N·m).
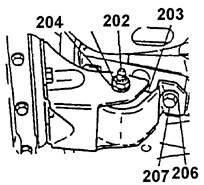
Rear engine mount
202. REAR MOUNT BOLT (TORQUE 65 N·m).
203. REAR MOUNT.
204. WASHER.
205. NUT.
206. WASHER.
207. BOLT (TORQUE 25 N·m).
Inspection
PROCEDURE.
1. Raise the engine to relieve the load on the mount rubber cushions.
2. Check the rubber cushion surfaces for cracks caused by overheating.
3. Check for separation of the rubber cushions from the plates.
4. Check for cracks and tears in the middle of the cushions.
5. Check for loose bolts and nuts.
Remove or disconnect:
PROCEDURE.
1. Disconnect the negative battery cable.
2. Suspend the engine from the crossbar.
3. Bolt 213, front right mount.
4. Bolts 215, front right mount.
5. Nuts 219 and washers 218, front right mount.
6. Bolts 213, front left mount.
7. Bolts 212, front left mount.
8. Bolts 210 and washers 209, front left mount.
9. Remove nut 205, bolt 202, washer 204 and rear mount bracket..
10. Remove bolts 207, washers 206 and rear engine mount from vehicle..
Installation
PROCEDURE.
1. Bolt 202, washer 204, nut 205 of rear mount..
2. Bolts 207, washers
206..
3. Install front left mount bracket with bolts 212 (tightening torque 60 N·m).
4. Install bracket 211 with bolts 213 (tightening torque 60 N·m).
5. Bolts 210 with washers
209..
6. Bolt 213 of right front mount..
7. Bolts 215 of right front mount bracket..
8. Nuts 219 and washers
218..
9. Remove crossmember..
10. Tighten bolts and nuts to specified torque, observing the
sequence: bolts 202, 207, 210, nut
219..
11. Negative battery cable.
Test yourself
A quick Daewoo Nexia quiz: every answer comes with an explanation and a link to the manual page.