Crankshaft
GENERAL INFORMATION
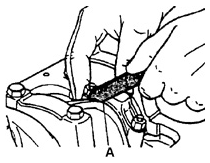
Checking connecting rod side clearance A. MEASURING CONNECTING ROD SIDE CLEARANCE
Remove or disconnect:
PROCEDURE.
1. Engine..
2. Drain oil..
3. Install engine on stand..
4. Remove spark plugs
20..
5. Pulley 145 with hub..
6. Timing belt cover..
7. Timing belt 44, loosening the water pump mounting bolts.
8. Flywheel
116..
9. Oil pan
125..
10. Crankshaft gear 141..
11. Rear timing belt cover..
12. Oil pump
137..
13. Connecting rod caps 157 with bearing shells, marking beforehand..
14. Move pistons 160 with connecting rods 159 away from the crankshaft journals..
15. Main bearing caps 122 with bearing shells 120 and
121. Preliminarily
mark the parts..
16. Crankshaft..
Clean.
PROCEDURE.
1. Oil, dirt and carbon deposits..
2. Oil passages from plugs and deposits.
Inspection
PROCEDURE.
1. Keyway.
2. Threads.
3. Bearing journals and thrust flanges for presence of
– cracks.
– metal flaking.
– pitting.
– roughness.
– grooves.
– signs of overheating.
Warning.
Inspect the corresponding bearing shells for embedded foreign particles.
If such defects are found, determine the origin of these
foreign particles..
If there are cracks or other deep defects on the working surfaces,
the crankshaft must be replaced. Small irregularities can be smoothed with fine
emery cloth moistened with engine oil. Scores are removed with a fine
grinding stone..
Measure
PROCEDURE.
Crankshaft journals. Measure taper and out-of-round (ovality) using a dial gauge or micrometer.
If the dimensions and shape of the journals are within the specified limits, record the measurement results for subsequent selection of the bearing shell set. If the condition of the journals is
unsatisfactory, the shaft can be restored by regrinding the journals.
Shafts with rolled fillets must be replaced..
Warning.
Check the position of the main bearing lugs. If they are located
not in line, the crankshaft is bent and must be replaced..
Installation
PROCEDURE.
1. New bearing shells 120, 121, crankshaft
119..
2. Main bearing caps 122 with new bearing shells. Do not tighten bolts 123. Lubricate the bearing shells with oil beforehand..
3. Install connecting rod big ends with new bearing shells 158 onto the crankshaft journals.
4. Connecting rod caps with new bearing shells. Do not tighten connecting rod bolts
156..
Lubricate the bearing shells with oil beforehand..
5. Center the thrust bearings by lightly tapping the ends of the crankshaft with a hammer with a rubber head
121..
6. Tighten the main bearing bolts to 50 N·m torque, then tighten additionally.
tighten them by turning through an angle of 45°–60°. Check the crankshaft end play. It
should be within 0.07–0.30 mm..
7. Tighten the connecting rod bearing cap bolts to 25 N·m, then tighten additionally.
tighten them by turning through an angle of 30°..
8. Measure the side clearance of all connecting rods. The clearance should be within 0.07–0.
242 mm..
9. Oil pump
137..
10. Install a new front crankshaft seal using special tool KM-
417..
11. Rear timing belt cover..
12. Crankshaft gear
141..
13. Oil pan
125..
14. New rear seal
117..
15. Flywheel. Tighten the bolts to 35 N·m, then tighten additionally.
by turning through an angle of 30°–45°..
16. Timing belt and cover..
17. Pulley. Tighten the bolts to 55 N·m..
18. Spark plugs..
19. Install the engine in the vehicle..
20. Fill the engine oil.
Test yourself
A quick Daewoo Nexia quiz: every answer comes with an explanation and a link to the manual page.