Engine Mount Components
GENERAL INFORMATION
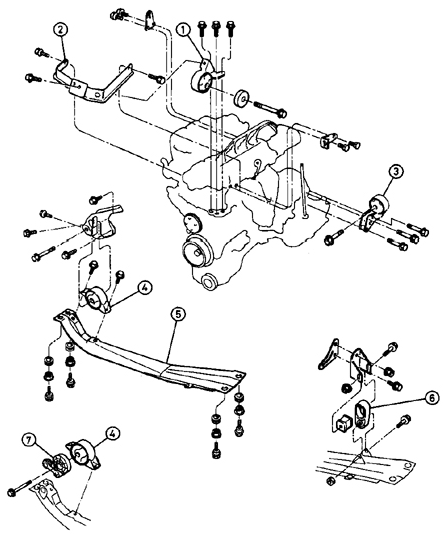
Engine Mounting Components
1. Right engine mount.
2. Right bracket.
3. Front mount.
4. Rear mount.
5. Side member.
6. Front mount (for manual transmission).
7. Torque rod (for manual transmission).
Inspection
PROCEDURE
1. Raise the vehicle and place it on support stands.
2. Check the mounts for cracks, hardening, or separation of the rubber from the metal base. If any of the above damage is found, replace the mount.
3. Using a torque wrench, check the tightness of all threaded connections of the mounts.
4. Check the mounts for wear by rocking the engine or the mount. If excessive play is found in the mounts, replace the worn parts after first checking the tightness of the bolts and nuts.
Replacement RIGHT ENGINE MOUNT
PROCEDURE
1. Disconnect the battery ground cable.
2. Raise the engine with a jack.
3. Remove the three bolts and the right mount bracket.
4. Remove the nut, the through bolt and the three bolts, then remove the right engine mount. Remove the rubber cushions.
5. If necessary, remove the bolts and the right mount bracket.
6. Carefully inspect all mount components for signs of wear or damage, and replace any worn parts.
7. Install the bracket and tighten the bolts.
8. Install the rubber cushions, making sure the cushion pins engage the corresponding holes in the bracket. Install the mount and tighten the bolts to the specified torque.
9. Align the support with the body bracket, insert the through bolt and tighten the nut to the specified torque. Remove the jack.
10. Install the upper bracket of the right support and tighten the bracket mounting bolts to the specified torque.
11. Connect the battery ground cable.
LEFT ENGINE MOUNTING
PROCEDURE
1. Remove the battery (refer to subsection 7.2).
2. Raise the engine with a jack.
3. Remove the nut, through bolt and three mounting bolts, then remove the right mounting. Remove the rubber cushions.
4. Carefully inspect all mounting components for signs of wear or damage. Replace worn parts.
5. Install the bracket and tighten the bolts.
6. Install the rubber cushions, making sure the cushion pins engage the corresponding bracket holes, then install the mounting. Tighten the bracket-to-transmission mounting bolts to the specified torque.
7. Align the left mounting with the bracket, then insert and tighten the through bolt.
8. Remove the jack, install the battery.
FRONT ENGINE MOUNTING
PROCEDURE
1. Apply the parking brake, raise the front of the vehicle and support it on safety stands. Disconnect the battery ground cable.
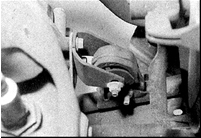
2. On vehicles with a manual transmission, mark the position of the front mounting through bolt on the bracket.
3. Raise the engine with a jack.
4. Remove the nut and withdraw the through bolt.
5. Remove the bolts and remove the front mounting bracket.
6. Carefully inspect all mounting components for signs of wear or damage. Replace parts as necessary. On vehicles with a manual transmission, press the cushion out of the center member (if necessary) and install a new cushion, lubricating it with soapy water.
7. Install the bracket on the engine and tighten the bolts to the specified torque.
8. Insert the mounting through bolt and tighten the nut slightly. Position the power unit so that the through bolt aligns exactly with the mark made before removal, then tighten the through bolt to the specified torque.
9. Remove the jack.
10. Lower the vehicle, connect the battery ground cable.
REAR ENGINE MOUNTING
PROCEDURE
1. Apply the parking brake, raise the front of the vehicle and support it on safety stands. Disconnect the battery ground cable.
2. Remove the nut and withdraw the through bolt.
3. Remove the bolts and remove the rear mounting bracket.
4. Remove the two bolts and remove the mounting from the center member. Remove the torsion bar (on vehicles with a manual transmission).
5. Carefully inspect all mounting components for signs of wear or damage. Replace damaged parts.
6. Install the rear mounting on the member and tighten the bolts.
7. Install the rear mounting bracket and tighten the bolts.
8. Align the rear mounting with the bracket, insert the through bolt and tighten the nut to the specified torque.
9. Lower the vehicle.
10. Connect the battery ground cable.
Test yourself
A quick Nissan Sunny quiz: every answer comes with an explanation and a link to the manual page.