Cylinder Block
GENERAL INFORMATION
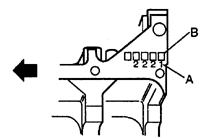
Cylinder bore and crankshaft main bearing size group identification A. Cylinder bore size group identification B. Crankshaft main bearing size group identification
Cleaning
PROCEDURE
1. Remove all attached components from the cylinder block and unscrew the sensors. Remove the plugs: drill holes in the plugs, screw in self-tapping screws into them, and pull them out with pliers by the screw heads.
2. Carefully clean the cylinder block of residual gasket material.
3. Remove all oil gallery plugs (if equipped). These plugs are screwed in very tightly, so it may be necessary to drill them out and then retap the threads. Replace all plugs during engine assembly.
4. If the cylinder block surface is heavily contaminated, steam cleaning will be required.
5. After steam cleaning, clean the oil holes and passages again. Flush all internal passages of the cylinder block with warm water until clean water runs out. Thoroughly dry the block and lubricate all mating and machined surfaces to prevent corrosion.
6. If the cylinder block surface is moderately dirty, washing the block with hot soapy water is sufficient.
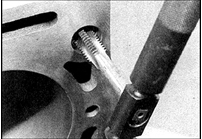
7. Clean the threaded holes and chase the threads with a tap.
8. Install new plugs after applying sealant to them.
9. If engine assembly is delayed, lubricate the cylinder block surfaces and cover the entire block with polyethylene film.
Inspection
PROCEDURE
1. Visually inspect the cylinder block for cracks and signs of corrosion. Check the condition of threads in the holes and mark locations with stripped threads. If coolant leakage inside the cylinder block is suspected, the block must be pressure tested at a workshop. If defects are found, repair the block (if possible) or replace it.
2. Check the cylinder bores for chips and scoring. Check for a ridge at the top of the cylinder, which indicates excessive cylinder wear.
3. Check the inner cylinder surfaces for chips and scoring.
4. Measure the cylinder bore diameter 10 mm from the edge of the cylinder, parallel and perpendicular to the engine axis. Repeat the measurements at 60 mm and 100 mm from the edge of the cylinder. Use these six measurements to determine the taper and out-of-round of the cylinder.
NOTE: The size group designation is stamped on the base of the cylinder block on the flywheel side. Two sets of markings are applied: four digits indicating the cylinder bore size group, and a fifth digit that refers to the crankshaft main bearing bores in the cylinder block. The first number in the cylinder designation indicates the size group of cylinder No. 1, and the fourth indicates the size group of cylinder No. 4 (see figure: Cylinder bore and crankshaft main bearing size group identification).
5. Check the condition of the pistons and rings. Determine the piston-to-cylinder clearance as the difference between the measured cylinder bore diameter and the piston diameter.
6. Compare the results with the specifications. If any measured value is outside the specified limits, bore the cylinder to the next oversize. If this is not possible, replace the cylinder block. To determine the most appropriate next steps, consult a specialist.
7. If the condition of the pistons and cylinders is satisfactory and the wear is such that the piston-to-cylinder clearance is within specification, only the piston rings need to be replaced.
8. In this case, the cylinders are only honed. Honing ensures better piston ring seating and a proper seal against the cylinder walls (performed at a service station).
Test yourself
A quick Nissan Sunny quiz: every answer comes with an explanation and a link to the manual page.