Camshaft Drive Chains
GENERAL INFORMATION
WARNING: The camshaft drive mechanism in early-production engines has a horizontal guide plate and an upper chain damper, which are not present in later-production engines.Removal
PROCEDURE
1. Set the No. 1 piston to TDC on the compression stroke.
2. Remove the cylinder head cover.
3. Remove the front cover (Refer to Sub-section 3.1.1.6).
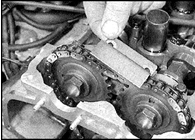
4. On early-production vehicles, remove the bolts and the upper chain guide plate.
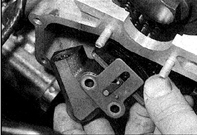
5. Hook the tensioner shoe with a hook, pull it away from the upper chain and hold it in this position. Remove the two bolts and the tensioner shoe.
6. On later-production engines, move the tensioner shoe away from the upper chain and secure it by inserting a rod. Remove the two bolts and the shoe.

7. Hold the camshaft with a wrench on the flats at the front, and remove the camshaft sprocket bolts.
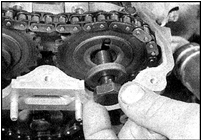
8. Remove the bolts together with the washers.
9. Disengage both camshaft sprockets from the chain and remove the sprockets.
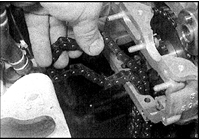
10. Disengage the upper chain from the intermediate sprocket and remove it from the cylinder head.
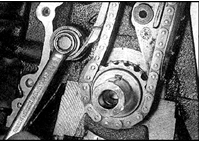
11. Remove the lower chain tensioner shoe pivot bolt and remove the shoe.
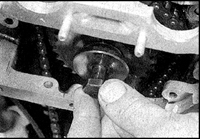
12. Remove the intermediate sprocket bolt, remove the bolt together with the washer, and remove the sprocket and shaft.
13. Remove the lower chain from the crankshaft drive sprocket and remove it from the engine.
14. Remove the crankshaft drive sprocket and the key from the crankshaft nose (if loose). Store the key together with the sprocket.
WARNING: Do not rotate the crankshaft while removing the camshaft drive chains.
Inspection
PROCEDURE
1. Check the drive, driven and intermediate sprockets for signs of wear and damage such as chipping, hooking or missing teeth. If any of these signs of wear or damage are found, replace all sprockets and both chains. Chains and sprockets are replaced as a set.
2. Inspect the chain links and check roller wear. Chain wear can be determined by the deflection in the horizontal plane. A new chain has almost no deflection. If there is noticeable lateral play in the chain links, replace both chains.
3. Note that the chain must also be replaced, regardless of external signs of wear, after high mileage, or if noticeable noise is heard from the chains with the engine running. It is strongly recommended to replace the chain together with the sprockets. Otherwise, if a new chain is installed on worn sprockets, wear of the new chain will increase. If the condition of the chains and sprockets is doubtful, consult a qualified Nissan service center.
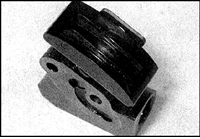
4. Check the tensioners and dampers for signs of wear or damage. Replace these parts if any defects are found (photo: chain tensioner with signs of wear).
5. Check the upper chain tensioner shoe and make sure the tensioner plunger moves freely inside the shoe. Check the condition of the tensioner spring by comparing it with a new one. If the shoe pad is damaged or worn, or if the spring condition is doubtful, replace the tensioner.
Installation
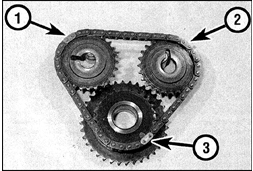
Upper chain, identification links and alignment marks
1. Mark on the intake camshaft sprocket and the corresponding chain link
2. Mark on the exhaust camshaft sprocket and the corresponding chain link
3. Mark on the intermediate sprocket and the corresponding chain link
PROCEDURE
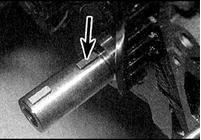
1. Make sure the No. 1 piston is at TDC on the compression stroke (the keyway on the crankshaft nose must face straight up when viewed from the right side of the engine). Insert the key into the keyway on the crankshaft nose (in the direction of the arrow).

2. Orient the drive sprocket so that the alignment mark faces away from the crankshaft. Align the keyway in the sprocket with the key and install the sprocket onto the crankshaft nose.
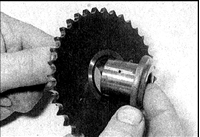
3. Lightly lubricate the intermediate sprocket shaft with fresh engine oil and install the sprocket onto the shaft so that the shaft flange faces the cylinder block. Engage the intermediate sprocket with the lower chain, aligning the outer alignment mark with one of the silver-colored links.

4. Install the chain together with the intermediate sprocket so that the second link with distinctive color aligns with the alignment mark on the crankshaft drive sprocket. The alignment mark is a small groove on the drive sprocket hub (indicated by the arrow).
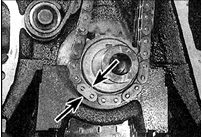
5. Make sure the marks (indicated by arrows) on the intermediate and drive sprockets are aligned with the silver-colored chain links.
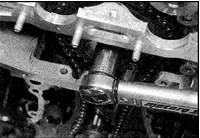
6. Install the intermediate sprocket bolt with washer and tighten to the specified torque.
7. The upper timing chain has three colored links, each corresponding to an alignment mark on each of the sprockets the chain engages. The colored links are spaced at different intervals. On early engines, all three links are silver-colored. The first colored link (which must align with the mark on the intake camshaft sprocket) is spaced 16 rollers from the second colored link (which aligns with the mark on the exhaust camshaft sprocket), and the third colored link is spaced 22 rollers from the first (see illustration: Upper Chain, Distinguishing Links and Alignment Marks).
8. On later engines, the intervals between the colored links of the upper chain are equal, and the link corresponding to the alignment mark on the intermediate sprocket is gold-colored (the other links are silver-colored and must align with the marks on the driven camshaft sprockets).
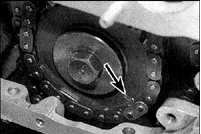
9. With reference to step 7, install the upper chain so that the colored links face outward. Install the chain on the intermediate sprocket, aligning the corresponding link with the mark (indicated by arrow) on the sprocket.

10. Install the camshaft sprockets with the alignment marks facing outward (both driven sprockets are identical). Install the chain so that the silver-colored links align with the alignment marks. Make sure that all differently colored links of the upper chain are precisely aligned in the center with the corresponding marks on the sprockets (arrow).
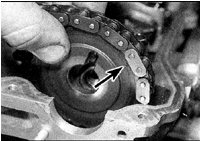
11. Orient the camshaft sprockets by aligning the slots with the locating pins. Again make sure that all colored links of the upper chain are aligned with the corresponding marks on the sprockets (arrow). If alignment is lost, disengage the sprockets from the chain and realign.

12. Tighten the sprocket bolts to the specified torque.
13. Install the lower chain tensioner shoe and tighten the shoe pivot bolt to the specified torque.

14. On early engines, install the upper chain guide rail on the cylinder head and tighten the rail bolts to the specified torque. Install the upper chain tensioner on the cylinder head after pressing it back and securing it in this position with a hook. Tighten the tensioner bolts to the specified torque, then remove the hook. Make sure the tensioner shoe pad is pressing firmly against the chain.
15. On later engines, move the tensioner shoe pad aside and hold it in this position with a rod. Install the tensioner on the cylinder head and tighten the mounting bolts to the specified torque. Remove the rod and make sure the tensioner shoe pad is pressing firmly against the chain.
16. Install the cylinder head cover.
17. Install the camshaft timing chain cover.
Test yourself
A quick Nissan Sunny quiz: every answer comes with an explanation and a link to the manual page.