Valve Clearance
GENERAL INFORMATION
WARNING: Valve clearances must be checked only on a warm engine. The manufacturer specifies nominal clearances for both warm and cold engines. Cold engine clearances are checked only before starting the engine after an engine overhaul. After the engine has warmed up, the clearances must be checked again.Valve clearances are checked and adjusted only after significant vehicle mileage, after an engine overhaul, or when searching for the cause of engine power loss when a valve train malfunction is suspected.
PROCEDURE
1. Check the clearances only if there is excessive noise from the valve train, after an engine overhaul, or when searching for the cause of engine power loss when a valve train malfunction is suspected.
2. Sketch the engine outline on a sheet of paper and indicate the positions of cylinders 1 through 4, noting that cylinder 1 is located on the timing chain cover side. Indicate the position of each valve and write the clearance that must be maintained according to the specifications. Next to the valve drawing, draw two lines in which the measured clearance and the amount by which the clearance must be corrected will be recorded.
WARNING: The manufacturer specifies two groups of valve clearance tolerances. One group is for checking clearances, and the other is for adjusting and setting valve clearances. The checking group tolerances are the widest; however, it is strongly recommended to keep all clearances within the adjusting group tolerances (although this is not strictly required).
3. Warm up the engine, turn the ignition off, and remove the cylinder head cover.
4. Set the No. 1 piston to top dead center on the compression stroke.
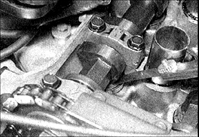
5. Measure the clearance between the camshaft lobe and the tappet with a feeler gauge for the following valves, recording each result: – Cylinder 1 – intake and exhaust valves; – Cylinder 2 – intake valves; – Cylinder 3 – exhaust valves.
6. Turn the crankshaft clockwise 360°, aligning the TDC mark with the pointer. In this crankshaft position, the No. 4 piston is at top dead center on the compression stroke.
7. Measure the clearance for the following valves, recording each result: – Cylinder 2 – exhaust valves; – Cylinder 3 – intake valves; – Cylinder 4 – intake and exhaust valves.
8. Calculate and record the difference between the measured clearance and the specified clearance. If the clearance of any valve differs from the specification, replace the adjusting shim of that valve with a new shim of the correct thickness.
9. To remove the adjusting shim, depress the tappet a sufficient distance against the valve spring force. To do this, rotate the camshaft so that the lobe of the corresponding valve faces away from the tappet. Then rotate the tappet so that its slot is positioned at a right angle to the camshaft axis.
10. Place an open-end wrench or a strong screwdriver against the camshaft and, using it as a lever, depress the tappet a sufficient distance for the shim to slide out. After removing the shim, slowly release the tappet. If the shim cannot be removed, the camshaft will need to be removed (refer to Subsection 3.1.1.10).
11. The shim thickness is marked on its lower surface (for example, 224 means 2.24 mm thickness); however, it is recommended to measure the shim with a micrometer, as the thickness may decrease due to wear. WARNING: Replacement shims are supplied in thicknesses from 2.00 to 2.98 mm in 0.02 mm increments.
12. If the measured clearance is less than the specified clearance, subtract the measured clearance from the specified clearance, then subtract the result from the thickness of the removed shim.
Example: Intake valve clearance is less than specification. Measured clearance 0.26 mm. Specified clearance 0.36 mm (0.32 to 0.40 mm). Difference 0.10 mm. Installed shim thickness 2.50 mm. Required thickness 2.50 - 0.10 = 2.40 mm.
13. If the measured clearance exceeds the specified clearance, subtract the specified clearance from the measured clearance, then add the result to the thickness of the removed shim. Example: Exhaust valve clearance exceeds specification. Measured clearance 0.51 mm. Specified clearance 0.41 mm (0.37 to 0.45 mm). Difference 0.10 mm. Installed shim thickness 2.76 mm. Required thickness 2.76 + 0.10 = 2.86 mm.
14. Depress the tappet, then install the adjusting shim of the selected thickness with the marked side facing down. Make sure the shim is installed correctly, then repeat the procedure for the remaining valves whose clearances differ from the specification (if any).
15. After completing the clearance adjustment, rotate the crankshaft at least 4 revolutions in the normal direction of rotation. Check the valve clearances again.
16. If all clearances are within specification, install the cylinder head cover and install the other removed parts.
Test yourself
A quick Nissan Sunny quiz: every answer comes with an explanation and a link to the manual page.