Pistons and Connecting Rods
Removal
PROCEDURE
1. Remove the timing chains, cylinder head and oil pan.
2. If a ridge has formed at the top of the cylinders, remove it with a reamer or scraper without damaging the cylinder wall. A ridge indicates excessive cylinder wear.
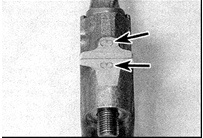
3. The cylinder number to which the connecting rod belongs must be stamped on the connecting rod and rod cap (indicated by arrows). Cylinder No. 1 is on the front cover side. If the numbers are not visible, mark them with paint or punch them. Apply marks on the machined side face of the rod and cap.
4. Set the pistons of No. 1 and No. 4 cylinders to TDC.
5. Unscrew the nuts of the No. 1 cylinder connecting rod cap. Remove the cap and take out the lower connecting rod bearing. If the bearing will be reinstalled, tape it to the removed cap.
6. Wrap tape over the threads of the connecting rod cap bolts.
7. Using the handle of a hammer, push the piston into the cylinder and remove the piston through the top of the cylinder block. Remove the upper connecting rod bearing and tape it to the removed connecting rod.
8. Install the cap on the connecting rod and secure with nuts, maintaining the original assembly order of the parts.
9. Repeat the above operations to remove the connecting rod with the piston of No. 4 cylinder.
10. Similarly, remove the connecting rods with pistons from No. 2 and No. 3 cylinders.
Test yourself
A quick Nissan Sunny quiz: every answer comes with an explanation and a link to the manual page.