Connecting Rod Bearing Clearance Installation and Inspection
GENERAL INFORMATION
Warning: This description applies only to standard size connecting rod bearings. Replacement connecting rod bearing inserts are not divided into size groups. New connecting rod bearings are selected by the size group codes marked on the crankshaft.Size group codes are marked on the No. 1 or No. 4 crankshaft counterweight.
To select connecting rod bearing inserts, determine the size group of the crankshaft connecting rod journal for the given cylinder, then use the supplied table to select the correct insert, based on the color code marked as a dot on the side surface of the insert.
Crankshaft code / Bearing insert size group color code: 0 - white (or no mark); 1 - brown; 2 - green
Connecting Rod Bearing Clearance Inspection
PROCEDURE
1. Clean the outer surface of the connecting rod bearing inserts and the bores for the inserts in the connecting rods and rod caps.
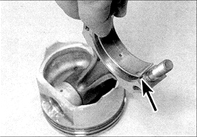
2. Install the inserts and make sure the tabs on the bearing inserts engage the recesses in the connecting rod (arrow) and in the rod cap.
3. When installing the inserts, do not touch the working surface. Make sure the oil hole in the upper connecting rod bearing insert aligns exactly with the hole in the connecting rod.
4. If the clearance check will be performed with used inserts, reinstall the inserts in their original positions.
5. The connecting rod bearing clearance can be checked in two ways.
6. When determining the clearance using the first method, assemble the caps with the connecting rods and connecting rod bearings, making sure these parts are correctly oriented relative to each other.
7. Tighten the cap nuts to the specified torque and measure the inside diameter of each assembled pair of inserts. The clearance is the difference between the inside diameter of the assembled connecting rod bearings and the diameter of the connecting rod journal.
8. The second method (more accurate) uses plastic gauge wire.
9. Install the connecting rod bearings, orienting them correctly. Place a piece of gauge wire on each crankshaft connecting rod journal.
10. Clean the surfaces of the connecting rod bearing inserts and install the connecting rods onto the corresponding crankshaft journals. Install the connecting rod bearing caps, orienting them by the marks present or the marks made during disassembly.
11. Tighten the cap nuts. Do not allow the wire to move during tightening, and do not rotate the crankshaft.
12. Remove the connecting rod caps without rotating the crankshaft or moving the gauge wire. Compare the width of the flattened wire with the scale on the packaging and determine the clearance of the connecting rod bearings.
13. If the clearance differs from the specification, the cause may be incorrect selection of connecting rod bearing inserts (or excessive wear if used inserts were checked).
14. Before concluding that the inserts must be replaced, make sure there was no dirt or oil between the surfaces of the caps or rods and the insert during measurement.
15. If the width of the flattened wire is greater at one edge, this indicates taper of the connecting rod journal.
16. If the clearance differs from the specification when measured with used inserts, repeat the measurement with new inserts.
17. If the clearance still exceeds the specification with new inserts, consult an automotive service facility. Regrinding of the crankshaft connecting rod journals and installation of undersize bearing inserts may be required.
18. If necessary, obtain inserts of the correct size group and repeat the connecting rod bearing clearance measurement procedure.
19. When finished, carefully remove all remaining gauge wire.
Connecting Rod and Piston Assembly Installation: The following description assumes that the crankshaft is already installed.
PROCEDURE
1. Make sure the connecting rod bearings are installed correctly.
2. If new bearings will be installed, wash them in kerosene.
3. Wipe the connecting rods and bearings dry.
4. Lubricate the cylinders, pistons and rings, then lay out the piston and connecting rod assemblies in the order in which they will be installed in the engine.
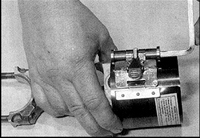
5. Begin assembly with cylinder No. 1. Make sure the piston ring end gaps are correctly staggered (see subsection 3.1.2.13) and compress the rings with a special ring compressor.
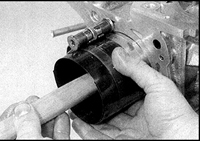
6. Insert the piston and connecting rod assembly into cylinder No. 1. Orient the piston so that the mark on the piston crown (arrow or line) faces the front cover. Lightly tap the piston with the handle of a hammer or a wooden block until the piston enters the cylinder and the piston crown is flush with the cylinder block mating surface.
7. Make sure the connecting rod bearing inserts are installed correctly, then generously lubricate the inserts and the crankshaft connecting rod journal.
8. Carefully pull the connecting rod onto the crankshaft journal, taking care not to damage the cylinder wall.
9. Install the connecting rod cap with the bearing insert and tighten the nuts by hand. Note that the marked surfaces on the connecting rod and the rod cap must align (this means the locating tabs of the connecting rod bearings are positioned opposite each other).
10. Tighten the connecting rod cap nuts to the Stage 1 torque using a torque wrench and a socket. Then turn the nuts an additional Stage 2 angle, or tighten them to the Stage 2 torque.
11. Check the crankshaft for free rotation. If new parts are installed, a noticeable constant resistance to crankshaft rotation should be felt; however, the crankshaft must turn smoothly, without binding.
12. Install the remaining pistons and connecting rods in the same way.
13. Install the cylinder head, camshaft chains and oil pan.
Test yourself
A quick Nissan Sunny quiz: every answer comes with an explanation and a link to the manual page.