Power unit with manual transmission
Removal Warning The engine may be removed from the vehicle only together with the power unit (i.e., as an assembly with the transmission). The power unit is lowered and removed from under the vehicle. To remove the engine this way without obstruction, raise the vehicle to a height of at least 75 cm (from floor to front bumper) and support it on stands.
PROCEDURE
1. Park the vehicle on a firm, level surface. Chock the rear wheels and apply the parking brake. Raise the front of the vehicle and support it on stands.
2. Remove the front wheels.
3. Remove the screws and all engine undercovers.
4. Remove the hood (see subsection 13.7).
5. Drain the engine coolant.
6. Drain the transmission oil, install and tighten both plugs.
7. Drain the engine oil and remove the oil filter. Clean and tighten the drain plug.
8. Remove the battery.
9. Remove the expansion tank with bracket.
10. Remove the drive belts.
11. Remove the alternator.
12. On vehicles equipped with air conditioning, unbolt the compressor, move it aside and secure it. Do not disconnect the air conditioning hoses.
13. Remove the power steering pump (see subsection 12.15).
14. Remove the brake calipers, move them aside and secure them without disconnecting the hoses.
15. Disconnect the CV joints from the hubs.
16. Disconnect the drive shafts (see subsection 10.2).
17. Disconnect the gear shift rods and the clutch cable from the transmission.
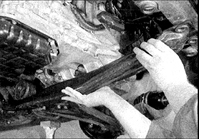
18. Remove the side member.
19. Disconnect the exhaust pipe from the muffler.
20. Remove the radiator with the hoses and fans.
21. Disconnect the stabilizer bar (see subsection 12.6).
22. On carbureted engines, remove or disconnect the following parts and assemblies: – air cleaner; – fuel hoses; – throttle cable; – carburetor wiring; – vacuum booster hose, cooling system hoses and other sensor and valve hoses; – intake manifold stand; – exhaust gas sensor connector.
23. On fuel-injected engines, perform the following: – remove the air cleaner intake duct; – relieve the fuel system pressure, disconnect the fuel hoses from the throttle body; – disconnect the throttle cable; – disconnect the wiring harness connectors; – move the wiring harness away from the engine.
24. Disconnect all hoses from the intake manifold.
25. Remove the intake manifold stand.
26. Mark the positions and disconnect the heater hoses and cooling system hoses from the engine.
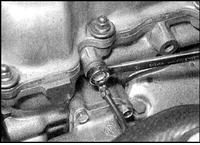
27. Disconnect the wiring harness connectors from the distributor, ignition coil and electronic ignition module. Release the wiring harness from the clamps on the cylinder head and move it aside. Remove the bolts and all ground wires from the cylinder head and intake manifold.
28. Disconnect the speedometer cable and wires from the transmission.
29. Attach the hoist to the cylinder head lifting eyes and take up the slack so that the hoist supports the weight of the powertrain.

30. Mark the position of the tie bolt (indicated by the arrow) on the front engine mount bracket, remove the tie bolt nut and pull out the bolt.
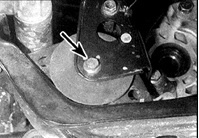
31. Remove the nut and pull out the rear mount tie bolt (indicated by the arrow). Remove the front mount and bracket.
32. Remove the right mount and rubber cushions.
33. Remove the left mount and rubber cushions.
34. Make sure that all parts, wires and hoses that could interfere with removal are disconnected, removed and moved aside.
35. Position a transmission jack under the engine and carefully lower the powertrain. It is advisable to perform this operation with an assistant, as the engine must be tilted slightly to avoid damaging the body.
36. Roll the powertrain out from under the vehicle.
Transmission Removal
PROCEDURE
1. Secure the removed powertrain with wooden blocks on a clean, level surface.
2. Unbolt and remove the starter motor.
3. Unbolt the transmission mounting bolts, marking the position of each bolt.
4. Carefully separate the transmission from the engine, making sure the weight of the transmission is not supported by the input shaft as it comes out of the clutch driven disc.
5. Remove the transmission locating dowels if their fit has loosened.
Installation
PROCEDURE
1. If the transmission was removed from the engine, perform the operations described in paragraphs 3–7 below. If the transmission was not removed, perform installation starting from paragraph 8.
2. Apply a thin layer of high-temperature grease to the splines of the transmission input shaft.
3. Install the dowels (if removed) and make sure the release bearing is securely attached to the clutch release fork.
4. Carefully install the transmission on the engine over the locating dowels. The weight of the transmission must not be supported by the input shaft during installation.
5. Install the transmission case mounting bolts in their original positions and tighten them to the specified torque.
6. Install the starter motor.
7. Position the powertrain under the vehicle and attach the hoist.
8. With an assistant, carefully raise the powertrain into the engine compartment.
9. Install the rubber cushions on the left mount bracket, making sure the cushion studs engage the bracket holes. Install the mount and tighten the bolts to the specified torque. Tighten the tie bolt nut finger-tight.
10. Install the cushions on the right body bracket. Install the mount and tighten the bolts to the specified torque. Tighten the tie bolt nut finger-tight.
11. Insert the rear mount tie bolt and tighten the nut finger-tight.
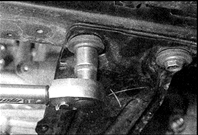
12. Install the side member and tighten the bolts.
13. Install the front mount bracket and tighten the bolts. Insert the tie bolt. Align the engine so that the mount tie bolt is exactly aligned with the mark made before disassembly, then tighten the bolt nut to the specified torque. The distance between the centers of the mount bolts and the bracket must be 55 (±1.0) mm.
14. Rock the powertrain and tighten the remaining tie bolts to the specified torque.
15. Install the powertrain in the reverse order of removal.
16. Make sure the wiring harness is routed along its original paths, secured with clips and brackets, and that all connectors are reconnected.
17. Replace the drive shaft seals and install the drive shafts on the transmission.
18. Reconnect all cooling system hoses.
19. Adjust the throttle cable (see subsection 6.1.7).
20. Connect and adjust the clutch cable (see subsection 8.3).
21. Install and adjust the drive belts.
22. Replace the engine oil and transmission oil.
23. Fill the cooling system with coolant.
24. Start the engine and check for leaks.
Test yourself
A quick Nissan Sunny quiz: every answer comes with an explanation and a link to the manual page.