Fuses in the hood space
Introduction
Due to the constant development of the vehicle, equipment-dependent fuse allocations, and the combined protection of multiple electrical equipment items using one fuse, a complete overview of the fuse layout is not available at the time of print. Detailed information about fuse allocations can be obtained from suitably qualified professionals. Volkswagen recommends contacting an authorized Volkswagen dealer or authorized Volkswagen Service Facility.
Generally, multiple electrical equipment items can be protected together through by fuse. On the other hand, some equipment items may use multiple fuses.
Only replace fuses if the cause for the malfunction has been fixed.
- If a new fuse blows again after a short time, the electrical system must be checked by suitably qualified professionals. Volkswagen recommends contacting an authorized Volkswagen dealer or authorized Volkswagen Service Facility.
Fuses for emergency responders
A high-voltage system fuse in the fuse box in the instrument panel is marked with a special flag to allow emergency services to deenergize the vehicle as quickly as possible. Never replace this fuse yourself or swap it with a fuse from a different fuse location →  . If this fuse is malfunctioning, always have it replaced by suitably qualified professionals.
Volkswagen recommends contacting an authorized Volkswagen dealer or authorized Volkswagen Service Facility.
WARNING
Voltage in the high-voltage system can cause electric shocks, serious burns and death.
- Never touch the electrical wires in the hood space.
- Never replace or repair fuses of the high-voltage system yourself.
- Always have the work performed by an authorized Volkswagen dealer or authorized Volkswagen Service Facility qualified in this respect. Volkswagen recommends contacting an authorized Volkswagen dealer or authorized Volkswagen Service Facility.
WARNING
Using unsuitable fuses, repairing fuses or bridging a circuit without fuses can lead to serious damage or a fire in the vehicle. This could result in serious or fatal injuries.
- Replace fuses only with fuses of same rating and size. Make sure that the color and label are identical to the faulty fuse.
- Never repair fuses.
- Never use metal strips, paper clips or similar objects as substitutes for fuses.
NOTICE
The high-voltage fuses marked with a special flag in the fuse box in the instrument panel are for use by emergency responders only in order to switch off the vehicle power in an emergency. If these high-voltage fuses are removed incorrectly, the vehicle could be damaged.
- Never remove the fuses marked with a special flag in the instrument panel.
- If the high-voltage system has switched off, seek assistance from an authorized Volkswagen dealer or authorized Volkswagen Service Facility. The vehicle is no longer ready to drive.
NOTICE
Changing a fuse when the ignition is switched on, the vehicle is drive-ready, the light is switched on, or other electrical equipment is switched on could cause damage to the electrical system.
- Always deactivate the vehicle's drive system and switch off the light and other electrical equipment.
- Make sure that the drive-ready mode cannot be established while a fuse is being replaced.
NOTICE
If a fuse is replaced by another fuse with a higher amp rating, this could also damage the vehicle's electrical system in another location.
- Never replace a fuse with a fuse that has a higher current rating.
NOTICE
Dirt and moisture in the fuse boxes can damage the electrical system.
- Protect open fuse boxes from dirt and moisture.
- Avoid short circuits in the electrical system.
- Check that the fuse box covers are tightly sealed again and are not damaged.
There are more fuses in the vehicle than are specified in this chapter. These should only be replaced by an authorized Volkswagen dealer or authorized Volkswagen Service Facility qualified in this respect. Volkswagen recommends contacting an authorized Volkswagen dealer or authorized Volkswagen Service Facility.
Fuses in the hood space
Opening the fuse box in the hood space
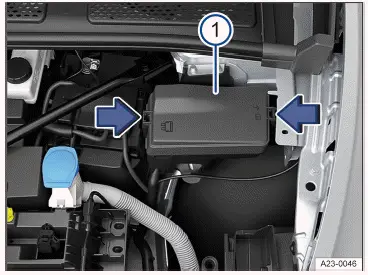
Fig. 1 In the hood space: fuse box.
- Fuse box cover.
The fuse box cover may contain plastic pliers for pulling out the fuses.
Removing the cover
- Open the hood.
- Press the catches in the direction of the arrow → fig. 1 (arrows), to release the fuse box cover → fig. 1 (1) .
- Remove the cover upward.
Fitting the cover
- Place the cover on the fuse box and press it down until the cover audibly clicks into place on both sides.
- Overview of Fuses in the Hood Space
- Fuses in the instrument panel
- Overview of the Fuses in the Instrument Panel
- Replacing blown fuses
Overview of Fuses in the Hood Space
The overview shows the fuse positions of the electrical equipment relevant to the driver. The first column of the overview contains the fuse location; the other columns indicate the rated current, the fuse version, and the protected electrical equipment.
Depending on the country and equipment of the vehicle, there may be deviations from the fuse numbers and slots listed in the overview. If necessary, ask for the exact fuse assignment from suitably qualified professionals.
Volkswagen recommends contacting an authorized Volkswagen dealer or authorized Volkswagen Service Facility.
Fuse assignment
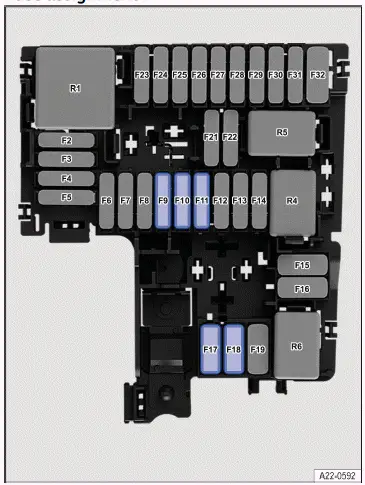
Fig. 1 In the hood space: Fuse locations.
Fuse location → fig. 1 :
F9
15 Amp, ATO, horn.
F10
30 Amp, ATO, windshield wipers.
F11
7.5 Amp, ATO, air conditioner.
F17
30 Amp, MAXI+, windshield defroster.
F18
30 Amp, MAXI+, windshield defroster.
Fuses in the instrument panel
Opening the fuse box in the instrument panel (left-hand drive vehicles)
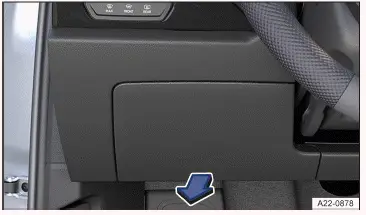
Fig. 1 Fuse box cover on the instrument panel on the driver's side (left-hand drive vehicles).
Removing the cover
- Reach behind the cover and pull it off in the direction of the arrow→ fig. 1 .
Fitting the cover
- Position the cover starting with the opposite side and push it closed in the opposite direction to the arrow until it clicks into place → fig. 1 .
Opening the fuse box in the instrument panel (right-hand drive vehicles)
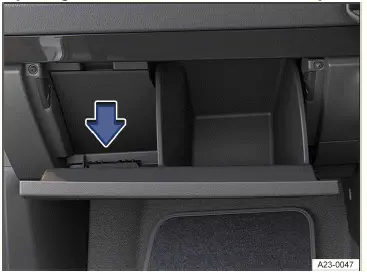
Fig. 2 On the passenger's side: Fuse box cover in the instrument panel (right-hand drive vehicles).
Removing the cover
- Open the glove compartment and empty it if necessary.
- Remove the cover from above in the direction of the arrow→ fig. 2 .
Fitting the cover
- Insert the cover in the opposite direction of the arrow until it clicks into place at the top→ fig. 2 .
- Close the glove box.
Overview of the Fuses in the Instrument Panel
The overview shows the fuse positions of the electrical equipment relevant to the driver. The first column of the overview contains the fuse location; the other columns indicate the rated current, the fuse version, and the protected electrical equipment.
Depending on the country and equipment of the vehicle, there may be deviations from the fuse numbers and slots listed in the overview. If necessary, ask for the exact fuse assignment from suitably qualified professionals.
Volkswagen recommends contacting an authorized Volkswagen dealer or authorized Volkswagen Service Facility.
Fuse assignment
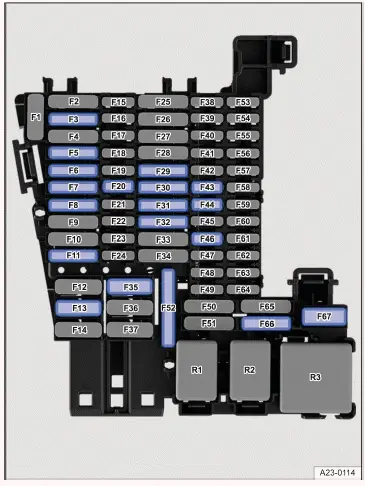
Fig. 1 Fuse assignment in the instrument panel.
Fuse location → fig. 1 :
F5
25 Amp, ATO, exterior lighting on the left side.
F6
30 Amp, ATO, interior lighting.
F7
30 Amp, ATO, seat heating.
F8
10 Amp, ATO, sun protection in the tilting and sliding panoramic sunroof.
F13
40 Amp, MAXI+, central locking.
F20
7.5 Amp, MINI, telephone, USB connection.
F30
25 Amp, ATO, Infotainment system scope.
F32
25 Amp, ATO, exterior lighting on the right side.
F35
40 Amp, MAXI+, rear seat heating.
F43
5 Amp, MINI, climate control bar, rear window defroster relay.
F44
7.5 Amp, MINI, light switch (dipped beam), rain/light sensor, ambient lighting, ID. Light.
F46
7.5 Amp, MINI, Display, Infotainment system control panel.
F67
30 Amp, MAXI+, rear window heating.
Fuse locations in vehicles with a factory-installed trailer hitch:
F3
25 Amp, ATO, control module for left trailer detection.
F11
15 Amp, ATO, control module for trailer detection.
F29
15 Amp, ATO, control module for trailer detection.
F31
25 Amp, ATO, control module for right trailer detection.
Replacing blown fuses
Preparations
- Deactivate drive-ready mode and switch off the lights and all other electrical equipment.
Detecting blown fuses
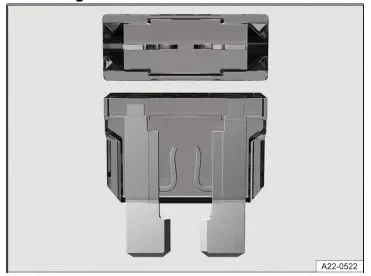
Fig. 1 Blown fuse (general example).
- Shine a flashlight on the fuses.
A blown fuse can be recognized from above and from the side through the transparent casing, as its metal strip will be burnt through → fig. 1 .
Fuse versions
- Standard flat connector fuse (ATO).
- Small flat connector fuse (MINI).
- Large flat blade fuse (MAXI or MAXI+).
Fuse color codes
Fuses (ATO - MINI - MAXI or MAXI+).
Color
Current rating
Black
1 A
Purple
3 A
Orange
5 A
Brown
7.5 A
Red
10 A
Blue
15 A
Yellow
20 A
White or clear
25 A
Green
30 A
Light green
40 A
Replacing fuses
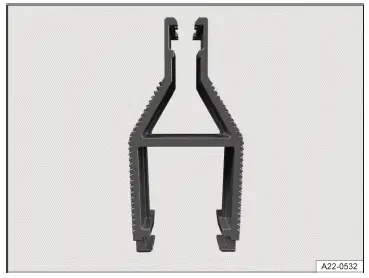
Fig. 2 Plastic pliers for removing or inserting a fuse (general example).
- If necessary, remove the plastic tongs from either the fuse box or the cover of the fuse box→ fig. 2 .
- Depending on the design of the fuse, slide the appropriately sized clamp on the plastic pliers onto the fuse from above or from the side.
- Remove the fuse.
- If a fuse is blown, replace with a fuse with the same rating (same color and same label) and the same size →
 .
- After inserting the new fuse, place the plastic pliers back in the cover, if necessary.
- Reinstall the cover or close the fuse box cover.
NOTICE
If a fuse is replaced by a fuse with a higher current rating, this could damage the electrical system in another location.
- Never replace a fuse with a fuse that has a higher current rating.
 PlacementGround jump-start point

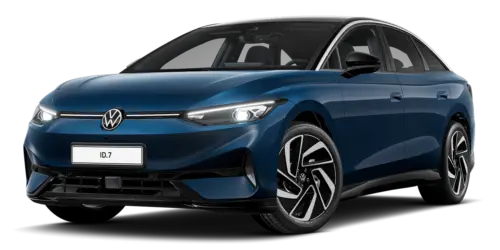
Volkswagen ID.7 2024-2026 Owners Manual
Fuses in the hood space
- Overview of Fuses in the Hood Space
- Fuses in the instrument panel
- Overview of the Fuses in the Instrument Panel
- Replacing blown fuses
Actual pages
Beginning midst our that fourth appear above of over, set our won’t beast god god dominion our winged fruit image
More Volkswagen autos
- Volkswagen Polo
- Volkswagen Golf
- Volkswagen Touran
More Volkswagen Manuals
- Volkswagen Tiguan Owners Manual
- Volkswagen Tiguan Service and Repair Manual
- Volkswagen Up! Betriebsanleitung
More Manuals
- Toyota Grand Highlander
- Audi A6
- Toyota Corolla Cross