Ground jump-start point
Introduction
The vehicle must not be tow started for technical reasons. If the vehicle's drive system cannot be engaged because the 12 V vehicle battery is dead, the 12 V vehicle battery on another vehicle can be used to engage your vehicle's drive system.
For technical reasons, the jump-start points in electric vehicles are not designed for use in jump-starting other vehicles →  .
WARNING
Using jumper cables incorrectly and performing a jump-start incorrectly could cause the 12 V vehicle battery to explode. Serious injuries may result.
- Always read and heed the warnings and safety precautions before working on the 12 V vehicle battery (→ 12-V vehicle battery) .
- Never confuse the positive battery terminal with the negative battery terminal.
- Never jump-start a vehicle with a frozen or thawed 12 V vehicle battery.
NOTICE
The electrical system of an electric vehicle is not designed to give jump-starts to other vehicles. This can cause significant damage to the electrical system of an electric vehicle.
- Never use an electric vehicle to jump-start another vehicle.
NOTICE
A drained 12 V vehicle battery can freeze, be damaged and fail at temperatures around approx. 0 ºC( approx. +32 ºF).
- Always replace a frozen or thawed 12 V vehicle battery.
Ground jump-start point
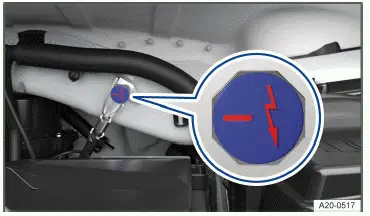
Fig. 1 In the hood space: Negative terminal jump-start point.
 The jump-start point (negative terminal) is for connecting the black jumper cable.
To reduce the risk of considerable damage to the vehicle electrical system, it is not permitted to jump-start other vehicles with an electric vehicle.
The vehicle can receive a jump-start using this negative terminal jump-start point.
- Positive jump-start point
- Preparing and Performing a Jump-start
Positive jump-start point
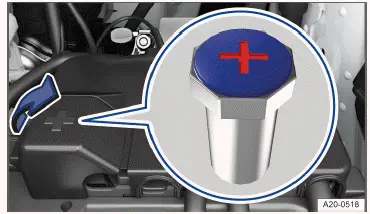
Fig. 1 Under a cover in the hood space: Positive jump-start point.
 The (positive) jump-start point for connecting the red jumper cable.
To reduce the risk of considerable damage to the vehicle electrical system, it is not permitted to jump-start other vehicles with an electric vehicle. The jump-start point is not designed for jump-starting other vehicles.
The vehicle can receive a jump-start using this positive terminal jump-start point.
Preparing and Performing a Jump-start
Preparations
Observe the following for jump-starting:
- Wear suitable eye protection and safety gloves →
 .
- Pay attention to the operating instructions provided by the manufacturer of the jump-start cables.
- Open the hood.
- Always use a jumper cable with fully insulated terminal clamps and without any insulation defects for jumpstarting →
 .
- Ensure that there is sufficient distance between the vehicle providing the jump-start and the vehicle receiving the jump-start, otherwise current could already flow when connecting the positive battery terminals.
- Make sure the terminal clamps have sufficient contact with metal.
Jumper cable
So that vehicles can be jump-started, an appropriate jumper cable is required.
The following jumper cable wire diameters must not be fallen short of by the vehicle providing the jump-start.
- Vehicles with electric drivetrain: To jump-start the vehicle with a drained 12 V vehicle battery, the wire diameter of the jumper cable must be at least 25 mm2 (0.038 in2).
Vehicle Receiving Jump-start
- Check that the discharged 12 V vehicle battery is properly connected to the 12 V vehicle electrical system.
- If a 12 V vehicle battery with a viewing window has been installed, check the color of the viewing window. If the viewing window is light yellow or has no color, do not perform a jump-start; instead, contact an authorized Volkswagen dealer or authorized Volkswagen Service Facility.
Vehicle to be Jump-started
- Pay attention to the operating instructions provided by the vehicle manufacturer.
- Check that the battery providing the jump-start has the same voltage (12 V) and approximately the same battery capacity as the dead 12 V vehicle battery. Pay attention to the information printed on the battery of the vehicle providing the jump-start.
Jump-starting
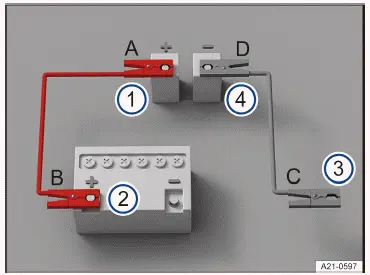
Fig. 1 Diagram for connecting the jumper cables.
- Positive jump-start point of the electric drivetrain vehicle receiving the jump-start.
- Positive battery terminal of the vehicle providing the jump-start.
- Suitable negative terminal of the vehicle providing the jump-start. Preferably a jump-start point( negative), otherwise a large metal part that is bolted securely to the engine block, or the engine block itself.
- Jump-start point (negative) of the electric drivetrain vehicle receiving the jump-start.
Only connect the jumper cables in the sequence A - B - C - D→ fig. 1 .
- Switch the ignition off on both vehicles.
- In the hood space, open the cover on the positive jump-start point , if fitted.
- Connect one end of the red jumper cable to the positive jump-start point (-) of the vehicle with the discharged 12 V vehicle battery → fig. 1 (1) →
 .
- Connect the other end of the red jumper cable to the positive battery terminal (-) on the vehicle providing current → fig. 1 (2) .
- Connect one end of the black jumper cable to a negative terminal jump-start point on the vehicle with the 12 V vehicle battery providing the jump-start → fig. 1 (3) .
Or: If there is no negative terminal jump-start point (-), connect the end of the black jumper cable to a large metal part that is bolted securely to the engine block, or the engine block itself, on the vehicle with the 12 V vehicle battery providing current → fig. 1 (3) .
- Connect the other end of the black jumper cable to the negative terminal jump-start point () on the vehicle with the discharged 12 V vehicle battery → fig. 1 (4) →
 .
- Route the jumper cables so that they cannot become caught in moving parts in the hood space.
Activating the vehicle's drive system
- Start the engine in the vehicle that is providing current and allow it to idle.
- Activate the vehicle's drive system in the vehicle with the discharged 12 V vehicle battery. If the vehicle's drive system cannot be activated, stop the starting process after 10 seconds, and try again after approximately 1 minute.
If the vehicle's drive system still cannot be activated, contact an authorized Volkswagen dealer or authorized Volkswagen Service Facility.
Removing the jumper cables
- Before disconnecting the jumper cables, switch off the low beam headlight if necessary.
- In the vehicle with the drained 12 V vehicle battery, switch on the blower for the air conditioner and the rear window defroster. This will reduce any voltage surges that may occur when disconnected.
- Once the vehicle has been jump-started, always disconnect the jumper cables in the order D - C - B - A → fig. 1 .
- Close the cover of the positive battery terminal jump-start point ( +), if fitted.
After successful jump-starting, have the 12 V vehicle battery checked by an authorized Volkswagen dealer or authorized Volkswagen Service Facility. Volkswagen recommends contacting an authorized Volkswagen dealer or authorized Volkswagen Service Facility.
WARNING
Performing a jump-start incorrectly can cause the 12 V vehicle battery to explode, which can cause serious injuries.
- Always wear suitable eye protection and safety gloves.
- Never lean over the 12 V vehicle battery.
- Always connect the positive cable first and then the negative cable.
- Never connect the negative cable to the brake lines.
- Ensure that there is no contact between the non-insulated parts of the terminal clamps.
- Make sure the cable insulation is free from any defects.
- Make sure that the cable that is connected to the positive battery terminal on the 12 V vehicle battery does not come into contact with any vehicle components that conduct electricity.
NOTICE
A drained 12 V vehicle battery can freeze at temperatures around approx. 0 ºC( approx. +32 ºF), suffer damage and fail.
- Always replace a frozen or thawed 12 V vehicle battery.

 Fuses in the hood spaceInstructions for towing


Volkswagen ID.7 2024-2026 Owners Manual
Ground jump-start point
- Positive jump-start point
- Preparing and Performing a Jump-start
Actual pages
Beginning midst our that fourth appear above of over, set our won’t beast god god dominion our winged fruit image
More Volkswagen autos
- Volkswagen Polo
- Volkswagen Golf
- Volkswagen Touran
More Volkswagen Manuals
- Volkswagen Tiguan Owners Manual
- Volkswagen Tiguan Service and Repair Manual
- Volkswagen Up! Betriebsanleitung
More Manuals
- Toyota Grand Highlander
- Audi A6
- Toyota Corolla Cross