Remove and install fuel pump/fuel level sender
The fuel sender and the gasoline fuel pump are located at the top of the fuel tank.
On diesel engines, only the fuel level sender without a pump is fitted; the fuel is delivered by the injection pump.
As the fuel level drops, the float in the fuel sender also drops. A sliding contact on the float increases the electrical resistance of the sender.
As a result, the voltage at the instrument cluster drops and the fuel gauge moves back toward "E" (empty).
If the float drops further, the warning contact closes at a certain position and an orange dot lights up on the instrument panel.
RemovalMake sure the work area is well ventilated.
Fuel vapors are toxic. No open flames, no smoking. Risk of fire! Keep a fire extinguisher ready.
Warning: the fuel tank must not be full when removing the fuel sender. Therefore, either run the tank empty or pump the fuel out into a suitably large container using a suitable pump. Fuel vapors are toxic; do not inhale them. Perform the work outdoors if possible and ensure good ventilation.
Disconnect the battery negative (-) cable. Warning: this erases electronic memories, such as engine operating values. Observe the notes in the chapter "Remove and install battery".
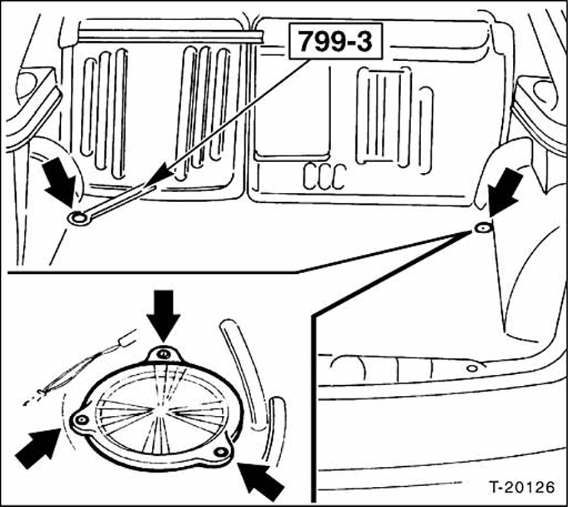
In the luggage compartment, use suitable tools, for example Hazet 799-3, to unclip the cover and unscrew the round cover for the fuel level sender (arrows).
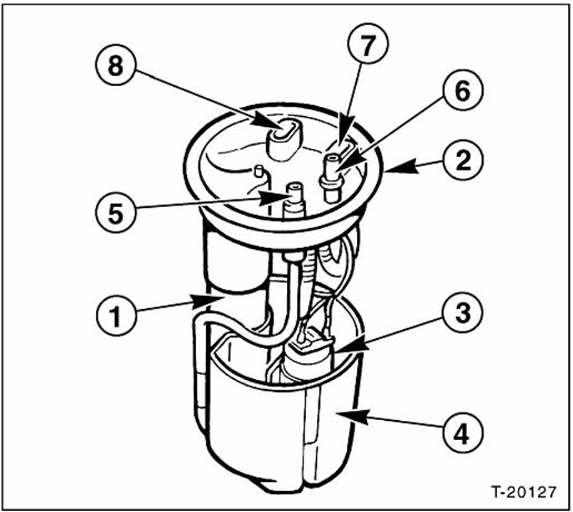
Fuel level sender
Retaining plate
Fuel pump
Reservoir with pre-filter screen
Fuel supply line
Fuel return
Plug connection for fuel pump
Plug connection for fuel level sender
The illustration shows the removed fuel sender with fuel pump. Disconnect the quick-connectors on the fuel supply - 5 - and return - 6 - lines by squeezing the 2 side tabs together. The quick-connectors have different diameters so that they cannot be mixed up.
Disconnect the multi-pin connector.
Unscrew the vent line from the fuel sender.
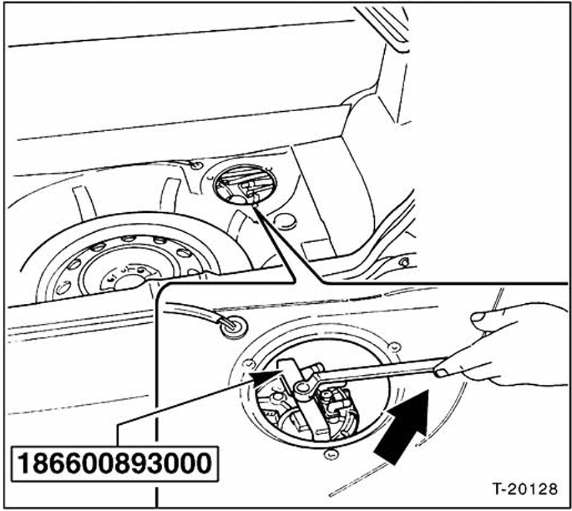
Carefully loosen the union nut by turning it counterclockwise. The workshop uses a special tool for this. The nut can also be loosened using a wooden rod and light hammer blows. Warning: no sparks may be produced.
Lift out the fuel sender, swivel it to the side and remove it.
Place rags underneath and catch any fuel that escapes.
Check the strainer of the fuel pump for contamination and clean it if necessary.
Check the seal for the fuel sender for porosity or damage and replace it if necessary.
Insert the fuel sender and fuel pump into the tank so that the fuel hoses can be pushed on after tightening.
Fit the union nut and tighten it (guide value: max. 60 N·m). Tighten the nut using a wooden rod and light hammer blows. Place the wedge at several points around the circumference.
Push on the fuel lines until they click into place. No special tool is required for this.
Slide the multi-pin connector onto the fuel sender.
Screw the vent line onto the fuel sender.
Connect the battery earth cable (-). Set the clock.
Program the radio stations.
Start the engine and check the connection for leaks.
Screw on the cover for the fuel level sender and fold back the luggage compartment cover.
Test yourself
A quick Fiat Bravo quiz: every answer comes with an explanation and a link to the manual page.