Removal and Installation of Cylinder Head Covers
REMOVAL
PROCEDURE
1. Disconnect the negative battery cable.
If the vehicle's audio system is equipped with an anti-theft code, make sure you have the correct code to reactivate the audio system before disconnecting the battery!
2. Disconnect the spark plug high-tension wires, remove the support brackets and move them aside. Disconnect the wiring from the oil temperature sensor, located on top of the rear cylinder head cover, near the timing belt.
3. Remove the upper intake manifold (see Intake Manifold Removal and Installation).
4. On the left side of the rear head cover, disconnect the PCV hose and remove the bolt securing the power steering pump hose support bracket. Move the hose aside.
5. Disconnect the breather hose from the left wall of the rear cylinder head cover. Move the hose aside.
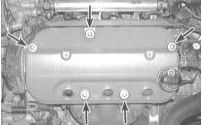
6. Remove the mounting bolts and remove the cylinder head cover. If the cover is stuck and will not separate from the head, carefully tap it with a hammer through a wooden block.
Never attempt to separate the cover by prying it at the mating surface. Any mechanical damage to the surface may cause leaks.
7. Remove the old gasket and sealing washers, then thoroughly clean the mating surfaces of the head and cover. Check the PCV valve for proper condition (see Maintenance and Tune-Up chapter) and return it to its original position on the cover.
INSTALLATION
PROCEDURE
1. Place a new gasket into its groove, and place sealing washers on the mounting bolts.
2. Install the cover on the cylinder head, install the mounting bolts and tighten them in three stages to the specified torque.
It is advisable to lightly lubricate the sealing washers and their contact surfaces on the cover and head with soapy water before installation.
3. Install the remaining components in the reverse order of removal.
Test yourself
A quick Honda Accord quiz: every answer comes with an explanation and a link to the manual page.