Replacement of Engine Mount (V6 Engines)
PROCEDURE
Disconnect the negative battery cable.
If the vehicle is equipped with an audio system with an anti-theft code, make sure you have the correct code to reactivate the audio system before disconnecting the battery! Apply the parking brake, raise the front of the vehicle and support it on safety stands. Support the engine.
Right Mount (Passenger Side)
1. Support the transaxle with a jack, fully unloading the right engine mount.
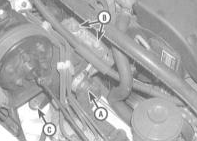
. Remove the through bolt, detach the electrical cable from the engine bracket bolt, then remove the two bolts securing the mount bracket to the engine. Remove the three bolts securing the mount to the vehicle body and remove the rubber cushion.
3. Install in the reverse order.
Final tightening of the mount fasteners to the specified torque must be performed only after the engine has been lowered to its normal position. Proceed to the procedures listed in the section Final Tightening of All Mount Fasteners.
Left Mount (Driver Side)
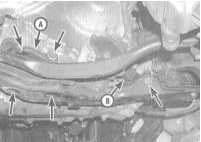
1. The left engine mount is located under the transaxle case and is secured to the subframe.
2. Support the engine, then remove the two nuts located under the subframe and the two bolts securing the assembly to the transaxle case. Remove the cushion.
3. Install in the reverse order.
Final tightening of the mount fasteners to the specified torque must be performed only after the engine has been lowered to its normal position. Proceed to the procedures listed in the section Final Tightening of All Mount Fasteners.
Front Mount
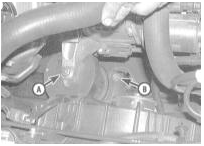
1. The front engine mount is located between the engine block and the radiator and is equipped with a hydraulic insert (refer to System for Adjusting Engine Mount - General Information and Functional Check).
2. Remove the large nut threaded onto the stud protruding from the engine bracket.
3. Remove the four bolts securing the mount to the vehicle body, then disconnect the vacuum hose from the bottom of the assembly.
4. Raise the engine just enough to free the stud from the upper bracket. Remove the assembly.
5. Install in the reverse order.
Final tightening of the mount fasteners to the specified torque must be performed only after the engine has been lowered to its normal position. Proceed to the procedures listed in the section Final Tightening of All Mount Fasteners.
Rear Mount
1. The rear mount is located between the engine and the rear bulkhead of the engine compartment and, like the front mount, is equipped with a hydraulic insert (refer to System for Adjusting Engine Mount - General Information and Functional Check).
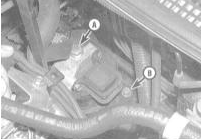
2. Remove the large nut threaded onto the stud protruding from the engine bracket.
3. Remove the four bolts securing the mount to the chassis and disconnect the vacuum hose from the lower part of the assembly.
4. Raise the engine just enough to allow the stud to be freed from the upper bracket without obstruction. Remove the assembly.
5. Installation is the reverse of removal.
Final tightening of the mount fasteners to the specified torque must be performed only after the powertrain has been lowered to its normal position. Proceed to the procedures listed in the Final Tightening of All Mount Fasteners section.
Final Tightening of All Mount Fasteners
1. To maximize the service life of the rubber-to-metal mounts and reduce noise and vibration, final tightening of the mount fasteners to the specified torque must be performed after the powertrain has been lowered to its normal position (park the vehicle on a level, horizontal surface).
Use non-hardening sealant to lubricate the threaded portion of the fasteners (bolts and nuts).
2. Make sure the rubber bushings are not twisted or displaced from their seats. If more than one mount was replaced, or if the powertrain was installed, tighten the mount fasteners in the following sequence:
a) Front mount;
b) Rear mount;
c) Right mount;
d) Left mount.
Test yourself
A quick Honda Accord quiz: every answer comes with an explanation and a link to the manual page.