Cylinder Head Installation
Before starting work, wait until the engine has completely cooled down.
INSTALLATION
PROCEDURE
1. Thoroughly clean the mating surfaces of the cylinder head and cylinder block. Scrape off all remaining gasket material and carbon deposits, then wipe the surfaces with a rag moistened with acetone. Any old gasket material left on the mating surfaces during cylinder head installation may cause improper gasket sealing and, as a result, leaks. When working on the block, plug the cylinder bores with clean rags to prevent small debris and foreign objects from entering them (as a last resort, thoroughly vacuum the cylinders).
2. Check the mating surfaces of the cylinder head and block for deep scratches, scoring and other damage. Minor defects can be removed with fine-grit sandpaper. In more serious cases, the only alternative is to machine or replace the components.
3. Using a tap of the correct size, chase the threaded bolt holes for the cylinder head bolts. After chasing, blow out the holes with compressed air. Clamp each bolt by its head in a vise and run a thread chaser over its threads. Old sealant, dirt and corrosion in the threads will cause the actual tightening torque to differ from the torque wrench reading.
When working with compressed air, always wear safety glasses!
4. Thoroughly clean the oil spray nozzle jets and replace their O-rings. Install new gaskets over the oil spray nozzles and the locating pins in the block.
5. Carefully place the cylinder head on the block, taking care not to displace the gasket.
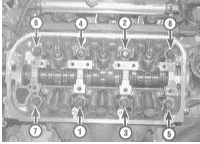
6. Lubricate the threads and the underside of the cylinder head bolt heads with clean engine oil, and install the bolts in their original positions (do not forget to fit the special washers under the bolt heads). Tighten the bolts by hand. Following the specified sequence, tighten the cylinder head bolts to the required torque in three stages (see Specifications).
Each tightening step must be performed twice, i.e., after tightening the bolts to the first-stage torque, repeat the procedure (tightening them to the same torque), and only then proceed to the second stage, and so on.
7. Install the second cylinder head in the same manner.
8. Install the remaining components in the reverse order of removal.
9. Do not forget to refill the cooling system and replace the oil filter (see Chapter Maintenance and Tune-Up).
10. Start the engine and check the ignition timing (see Chapter Maintenance and Tune-Up). Let the engine run at idle for about five minutes to purge air from the valve lash adjusters. Make sure the unit operates correctly.
For the first five minutes after initial start-up, the valvetrain will run noisily. If the noise level does not decrease afterward, this may indicate a faulty valve lash adjuster.
Test yourself
A quick Honda Accord quiz: every answer comes with an explanation and a link to the manual page.