Drive Plate Removal and Installation
PROCEDURE
1. Remove the transmission (refer to Transmission Section).
Support the engine from above using a hoist or an A-frame.
2. Remove the bolts securing the drive plate to the crankshaft.
3. Thoroughly wipe the removed plate with a rag moistened with acetone, completely removing all oil and grease. Inspect the friction surface of the plate for cracks and other mechanical damage. Minor defects can be removed with fine-grit sandpaper. Check the ring gear for cracks and chipped teeth. Place the plate on a flat surface to check its flatness (use a straightedge). If necessary, have the assembly resurfaced.
4. Wipe the mating surfaces of the drive plate and the crankshaft. If there are signs of oil leakage through the rear crankshaft seal, replace it (refer to Rear Crankshaft Seal Replacement).
5. Install the drive plate onto the crankshaft.
The mounting holes are asymmetrical, which ensures the assembly can only be installed one way. Before installing the mounting bolts, apply threadlocker to their threads.
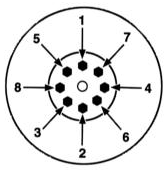
6. Tighten the mounting bolts to the specified torque in the specified sequence.
7. Install the remaining components in the reverse order of removal.
Test yourself
A quick Honda Accord quiz: every answer comes with an explanation and a link to the manual page.