Inspection and Installation of Timing Belt and Timing Drive Sprockets
INSPECTION
PROCEDURE
1. Inspect the sprockets, paying particular attention to wear and signs of mechanical damage to the teeth. Check the timing belt for signs of wear, damage and oil contamination. Check the camshaft end play (refer to Removal, Inspection and Installation of Camshafts). Turn the tensioner roller by hand to check that it rotates freely, then rock it from side to side to check for bearing play. Replace any defective components.
2. Inspect the water pump (refer to Cooling and Heating Systems).
It is advisable to replace the water pump regardless of its condition.
INSTALLATION
PROCEDURE
1. Clean the surfaces in the timing belt area of dirt and oil. Wipe the sprockets with acetone.
2. If removed, install the timing drive sprockets (do not forget to fit the keys into their slots). Tighten the mounting bolts to the specified torque.
3. If removed, install the timing belt guide onto the crankshaft journal in its original position (chamfered side facing the belt). Then install the crankshaft sprocket.
4. Check that the timing marks are correctly aligned. Install the timing belt: start by fitting the belt onto the crankshaft sprocket and the tensioner roller, then, moving clockwise, route it over the rear camshaft sprocket, water pump, front camshaft sprocket and finally tension it over the idler roller. If reinstalling the old belt, its original direction of rotation must be maintained.
If the tensioner piston has extended and the belt cannot be fitted over the idler roller, remove the tensioner and push the piston back in by hand.

5. Install the outer timing belt guide on the crankshaft sprocket with the chamfer facing outward.
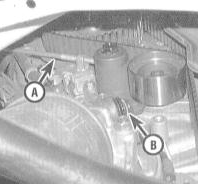
6. Tighten the idler pulley mounting bolt to the specified torque. Remove the tensioner's long retaining bolt for the battery mounting.
7. Slowly rotate the crankshaft six times clockwise by the pulley bolt to seat the belt and return the engine to TDC. Make sure the timing marks of all shafts are correctly aligned.
If any resistance is felt, stop rotating the shaft, return it to its original position and check the alignment of the marks again. Never try to overcome the resistance by force!
8. Install the timing belt lower cover in place.
9. Install the crankshaft pulley in place (make sure the keyway in its hub aligns with the key on the shaft journal). Install the mounting bolt and tighten it to the specified torque, locking the pulley against rotation with a chain or strap wrench.
10. Check again that all timing marks are correctly aligned.
If the timing marks are misaligned in any way, repeat the timing belt installation procedure. Disregarding this requirement may lead to the most serious consequences, requiring major engine repair!
11. Install the remaining components in the reverse order of removal.
Timing Belt Tensioner Adjustment
PROCEDURE
1. Removal or adjustment of the tensioner is normally not required when replacing the timing belt (unless the tensioner piston has extended). Removing the water pump, however, requires mandatory removal of the belt tensioner. Removing the tensioner inevitably causes its piston to extend. The procedures described below are only required when the tensioner is removed.
2. To remove the tensioner, remove the long bolt securing it, then unbolt the tensioner assembly from the cylinder block.
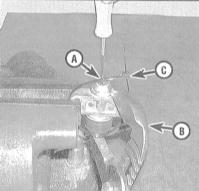
3. Clamp the tensioner by the flange (never by the body) in a vise so that the service bolt faces upward. Remove the service bolt. Insert a long-tipped screwdriver through the service opening and turn the piston until it returns to its fully retracted position.
Try not to tilt the tensioner to prevent oil from leaking out. If necessary, add the required amount of fresh oil to the assembly. The total oil capacity of the tensioner is 6.6 ml.
4. At service shops, the tensioner piston is locked in the retracted position using a special tool. If a suitable tool is not available, the piston can be locked using adjustable pliers. At the same time, an assistant must wrap the assembly body with strong nylon strap.
The piston locking strap must be routed between the pliers jaws and the end face of the piston before the piston is retracted. This procedure is quite delicate, and only a very experienced mechanic can perform it on the first attempt.
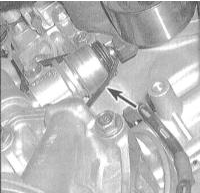
5. Install the service bolt in place. Install the tensioner in its normal position, making sure the nylon strap locking the piston does not slip off. Install the mounting bolts and tighten them to the specified torque. After completing the timing belt installation, cut the strap with side cutters and pull it out with pliers.
Test yourself
A quick Honda Accord quiz: every answer comes with an explanation and a link to the manual page.