Replacing Valve Stem Seals and Valve Springs with Retainers
PROCEDURE
Broken valve springs and worn valve stem seals can be replaced without removing the cylinder heads. Two special tools and a compressed air source are required. Before starting the work, make sure you have a sufficiently powerful tool for compressing the stiff valve springs used on the engines of the models in question.
1. Remove the cylinder head cover(s) (see Section Cylinder Head Cover Removal and Installation).
2. Remove the spark plugs from the cylinders whose components need to be checked. If the valve stem seals must be replaced, remove all spark plugs.
3. Turn the crankshaft to bring the corresponding piston to TDC on the compression stroke (see Section Positioning Cylinder No. 1 Piston at Top Dead Center (TDC)). When replacing valve stem seals, start with cylinder No. 1, then proceed from one cylinder to the next in firing order (see Specifications).
4. Remove the rocker arm assemblies with their shafts (see Section Removal, Inspection and Installation of Rocker Arm Assembly).
5. Screw a long adapter into the spark plug hole of the corresponding cylinder and connect a hose from the compressed air source to it.
Special threaded adapters with a quick-connect fitting are available - ask at auto parts stores.
6. Apply air pressure to the cylinder.
Under air pressure the piston may move down, causing the crankshaft to rotate suddenly - do not leave the socket wrench used to bring the piston to TDC on the bolt threaded into the crankshaft pulley. The valves will be held in place by the air pressure.
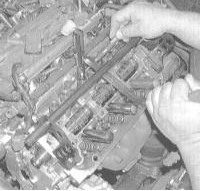
7. To prevent debris and other foreign objects from entering the engine, plug all openings in the block around the valves being serviced with rags. Now use the special tool to compress the spring of the valve being serviced. Using tweezers or a magnetized rod, remove the split cotters from the grooves in the valve stem.
If the valve cannot be held closed with compressed air, this indicates a loss of sealing caused by mechanical damage to the valve face or valve seat. In this case, the cylinder head must be removed from the engine for the appropriate repair.
8. Remove the spring retainer, the spring shield and the spring from the valve stem, then remove the valve stem seal from the valve guide.
9. Secure a rubber sleeve or wrap tape around the upper end of the valve stem to prevent the valve from falling into the combustion chamber, then shut off the air supply to the cylinder.
10. Inspect the valve stem for signs of wear or mechanical damage. While rotating the valve inside the valve guide, check the radial play at the valve tip, which determines the straightness of the stem (a bent valve must be replaced).
11. Move the valve up and down in the valve guide, checking for binding points. Binding indicates either a bent valve stem or a damaged guide. In either case, the cylinder head must be removed for the necessary repair.
12. Reapply air pressure to the cylinder to hold the valve closed. Remove the rubber sleeve/tape from the valve stem.
13. Lubricate the valve stem with clean engine oil and install a new valve stem seal.
Intake valve stem seals are supplied with a white spring, exhaust valve stem seals with a black spring.
14. Install the valve spring(s) onto the valve stem (with the close-pitch coil end facing the cylinder head).
15. Place the spring retainer on the spring, then compress the spring(s) with the special tool and carefully seat the split cotters in the groove on the valve stem. To hold the cotters in place until the tool is released, apply heavy grease to their inner surfaces.
16. While checking that the cotters are correctly seated in the groove, release the spring compressor tool.
17. Shut off the air supply to the cylinder and remove the adapter from the spark plug hole.
18. Install the rocker arm assembly (see Rocker Arm Assembly Removal, Inspection and Installation).
19. Install the cylinder head cover (see Cylinder Head Cover Removal and Installation).
20. Install the spark plugs and connect the spark plug wires (in the correct order).
21. Start the engine and check for oil leaks and abnormal noises from the valve train.
Test yourself
A quick Honda Accord quiz: every answer comes with an explanation and a link to the manual page.