Single-Use Parts

Front Bumper

22steps
~132min
4/5difficulty
0102030405012.79N·mlb·ft
Tightening torque found on this page
Done 0 of 22

Contents:

Components and Components Location

Component

Removal and Installation
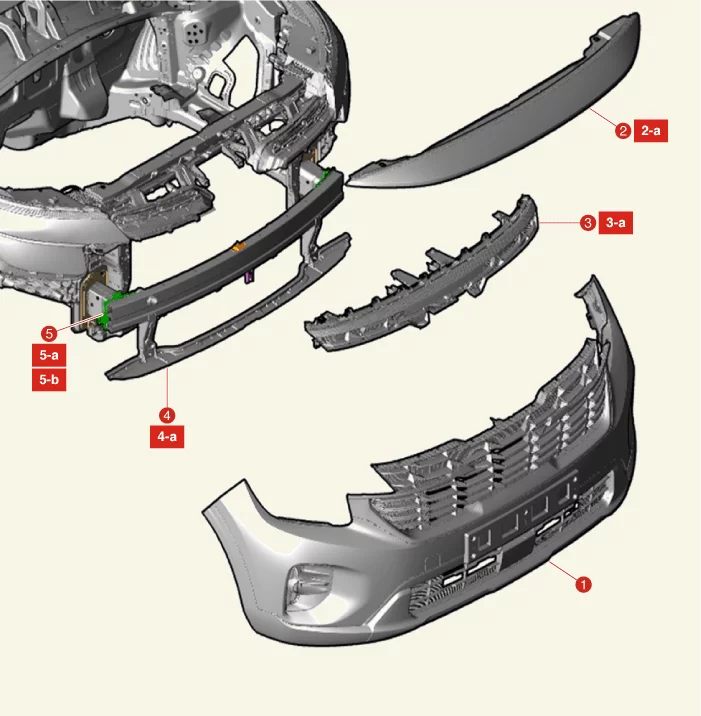
Body (Interior and Exterior) — Front Bumper / Components and Components Location / Component illustration
1. Front Bumper Assembly
2. Radiator Grille Upper Cover
2-a. 8.8 - 12,7 N·m
3. Radiator Grille Upper Garnish
3-a. 8.8 - 12,7 N·m
4. Front Bumper Stiffener
4-a. 3.9 - 5,9 N·m (0.4 - 0.6 kgf·m, 2.9 - 4.3 lb·ft, 34.7 - 52.1 lb·in)
5. Front Bumper Beam Assembly
5-a. 21.6 - 26 N·m
5-b. 3.9 - 5,9 N·m (0.4 - 0.6 kgf·m, 2.9 - 4.3 lb·ft, 34.7 - 52.1 lb·in)

Disassembly and Reassembly
Body (Interior and Exterior) — Front Bumper / Components and Components Location / Component illustration
1. Front Bumper Energy Absorber
2. Radiator Grille
3. Front Bumper Grille
4. Front Bumper Fog Lamp Cover
5. Front Bumper Lip
6. Front Bumper Skid Plate
7. Front Bumper Lower Cover
8. Front Bumper Upper Cover

Front Bumper Assembly Removal and Installation

Removal

Front Bumper Assembly
  1. Disconnect the battery negative ( - ) terminal.
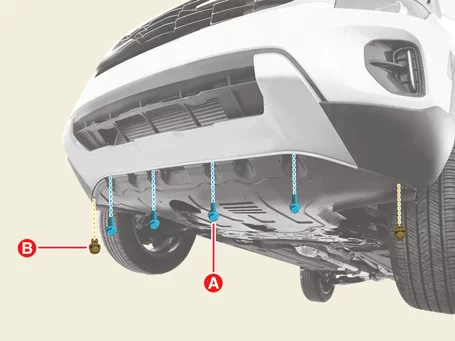
  2. Remove the engine room under cover bolts (A) and clips (B).
    Body (Interior and Exterior) — Front Bumper / Front Bumper Assembly / Removal and Installation / Removal illustration
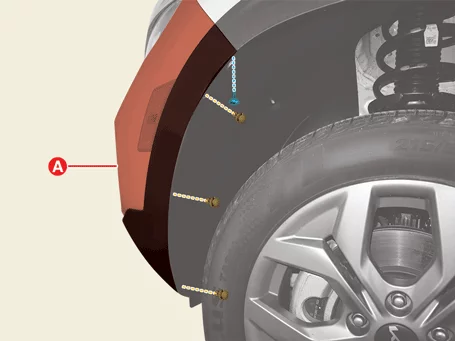
  3. Separate the left and right sides of the front bumper (A) after removing the screw and clips.
    Body (Interior and Exterior) — Front Bumper / Front Bumper Assembly / Removal and Installation / Removal illustration
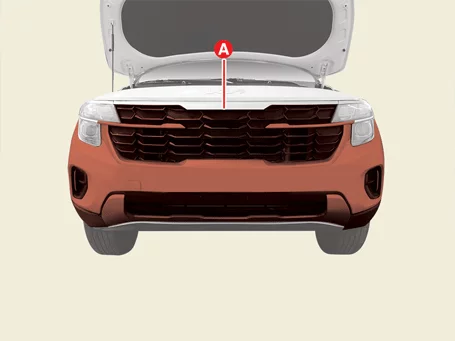
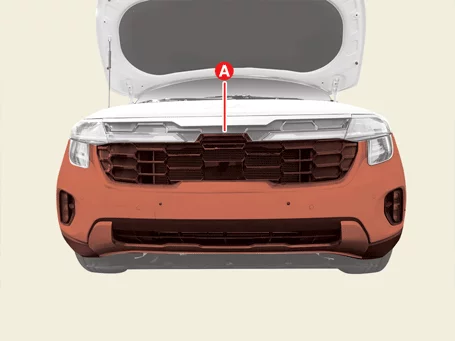
  4. Remove the front bumper assembly (A). [Standard Type]
    Body (Interior and Exterior) — Front Bumper / Front Bumper Assembly / Removal and Installation / Removal illustration
    [Option Type]
    Body (Interior and Exterior) — Front Bumper / Front Bumper Assembly / Removal and Installation / Removal illustration
    Note
    Avoid damage to the front bumper clips and hooks.
    Body (Interior and Exterior) — Front Bumper / Front Bumper Assembly / Removal and Installation / Removal illustration
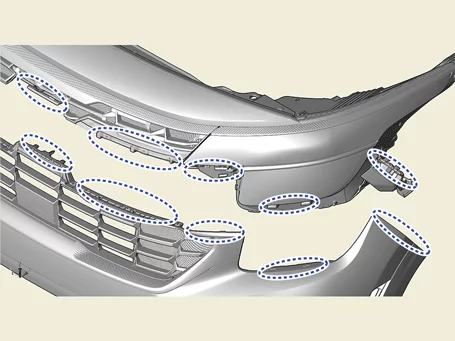
    Information
    Clip position :
    Body (Interior and Exterior) — Front Bumper / Front Bumper Assembly / Removal and Installation / Removal illustration
  5. Disconnect the front bumper connectors (A).
    Body (Interior and Exterior) — Front Bumper / Front Bumper Assembly / Removal and Installation / Removal illustration
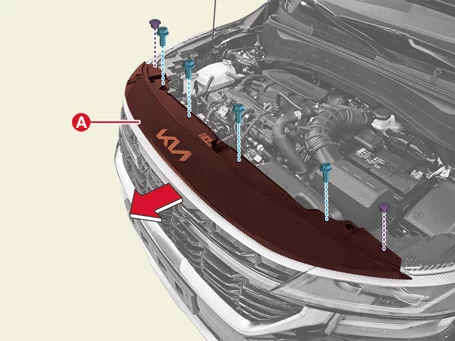
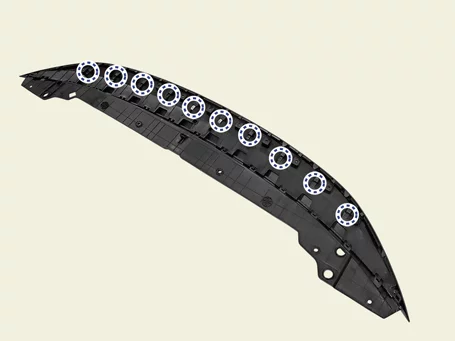
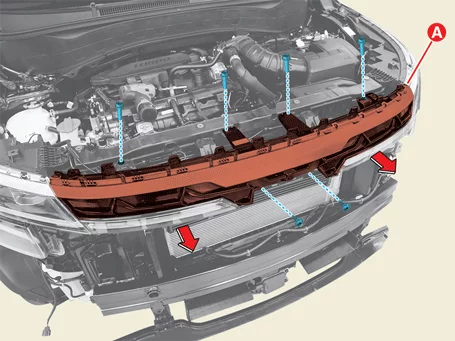
  6. Remove the radiator grille upper cover (A) in the direction of the arrow after removing the bolts and clips.

    Tightening torque : 8.8 - 12,7 N·m

    Body (Interior and Exterior) — Front Bumper / Front Bumper Assembly / Removal and Installation / Removal illustration
    Body (Interior and Exterior) — Front Bumper / Front Bumper Assembly / Removal and Installation / Removal illustration
    Information
    Clip position :
    Body (Interior and Exterior) — Front Bumper / Front Bumper Assembly / Removal and Installation / Removal illustration
  7. Remove the front bumper assembly.
  8. Remove the radiator grille upper cover.
  9. Remove the radiator grille upper garnish. [Standard Type]
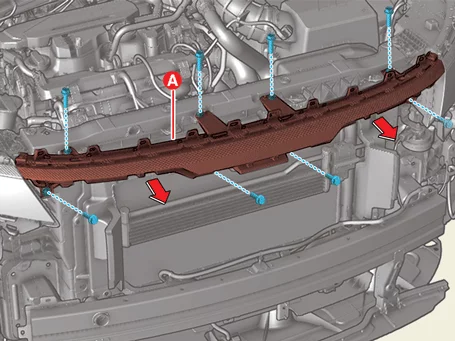
    1. Remove the radiator grille upper garnish (A) in the direction of the arrow after removing the bolts.

      Tightening torque : 8.8 - 12,7 N·m

      Body (Interior and Exterior) — Front Bumper / Front Bumper Assembly / Removal and Installation / Removal illustration
    [Option Type]
    1. Remove the radiator grille upper garnish (A) in the direction of the arrow after removing the bolts and screws.

      Tightening torque : 8.8 - 12,7 N·m

      Body (Interior and Exterior) — Front Bumper / Front Bumper Assembly / Removal and Installation / Removal illustration
Radiator Grille Upper Cover Radiator Grille Upper Garnish

Installation

  1. Install in reverse order of removal.

Front Bumper Assembly Disassembly and Reassembly

Disassembly

  1. Remove the fog lamp. (Refer to Body Electrical System - "Fog Lamp")
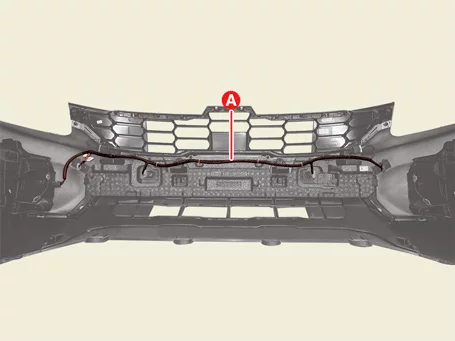
  2. Remove the front bumper wiring harness (A).
    Body (Interior and Exterior) — Front Bumper / Front Bumper Assembly / Disassembly and Reassembly / Disassembly illustration
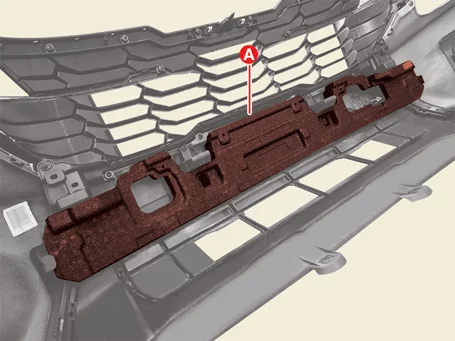
  3. Remove the energy absorber (A).
    Body (Interior and Exterior) — Front Bumper / Front Bumper Assembly / Disassembly and Reassembly / Disassembly illustration
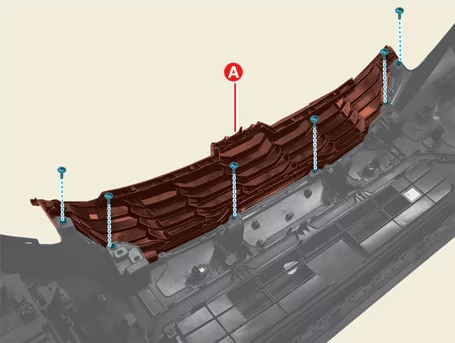
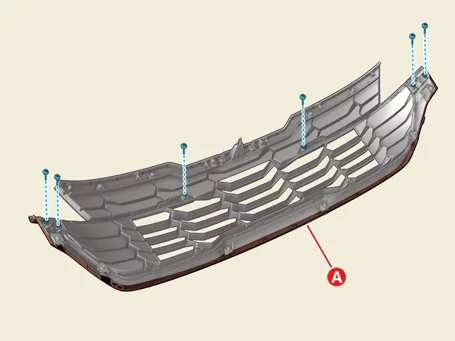
  4. Remove the radiator grille (A) after removing the screws. [Standard Type]
    Body (Interior and Exterior) — Front Bumper / Front Bumper Assembly / Disassembly and Reassembly / Disassembly illustration
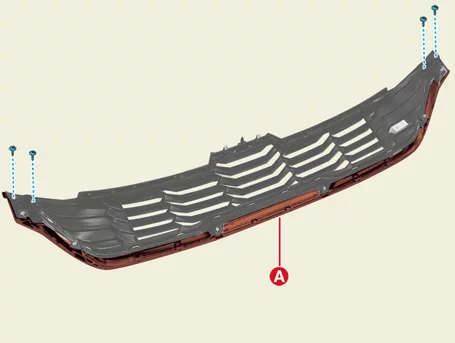
    [Option Type]
    Body (Interior and Exterior) — Front Bumper / Front Bumper Assembly / Disassembly and Reassembly / Disassembly illustration
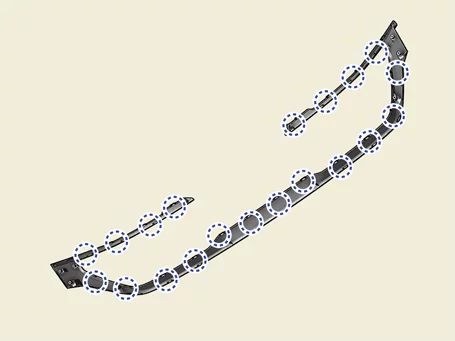
  5. Remove the radiator molding (A) after removing the screws. [Standard Type]
    Body (Interior and Exterior) — Front Bumper / Front Bumper Assembly / Disassembly and Reassembly / Disassembly illustration
    Body (Interior and Exterior) — Front Bumper / Front Bumper Assembly / Disassembly and Reassembly / Disassembly illustration
    Information
    Clip position :
    Body (Interior and Exterior) — Front Bumper / Front Bumper Assembly / Disassembly and Reassembly / Disassembly illustration
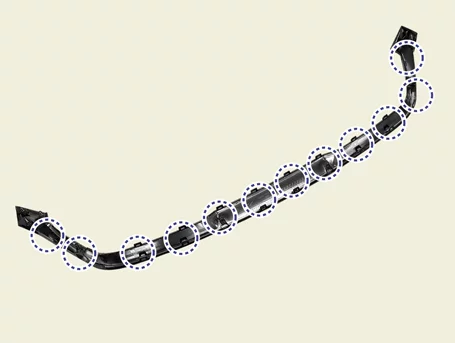
    [Option Type]
    Body (Interior and Exterior) — Front Bumper / Front Bumper Assembly / Disassembly and Reassembly / Disassembly illustration
    Body (Interior and Exterior) — Front Bumper / Front Bumper Assembly / Disassembly and Reassembly / Disassembly illustration
    Information
    Clip position :
    Body (Interior and Exterior) — Front Bumper / Front Bumper Assembly / Disassembly and Reassembly / Disassembly illustration
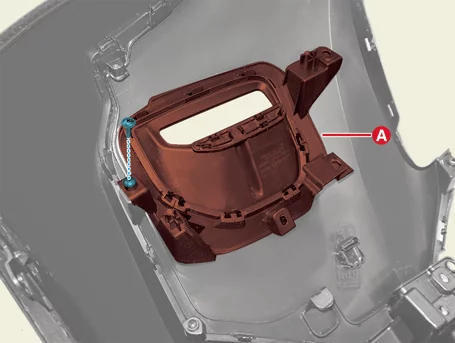
  6. Remove the fog lamp cover (A) after removing the screw.
    Body (Interior and Exterior) — Front Bumper / Front Bumper Assembly / Disassembly and Reassembly / Disassembly illustration
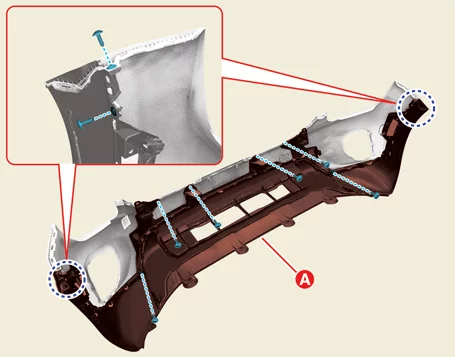
  7. Remove the front bumper lower cover (A) after removing the screws.
    Body (Interior and Exterior) — Front Bumper / Front Bumper Assembly / Disassembly and Reassembly / Disassembly illustration
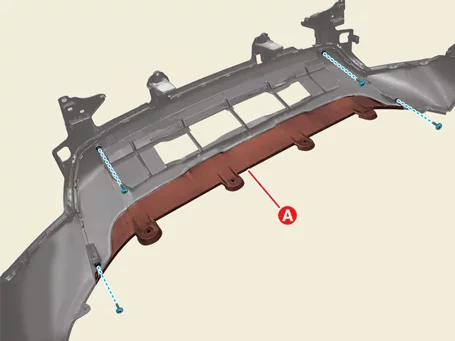
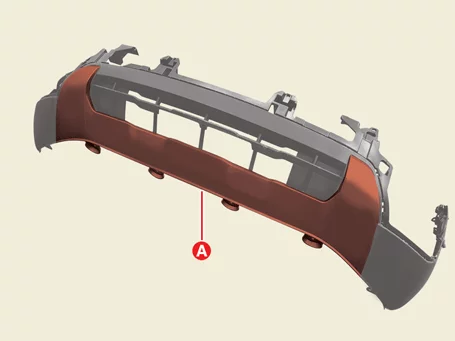
  8. Remove the front bumper skid plate (A) after removing the screws.
    Body (Interior and Exterior) — Front Bumper / Front Bumper Assembly / Disassembly and Reassembly / Disassembly illustration
    Body (Interior and Exterior) — Front Bumper / Front Bumper Assembly / Disassembly and Reassembly / Disassembly illustration

Reassembly

  1. Reassemble in the reverse order of disassembly.

Front Bumper Beam Assembly Removal and Installation

Removal

Front Bumper Beam Assembly

  1. Remove the front bumper assembly. (Refer to Front Bumper - "Front Bumper Assembly")
  2. Remove the front radar. (Refer to Advanced Driver Assistance System (ADAS) - "Front Radar")
  3. Remove the ambient temperature sensor. (Refer to Heating,Ventilation And Air Conditioning - "Ambient Temperature Sensor")
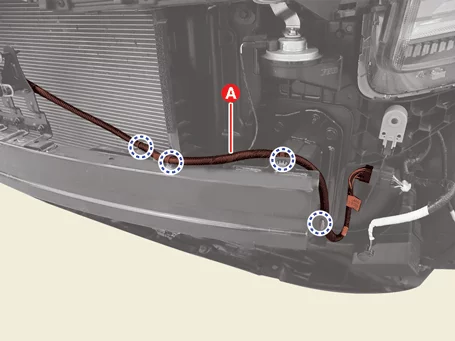
  4. Separate the front bumper beam wiring (A).
    Body (Interior and Exterior) — Front Bumper / Front Bumper Beam Assembly / Removal and Installation / Removal illustration
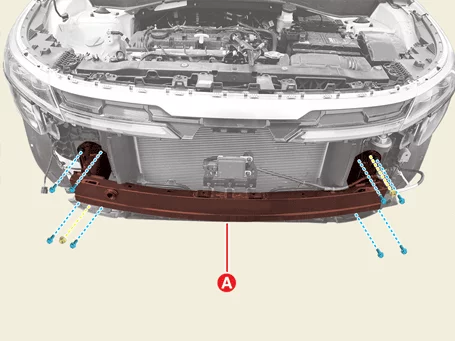
  5. Remove the front bumper beam assembly (A) after removing the bolts and nuts.
    Tightening torque Bolt : 21.6 - 26 N·m Nut : 3.9 - 5,9 N·m
    Body (Interior and Exterior) — Front Bumper / Front Bumper Beam Assembly / Removal and Installation / Removal illustration

Installation

  1. Install in reverse order of removal.
    Note
    Installation/calibration is required when reinstalled after the front radar is removed. (Refer to Advanced Driver Assistance System (ADAS) - "Front Radar")