XM Tuner Antenna Disconnected (B15FE,B15FF)
DESCRIPTION
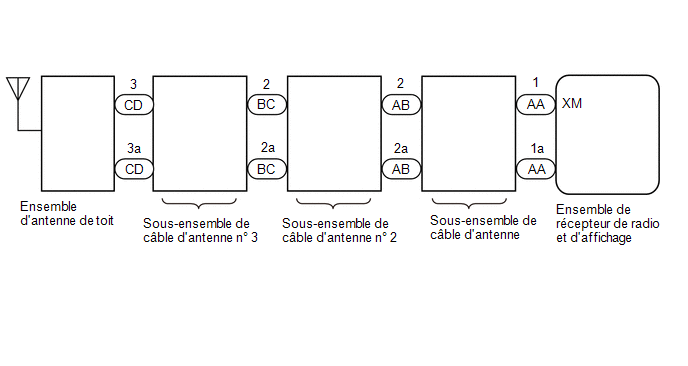
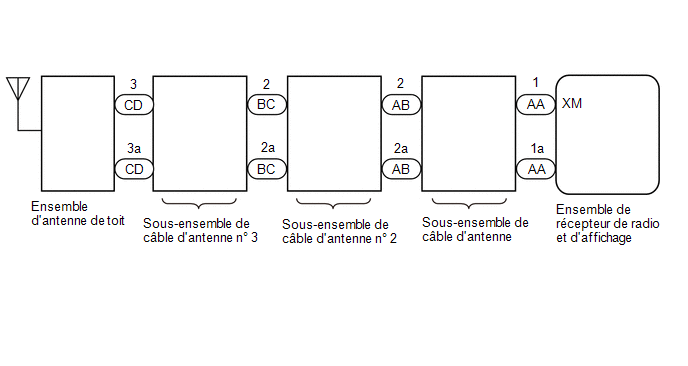
These DTCs are stored when a malfunction occurs in the roof antenna assembly, which is connected to the radio and display receiver assembly.
DTC No. | Detection Item | DTC Detection Condition | Suspected Area |
|---|---|---|---|
B15FE |
XM Tuner Antenna Disconnected |
Telephone antenna assembly is not connected |
|
B15FF |
XM Tuner Antenna Short Circuit |
A short circuit occurs in the telephone antenna assembly |
|
WIRING DIAGRAM
TMMT manufactured
TMC manufactured
PRECAUTION / NOTICE / HINT
NOTICE:
- Depending on the parts replaced during vehicle inspection or maintenance, initialization, registration or calibration may be necessary. Refer to the precautions for the audio and visual system (for type with radio and display).
Click here

- When replacing the radio and display receiver assembly, always replace it with a new one. If a radio and display receiver assembly that was installed in another vehicle is reused, the following may occur:
- A communication malfunction DTC is stored.
- The radio and display receiver assembly may not operate normally.
PROCEDURE
REPLACE ANTENNA CABLE SUB-ASSEMBLY
(a) Replace the antenna cable sub-assembly with a new or normally functioning one.
Click here
(b) Clear the DTCs.
Body Electrical > Navigation System > Clear DTCs(c) Check DTCs again and confirm that no DTCs are output.
Body Electrical > Navigation System > Trouble CodesOK:
No DTC is output.
Result:
Result | Proceed to |
|---|---|
OK |
A |
NG (for TMMT manufactured) |
B |
NG (for TMC manufactured) |
C |
| A |  |
END (ANTENNA CABLE SUB-ASSEMBLY WAS FAULTY) |
| C | |
GO TO STEP 5 |
|

CHECK ANTENNA CABLE SUB-ASSEMBLY NO. 2
(a) Disconnect the antenna cable sub-assembly No. 2 connector from the antenna cable sub-assembly. |
|
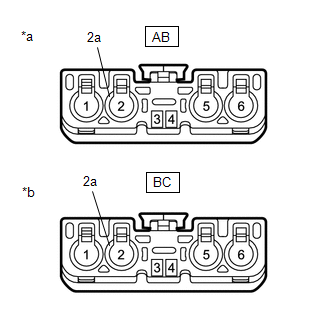
(b) Disconnect the antenna cable sub-assembly No. 2 connector from the antenna cable sub-assembly No. 3.
(c) Measure the resistance according to the value(s) in the table below.
Standard resistance:
Tester Connection | Condition | Specified Condition |
|---|---|---|
AB-2 - BC-2 |
Always |
Below 1 Ω |
AB-2a - BC-2a |
Always |
Below 1 Ω |
AB-2 - Body Ground |
Always |
10 kΩ minimum |
AB-2a - Body Ground |
Always |
10 kΩ minimum |
| NG | |
REPLACE ANTENNA CABLE ASSY NO. 2 |
|
INSPECT ANTENNA CABLE ASSY NO. 3
(a) Disconnect the No. 3 antenna cable assy connector from the No. 2 antenna cable assy. |
|
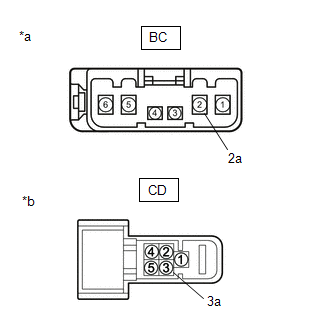
(b) Disconnect the No. 3 antenna cable assy connector from the roof antenna assy.
(c) Measure the resistance according to the value(s) in the table below.
Standard resistance:
Tester Connection | Condition | Specified Condition |
|---|---|---|
BC-2 - CD-3 |
Always |
Below 1 Ω |
BC-2a - CD-3a |
Always |
Below 1 Ω |
BC-2 - Body Ground |
Always |
10 kΩ minimum |
BC-2a - Body Ground |
Always |
10 kΩ minimum |
| NG | |
REPLACE ANTENNA CABLE ASSY NO. 3 |
|
REPLACE ROOF ANTENNA ASSY
(a) Replace the roof antenna assy with a new or normally functioning part.
Click here
(b) Clear the DTCs.
Body Electrical > Navigation System > Clear DTCs(c) Check DTCs again and confirm that no DTCs are output.
Body Electrical > Navigation System > Trouble CodesOK:
No DTC is output.
| OK | |
END |
| NG | |
REPLACE RADIO AND DISPLAY RECEIVER ASSEMBLY |
CHECK ANTENNA CABLE SUB-ASSEMBLY NO. 2
(a) Disconnect the antenna cable sub-assembly No. 2 connector from the antenna cable sub-assembly. |
|
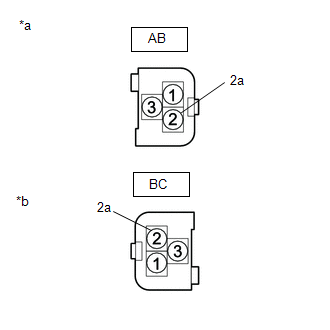
(b) Disconnect the antenna cable sub-assembly No. 2 connector from the antenna cable sub-assembly No. 3.
(c) Measure the resistance according to the value(s) in the table below.
Standard resistance:
Tester Connection | Condition | Specified Condition |
|---|---|---|
AB-2 - BC-2 |
Always |
Below 1 Ω |
AB-2a - BC-2a |
Always |
Below 1 Ω |
AB-2 - Body Ground |
Always |
10 kΩ minimum |
AB-2a - Body Ground |
Always |
10 kΩ minimum |
| NG | |
REPLACE ANTENNA CABLE ASSY NO. 2 |
|
INSPECT ANTENNA CABLE ASSY NO. 3
(a) Disconnect the No. 3 antenna cable assy connector from the No. 2 antenna cable assy. |
|
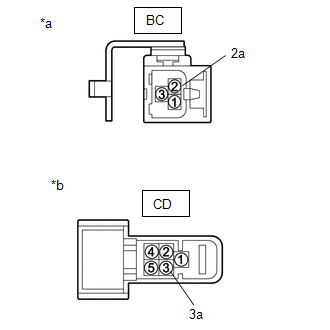
(b) Disconnect the No. 3 antenna cable assy connector from the roof antenna assy.
(c) Measure the resistance according to the value(s) in the table below.
Standard resistance:
Tester Connection | Condition | Specified Condition |
|---|---|---|
BC-2 - CD |
Always |
Below 1 Ω |
BC-2a - CD-3a |
Always |
Below 1 Ω |
BC-2 - Body Ground |
Always |
10 kΩ minimum |
BC-2a - Body Ground |
Always |
10 kΩ minimum |
| NG | |
REPLACE ANTENNA CABLE ASSY NO. 3 |
|
REPLACE ROOF ANTENNA ASSY
(a) Replace the roof antenna assy with a new or normally functioning part.
Click here
(b) Clear the DTCs.
Body Electrical > Navigation System > Clear DTCs(c) Check DTCs again and confirm that no DTCs are output.
Body Electrical > Navigation System > Trouble CodesOK:
No DTC is output.
| OK | |
END |
| NG | |
REPLACE RADIO AND DISPLAY RECEIVER ASSEMBLY |