Operation Check
OPERATION CHECK
STORAGE CHECK (DCU STORAGE CHECK)
NOTICE:
When replacing the radio and display receiver assembly, always replace it with a new one. If a radio and display receiver assembly that was installed in another vehicle is reused, the following may occur:
- A communication malfunction DTC is stored.
- The radio and display receiver assembly may not operate normally.
HINT:
- Check the storage once installed on the radio receiver and display assembly.
- The diagrams may differ from the vehicle's screen depending on the layout of the components and the options. For this reason, some detailed areas may not be identical to those on the vehicle's screen.
(a) Enter diagnostic mode.
Click here
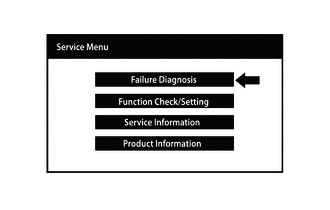
(b) Select "Failure Diagnosis" on the "Service Menu" screen.
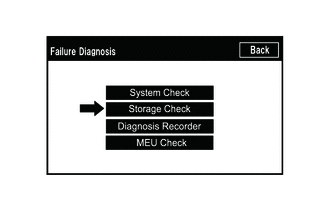
(c) Select "Storage Check" on the "Failure Diagnosis" screen.
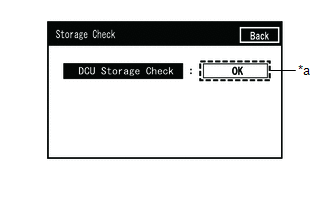
(d) Storage check.
*a |
Result |
(1) Select "DCU Storage Check" to start the DCU storage check.
(2) Check the result displayed when the DCU storage check is complete.
Screen DescriptionDisplay (Result) | Description |
|---|---|
Checking |
Check in progress |
OK |
Storage of the radio receiver and display assembly is normal |
NG |
Storage of the radio receiver and display assembly is not functioning properly |
HINT:
- After selecting "DCU Storage Check", the result may take some time to appear.
- If the cabin temperature is -20°C (-4°F) or lower, or 65 °C or higher, the storage may not function normally and "NG" may be displayed on the screen. Be sure to perform troubleshooting with an appropriate cabin temperature.
- If "NG" is displayed even when the cabin temperature is appropriate, replace the radio receiver and display assembly with a new one.
CHECK the "PANEL & STEERING SWITCH" SCREEN
HINT:
- The radio receiver and display assembly panel switches and steering wheel switches are checked using the following procedure.
- The diagrams may differ from the vehicle's screen depending on the layout of the components and the options. For this reason, some detailed areas may not be identical to those on the vehicle's screen.
(a) Enter diagnostic mode.
Click here
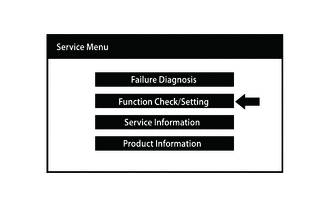
(b) Select "Function Check/Setting" on the "Service Menu" screen.
(c) Select "Panel&Steering Switch" on the "Function Check/Setting I" screen.
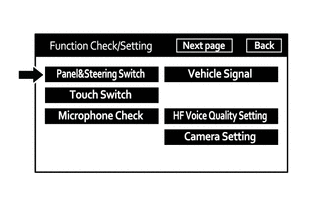
(d) Panel&Steering Switch check mode
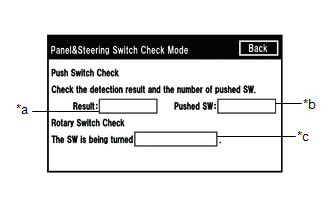 Screen Description
Display | Content |
|---|---|
*a: Switch condition |
"Pushed" is displayed when any switch is pressed. |
*b: Number of switches pushed |
|
*c: Rotary switch direction |
Rotary switch direction is displayed. |
(1) Operate each switch and check that the switch functions are displayed correctly.
NOTICE:
When the "SETUP" switch is pressed and held for at least 3 seconds, diagnostic mode is canceled.
TOUCH SWITCH CHECK
HINT:
- The following procedure is used to check the touch switches on the screen.
- The diagrams may differ from the vehicle's screen depending on the layout of the components and the options. For this reason, some detailed areas may not be identical to those on the vehicle's screen.
(a) Enter diagnostic mode.
Click here
(b) Select "Function Check/Setting" on the "Service Menu" screen.
(c) Select "Touch Switch" on the "Function Check/Setting I" screen.
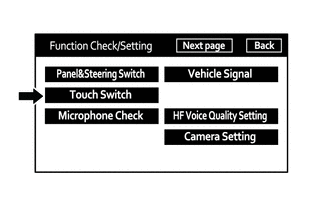
(d) Touch switch check
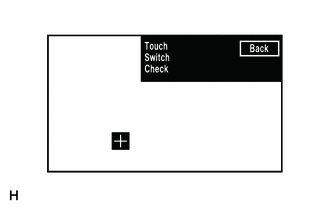
(1) When the "Touch Switch Check" screen is displayed, touch anywhere in the free area of the screen to start the check.
HINT:
- A "+" is displayed at the point where the screen was touched.
- This "+" remains displayed even after your finger is no longer pressing the screen.
CHECK THE MICROPHONE (TRANSMISSION TO RADIO RECEIVER AND DISPLAY ASSEMBLY)
HINT:
- The radio receiver and display assembly microphone and the microphone input signal can be checked using the following procedures.
- The diagrams may differ from the vehicle's screen depending on the layout of the components and the options. For this reason, some detailed areas may not be identical to those on the vehicle's screen.
(a) Enter diagnostic mode.
Click here
(b) Select "Function Check/Setting" on the "Service Menu" screen.
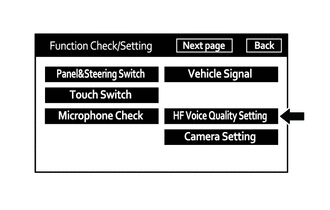
(c) Select the "Microphone Check" mode on the "Function Check/Setting I" screen of the Techstream.
(d) Microphone check
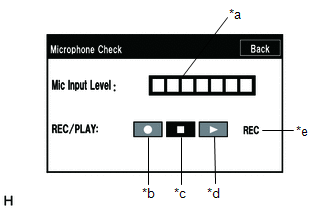 Screen Description
Display | Content |
|---|---|
*a: Microphone input level meter |
Checks the microphone input level every 0.1 second and displays the result in 8 different levels. |
*b: Recording switch |
Starts recording. |
*c: Stop switch |
Stops recording and playback. |
*d: Play switch |
Plays back the recorded voice. |
*e: Recording indicator |
Illuminates during recording. |
(1) Speak into the microphone and check that the microphone input level value changes with your voice.
HINT:
The microphone is activated continuously while this screen is displayed.
(2) Press the recording switch and perform voice recording.
HINT:
- Select the recording switch when the blower motor of the air conditioning system is stopped. If an air conditioning outlet is directed toward the microphone, noise may be recorded.
- During playback or recording, switches other than the stop switch are not operational.
- When there is no recording, the play switch is not operational.
- Recording stops after 5 seconds or when the stop switch is pressed.
(3) Make sure the recording indicator illuminates during recording and that the recording can be played back normally.
CHECK GPS AND VEHICLE SENSOR SIGNALS
HINT:
- The following procedure is used to check the GPS information, vehicle signals and sensor signals.
- The diagrams may differ from the vehicle's screen depending on the layout of the components and the options. For this reason, some detailed areas may not be identical to those on the vehicle's screen.
(a) Enter diagnostic mode.
Click here
(b) Select "Function Check/Setting" on the "Service Menu" screen.
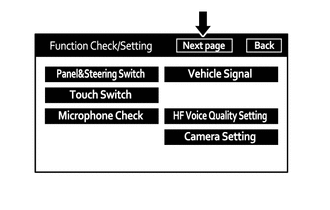
(c) Select "Next page" on the "Function Check/Setting" screen.
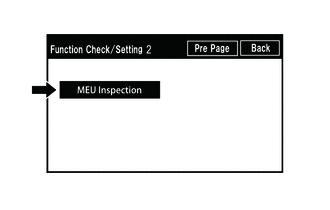
(d) Select "MEU Inspection" on the "Function Check/Setting 2" screen.
(e) Select "System Sensors Check" on the "MEU Inspection" screen.
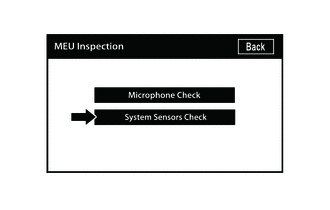
(f) System sensors check
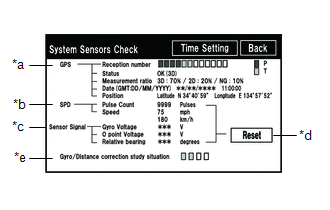 *a: GPS
Display | Content |
||
|---|---|---|---|
Reception number |
Displays the reception status of the satellites used to determine the vehicle position. |
Blue: P (in use) |
The system uses the GPS signal for positioning. |
Yellow: T (receiving) |
The system tracks the GPS signal for positioning. |
||
No color: not in use |
The system cannot receive a GPS signal. (searching for GPS signal) |
||
Status |
Displays the reception status of the satellites used to determine the vehicle position. |
OK (3D) |
Three-dimensional positioning is being used. |
OK (2D) |
Two-dimensional positioning is being used. |
||
NG |
The positioning data cannot be used. |
||
error |
A reception error has occurred. |
||
- |
Other status. |
||
Measurement ratio |
Displays the ratio of satellites taking measurements. |
3D |
The ratio of satellites performing 3D positioning is displayed. |
2D |
The ratio of satellites performing 2D positioning is displayed. |
||
NG |
The ratio of satellites not taking measurements is displayed. |
||
Date |
Displays the date and time obtained from the GPS signals, referenced to Greenwich Mean Time (GMT). |
||
Position |
Displays the latitude and longitude of the current position. |
||
Display | Content |
|---|---|
Pulse Count |
Displays the cumulative number of input pulses while this screen is displayed. |
Speed |
Displays the vehicle speed. |
Display | Content | Note |
|---|---|---|
Gyro Voltage |
Displays the output voltage of the gyro sensor. |
- |
0 point Voltage |
Displays the zero point voltage of the gyro sensor. |
- |
Relative bearing |
Displays the output angle of the gyro sensor. |
The amount of change in the roll angle (degrees) once the system sensors check screen is displayed (clockwise: "+", counterclockwise: "-"). |
Display | Content |
|---|---|
Reset |
When this switch is held down for at least 3 seconds, the values of the SPD signal and gyro sensor signal items on the screen are reset and display "0". |
Display | Content |
|---|---|
Gyro/Distance correction study status |
Displays the learning status of the distance/gyro correction. |
(1) When the "System Sensors Check" screen is displayed, check all sensor signals.
HINT:
This screen is updated every second.
(g) GPS time setting
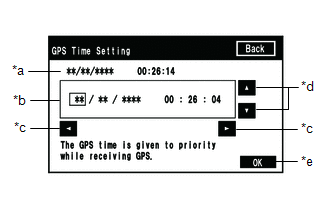 Screen Description
Display | Content |
|---|---|
*a: Time display |
Displays the date and time on the unit. |
*b: Date and time setting screen |
Setting is only possible when no GPS signal is being received. |
*c: Cursor movement switch |
Moves the cursor left and right on the time and date setting screen. |
*d: Adjustment switch |
Adjusts the values of the items selected by the cursor. |
*e: OK switch |
Selecting this switch after adjusting the time and date updates the unit's time and date (only when no GPS signal is being received). |
(1) When no GPS signal is received, the date and time of the unit can be set.
HINT:
Time adjustment is only possible when no GPS signal is received. When the audio and video system (for radio and display type) receives GPS signals, priority is given to displaying the time and date received via GPS.
VEHICLE SIGNAL CHECK
HINT:
- The vehicle signals received by the radio and display receiver assembly are checked using the following procedure.
- The diagrams may differ from the vehicle's screen depending on the layout of the components and the options. For this reason, some detailed areas may not be identical to those on the vehicle's screen.
(a) Enter diagnostic mode.
Click here
(b) Select "Function Check/Setting" on the "Service Menu" screen.
(c) Select "Vehicle Signal" on the "Function Check/Setting I" screen.
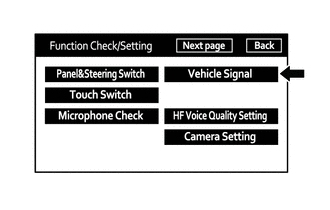
(d) Vehicle Signal Check Mode
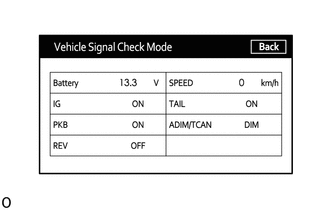 Screen Description
Display | Content |
|---|---|
Battery |
Displays the battery voltage. |
IG |
Displays the ON/OFF position of the ignition switch. |
PKB |
Displays the ON/OFF position of the parking brake. |
REV |
Displays the ON/OFF position of the reverse signal. |
SPEED |
Displays the vehicle speed in km/h. |
TAIL |
Displays the ON/OFF position of the tail signal (lighting control switch). |
ADIM/TCAN |
Displays the dimmer status: DIM (with) / BRIGHT (without). |
HINT:
- Only items that output vehicle signals will be displayed.
- This screen displays the vehicle signal inputs to the radio and display receiver assembly.
(1) When the "Vehicle Signal Check Mode" screen is displayed, check all vehicle signal conditions.
NOTICE:
- These settings must be made separately for each registered mobile phone.
- If a mobile phone has not been registered, the settings cannot be made.
CHECK HANDS-FREE VOICE QUALITY AND VOLUME SETTING
HINT:
- The following procedure is used to adjust the hands-free voice quality of a "Bluetooth" compatible mobile phone.
- The diagrams may differ from the vehicle's screen depending on the layout of the components and the options. For this reason, some detailed areas may not be identical to those on the vehicle's screen.
(a) Enter diagnostic mode.
Click here
(b) Select "Function Check/Setting" on the "Service Menu" screen.
(c) Select "HF Voice Quality Setting" on the "Function Check/Setting I" screen.
(d) Hands-free voice quality setting (voice quality type setting)
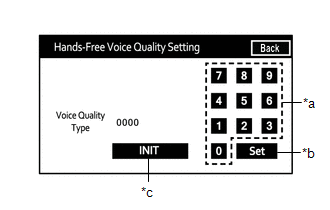
*a |
Numeric keypad |
*b |
Adjustment knob |
*c |
Reset button |
(1) If necessary, refer to the table below to set the voice quality type using the numeric keypad.
(2) When setting the parameters, use the numeric keypad on the screen to set the voice quality type according to the table.
SettingsParameter | Target phenomenon | Voice quality type | Positive effect of changing the voice quality | Negative effect of changing the voice quality |
|---|---|---|---|---|
A (Noise) |
The other party hears background noise when listening to your voice. |
1 000 |
The amount of background noise the other party hears when listening to your voice is reduced. |
The volume of your voice heard by the other party may temporarily drop. |
B (Noise) |
The other party hears a lot of background noise when listening to your voice. |
2 000 |
The amount of interference the other party hears when listening to your voice is greatly reduced. |
The volume of your voice heard by the other party may temporarily drop. |
C (Echo) |
The other party hears a slight echo. |
0100 |
The echo strength is reduced (low level). |
The sound quality for the other party deteriorates (low level). |
D (Echo) |
The other party hears a strong echo. |
0200 |
The echo strength is reduced (high level). |
The sound quality for the other party deteriorates (high level). |
Parameter | Target phenomenon | Voice quality type | Positive effect of changing the voice quality | Negative effect of changing the voice quality |
|---|---|---|---|---|
A+C |
The other party hears background noise and a slight echo when listening to your voice. |
1 100 |
|
|
A+D |
The other party hears background noise and a strong echo when listening to your voice. |
1 200 |
|
|
B+C |
The other party hears a lot of background noise and a slight echo when listening to your voice. |
2 100 |
|
|
B+D |
The other party hears a lot of background noise and a strong echo when listening to your voice. |
2 200 |
|
|
HINT:
- The default value is "0000".
- The settings will be applied when the adjustment knob is selected.
- If voice quality type values not listed in the table are entered, the setting will not be applied and there will be no positive effect.
- If call quality decreases due to a change in settings, return to the "0000" settings by selecting "INIT".
CHECK SPEAKER
HINT:
- This function is used to check the speaker wiring and confirm that the speakers operate correctly.
- The diagrams may differ from the vehicle's screen depending on the layout of the components and the options. For this reason, some detailed areas may not be identical to those on the vehicle's screen.
(a) Set the audio mode to ON and play an audio source.
HINT:
The audio source will be used to check the speakers.
(b) Enter diagnostic mode.
Click here
(c) Select "Failure Diagnosis" on the "Service Menu" screen.
(d) Select "System Check" on the "Failure Diagnosis" screen.
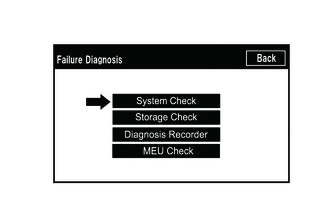
(e) Select "SPCheck ON" on the "System Check Mode" screen.
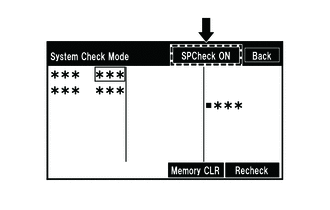
(f) Check the speaker wiring and confirm that the speakers operate correctly.
HINT:
- Confirm that each speaker outputs sound correctly from the selected audio source.
- "SPCheck OFF" is displayed during speaker check.
- Sound is output from the speakers in the vehicle, starting with a speaker in the front.
- Several speakers may sound at the same time depending on the speaker wiring.
- The sound order during the SPCheck function cannot be adjusted.
(g) The sound stops when any of the following conditions is met:
(1) "SPCheck OFF" is selected.
(2) The ignition switch is turned OFF.
(3) Diagnostic mode is turned OFF.
(4) The screen changes to another display.
(5) Set the audio mode to OFF.
CHECK SOFTWARE ERROR HISTORY
HINT:
- This function is used to check the cause of the black screen on the radio receiver and display assembly.
- The existence of an error history can be confirmed, but the location of the malfunction cannot be determined.
(a) Check the software error history.
(1) Connect the Techstream to the DLC3.
(2) Turn the ignition switch ON.
(3) Turn on the Techstream.
(4) Select the following menus: Body Electrical / Navigation System / Utility / Software Error History.
Body Electrical > Navigation System > UtilitySoftware Error History
(5) When an item is recorded in the software error history, record it before repairing the radio receiver and display assembly.
"Software Error History" Screen DescriptionError Description | Trigger |
|---|---|
Software Reset |
Navi Microcomputer |
Audio Microcomputer |
|
CAN Microcomputer |
|
No Video Signal |
Front Monitor |
Rear Monitor |
|
MOST cold restarts |
Always |
HINT:
- The trigger detects malfunctions and displays the location where the malfunction information was recorded.
- The software error history can store up to 5 items of history data. If a new software error occurs when 5 data items are already stored, the oldest data is erased and the new data is recorded.
- For errors not supported by the Techstream, "-" is displayed for the displayed items.
(b) Clear the software error history.
(1) When DTCs are cleared using any of the following operations, the software error history will also be cleared.
Click here
- Clearing using Techstream.
- Cleared using the "System Check Mode" screen.
- Cleared using the "Unit Check Mode" screen.
CHECK BLUETOOTH CONNECTION HISTORY
HINT:
This function is used to check the connection history when the connection between the audio/display receiver and a Bluetooth device is unstable.
(a) Check the Bluetooth connection history.
HINT:
- The Bluetooth connection history displays data stored in the ECU's internal memory, such as the date of Bluetooth connection attempts and the status of a Bluetooth connection.
- By checking the Bluetooth connection history, the date, cause, etc. of a Bluetooth device that failed to register or connect can be analyzed.
- The Bluetooth connection history indicates the estimated cause of the malfunction, but does not determine it. Therefore, checking the Bluetooth connection history may not resolve the problem.
- Performing a check using the Techstream before recording the Bluetooth connection history may erase the history.
(1) Connect the USB flash drive to the No. 1 stereo jack adapter assembly.
(2) Enter diagnostic mode.
Click here
(3) Select "Failure Diagnosis" on the "Service Menu" screen.
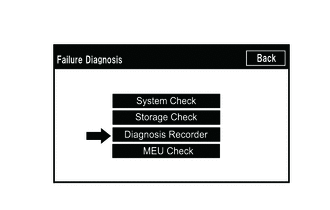
(4) Select "Diagnosis Recorder" on the "Failure Diagnosis" screen.
(5) Press the "Recording ON/OFF" switch to enable "BT Communication Trace output".
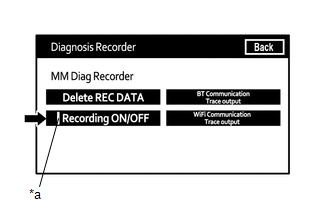
*a |
Green indicator |
HINT:
When the green "Recording ON/OFF" indicator is on, "BT Communication Trace output" is greyed out and cannot be selected.
(6) Select "BT Communication Trace output" for 3 seconds.
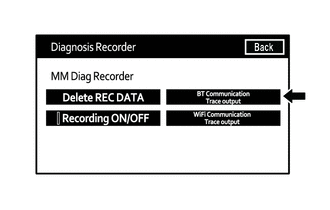
(7) Following the on-screen instructions, save the Bluetooth connection history data to the USB flash drive.
(8) Select "Recording ON/OFF" on the "Diagnosis Recorder" screen to turn on the green "Recording ON/OFF" indicator.
HINT:
After performing the above procedure, make sure the green "Recording ON/OFF" indicator turns on steadily again.
(9) Connect a USB device containing the saved Bluetooth connection history data to the Techstream.
(10) Turn on the Techstream.
(11) Select the following menus: Advanced Function / Bluetooth Connection History.
(12) On the Techstream screen, select the saved Bluetooth connection history file.
(13) On the Techstream screen, select the saved Bluetooth connection history file.
"Bluetooth" Connection History Screen DescriptionItem | Content |
|---|---|
Occurrence Start Date/Time |
Date and time the Bluetooth connection was displayed. |
Occurrence End Date/Time |
Date and time the Bluetooth disconnection was displayed. |
History Type |
The type of Bluetooth connection history is displayed. |
Result |
The Bluetooth connection result is displayed. |
Content |
The Bluetooth connection status is displayed. |
Bluetooth Address |
The address of the Bluetooth device is displayed. |
Retry Count |
The number of retries when the Bluetooth connection was made is displayed. |
Result | Content | Details | Items to Check |
|---|---|---|---|
- |
- |
The ignition switch is in the ACC position. |
- |
Result | Content | Details | Items to Check |
|---|---|---|---|
Success (HFP) |
No error |
The Bluetooth device was registered correctly as a hands-free component. |
- |
Success (AVP) |
No error |
The Bluetooth device was registered correctly as a Bluetooth audio device. |
- |
Failure |
Elapsed time |
The Bluetooth connection could not be established correctly. |
|
Authentication Error |
An incorrect PIN code was entered for PIN code verification. |
Register the Bluetooth device again. (Enter the PIN code correctly.) |
|
The confirm button was not selected even though a passkey was displayed. |
Register the Bluetooth device again. (When a passkey is displayed, select the confirm button.) |
||
A verification error occurred between the audio/display receiver and the Bluetooth device. |
Restart the radio receiver and display assembly and the Bluetooth device, then try again. |
||
ACL Link Disconnection |
The Bluetooth connection was disconnected by operating the Bluetooth device. |
Register the "Bluetooth" device again. |
|
The "Bluetooth" connection could not be established due to radio wave interference near the vehicle. |
Check for radio wave interference and register the "Bluetooth" device again. |
||
The "Bluetooth" device was out of the communication range. |
Bring the "Bluetooth" device close to the audio and display unit and register the "Bluetooth" device again. |
||
The "Bluetooth" setting on the "Bluetooth" device was set to OFF. |
Set the "Bluetooth" setting to ON and register the "Bluetooth" device again. |
||
The "Bluetooth" device was turned OFF. |
Turn the "Bluetooth" device ON and register the "Bluetooth" device again. |
||
Memory write malfunction |
The "Bluetooth" device information could not be saved in the audio and display unit. |
Register the "Bluetooth" device again. |
|
Other error |
An error other than those listed above occurred. |
After turning the ignition switch OFF and then back ON (IG), register the "Bluetooth" device again. |
|
Cancel |
No error |
Registration was interrupted by operation of the audio and display unit or the "Bluetooth" device. |
- |
Result | Content | Details | Items to Check |
|---|---|---|---|
|
No error |
The "Bluetooth" device was connected correctly as a hands-free device. |
- |
|
Elapsed time |
The Bluetooth connection could not be established correctly. |
|
Authentication Error |
Authentication key verification between the audio and display unit and the "Bluetooth" device failed. |
If the "Bluetooth" connection fails repeatedly, register the device again. |
|
A verification error occurred between the audio/display receiver and the Bluetooth device. |
Restart the radio receiver and display assembly and the Bluetooth device, then try again. |
||
Page timeout |
No "Bluetooth" device could be found near the audio and display unit. |
Bring the "Bluetooth" device close to the audio and display unit and connect the "Bluetooth" device again. |
|
The "Bluetooth" connection could not be established due to radio wave interference near the vehicle. |
Check for radio wave interference and connect the "Bluetooth" device again. |
||
The "Bluetooth" device was out of the communication range. |
Bring the "Bluetooth" device close to the audio and display unit and connect the "Bluetooth" device again. |
||
The "Bluetooth" setting on the "Bluetooth" device was set to OFF. |
Set the "Bluetooth" setting to ON and connect the "Bluetooth" device again. |
||
The "Bluetooth" device was turned OFF. |
Turn the "Bluetooth" device ON and connect the "Bluetooth" device again. |
||
A malfunction occurred in the "Bluetooth" device. |
Restart the Bluetooth device and try again. |
Result | Content | Details | Items to Check |
|---|---|---|---|
|
ACL Link Disconnection |
The Bluetooth connection was disconnected by operating the Bluetooth device. |
Connect the "Bluetooth" device again. |
The "Bluetooth" connection could not be established due to radio wave interference near the vehicle. |
Check for radio wave interference and connect the "Bluetooth" device again. |
||
The "Bluetooth" device was out of the communication range. |
Bring the "Bluetooth" device close to the audio and display unit and connect the "Bluetooth" device again. |
||
The "Bluetooth" setting on the "Bluetooth" device was set to OFF. |
Set the "Bluetooth" setting to ON and connect the "Bluetooth" device again. |
||
The "Bluetooth" device was turned OFF. |
Turn the "Bluetooth" device ON and connect the "Bluetooth" device again. |
||
A malfunction occurred in the "Bluetooth" device. |
Restart the Bluetooth device and try again. |
||
SDP error |
HFP is disabled on the "Bluetooth" device. |
Enable HFP on the "Bluetooth" device and connect the "Bluetooth" device again. |
|
A "Bluetooth" device whose operation has not been confirmed was used. |
Check that the "Bluetooth" device is hands-free compatible and that its operation has been confirmed. |
||
Other error |
An error other than those listed above occurred. |
After turning the ignition switch OFF and then back ON (IG), register the "Bluetooth" device again. |
|
Cancel manual connection (HFP) |
No error |
The connection was interrupted by operation of the audio and display unit or the "Bluetooth" device. |
- |
Result | Content | Details | Items to Check |
|---|---|---|---|
|
No error |
The "Bluetooth" device was connected correctly as a "Bluetooth" audio device. |
- |
|
Elapsed time |
The Bluetooth connection could not be established correctly. |
|
Authentication Error |
Authentication key verification between the audio and display unit and the "Bluetooth" device failed. |
If the "Bluetooth" connection fails repeatedly, register the device again. |
|
A verification error occurred between the audio/display receiver and the Bluetooth device. |
Restart the radio receiver and display assembly and the Bluetooth device, then try again. |
||
Page timeout |
No "Bluetooth" device could be found near the audio and display unit. |
Bring the "Bluetooth" device close to the audio and display unit and connect the "Bluetooth" device again. |
|
The "Bluetooth" connection could not be established due to radio wave interference near the vehicle. |
Check for radio wave interference and connect the "Bluetooth" device again. |
||
The "Bluetooth" device was out of the communication range. |
Bring the "Bluetooth" device close to the audio and display unit and connect the "Bluetooth" device again. |
||
The "Bluetooth" setting on the "Bluetooth" device was set to OFF. |
Set the "Bluetooth" setting to ON and connect the "Bluetooth" device again. |
||
The "Bluetooth" device was turned OFF. |
Turn the "Bluetooth" device ON and connect the "Bluetooth" device again. |
||
A malfunction occurred in the "Bluetooth" device. |
Restart the Bluetooth device and try again. |
Result | Content | Details | Items to Check |
|---|---|---|---|
|
ACL Link Disconnection |
The Bluetooth connection was disconnected by operating the Bluetooth device. |
Connect the "Bluetooth" device again. |
The "Bluetooth" connection could not be established due to radio wave interference near the vehicle. |
Check for radio wave interference and connect the "Bluetooth" device again. |
||
The "Bluetooth" device was out of the communication range. |
Bring the "Bluetooth" device close to the audio and display unit and connect the "Bluetooth" device again. |
||
The "Bluetooth" setting on the "Bluetooth" device was set to OFF. |
Set the "Bluetooth" setting to ON and connect the "Bluetooth" device again. |
||
The "Bluetooth" device was turned OFF. |
Turn the "Bluetooth" device ON and connect the "Bluetooth" device again. |
||
A malfunction occurred in the "Bluetooth" device. |
Restart the Bluetooth device and try again. |
||
SDP error |
AVP is disabled on the "Bluetooth" device. |
Enable AVP on the "Bluetooth" device and connect the "Bluetooth" device again. |
|
A "Bluetooth" device whose operation has not been confirmed was used. |
Check that the "Bluetooth" device is "Bluetooth" audio compatible and that its operation has been confirmed. |
||
Other error |
An error other than those listed above occurred. |
After turning the ignition switch OFF and then back ON (IG), register the "Bluetooth" device again. |
|
Manual connection (AVP) cancelled |
No error |
The connection was interrupted by operation of the audio and display unit or the "Bluetooth" device. |
- |
Result | Content | Details | Items to Check |
|---|---|---|---|
Disconnection completed (HFP) |
Link loss |
The "Bluetooth" device was moved outside the communication range. |
Move the "Bluetooth" device back within the communication range. |
The "Bluetooth" connection was disconnected due to radio wave interference near the vehicle. |
Check for radio wave interference and connect the "Bluetooth" device again. |
||
A malfunction occurred in the "Bluetooth" device. |
Restart the Bluetooth device and try again. |
||
Partner disconnection |
The Bluetooth connection was disconnected by operating the Bluetooth device. |
- |
|
Self disconnection |
The "Bluetooth" connection was disconnected by operation of the audio and display unit. |
- |
|
Other error |
An error other than those listed above occurred. |
After turning the ignition switch OFF and then back ON (IG), register the "Bluetooth" device again. |
|
Disconnection completed (AVP) |
Link loss |
The "Bluetooth" device was moved outside the communication range. |
Move the "Bluetooth" device back within the communication range. |
The "Bluetooth" connection was disconnected due to radio wave interference near the vehicle. |
Check for radio wave interference and connect the "Bluetooth" device again. |
||
A malfunction occurred in the "Bluetooth" device. |
Restart the Bluetooth device and try again. |
||
Partner disconnection |
The Bluetooth connection was disconnected by operating the Bluetooth device. |
- |
|
Self disconnection |
The "Bluetooth" connection was disconnected by operation of the audio and display unit. |
- |
|
Other error |
An error other than those listed above occurred. |
After turning the ignition switch OFF and then back ON (IG), register the "Bluetooth" device again. |
Result | Content | Details | Items to Check |
|---|---|---|---|
Success |
No error |
The call was placed successfully. |
- |
Failure |
Out of service |
Outside the mobile phone reception area. |
Move the vehicle to a mobile phone reception area, make sure the "Bluetooth" device is connected to the vehicle, and operate the device again. |
Redial control |
Redialing the "Bluetooth" device was restricted and a hands-free call could not be placed. |
Restart the Bluetooth device and try again. |
|
Other error |
A hands-free call could not be placed due to a malfunction of the "Bluetooth" device. |
Restart the Bluetooth device and try again. |
|
A hands-free call could not be placed due to a malfunction of the audio and display unit. |
After turning the ignition switch OFF and then back ON (IG), register the "Bluetooth" device again. |
||
A hands-free call could not be placed from the audio and display unit because the call status of the "Bluetooth" device was not transmitted to the audio and display unit. |
Restart the Bluetooth device and try again. |
HINT:
The item names in the Results and Contents columns of the table may differ from the item display on the Techstream.
Bluetooth connection sequence (registration from an onboard device)
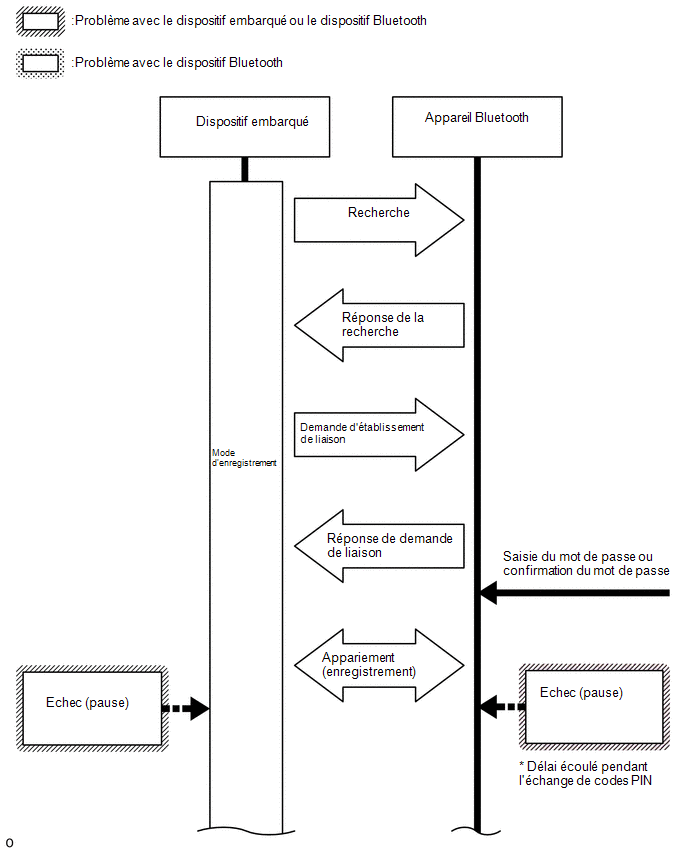
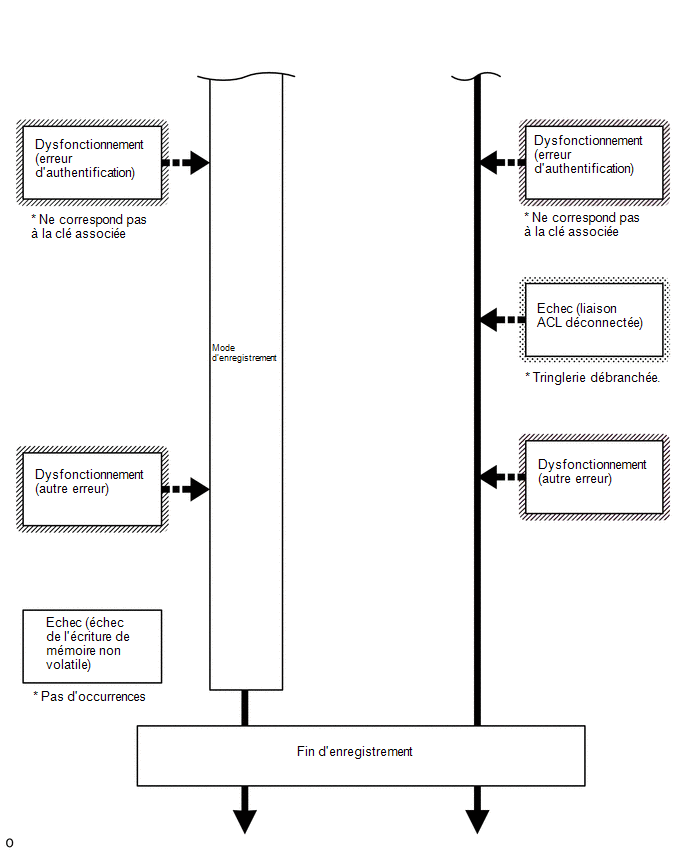
Bluetooth connection sequence (connection from an onboard device after registration)
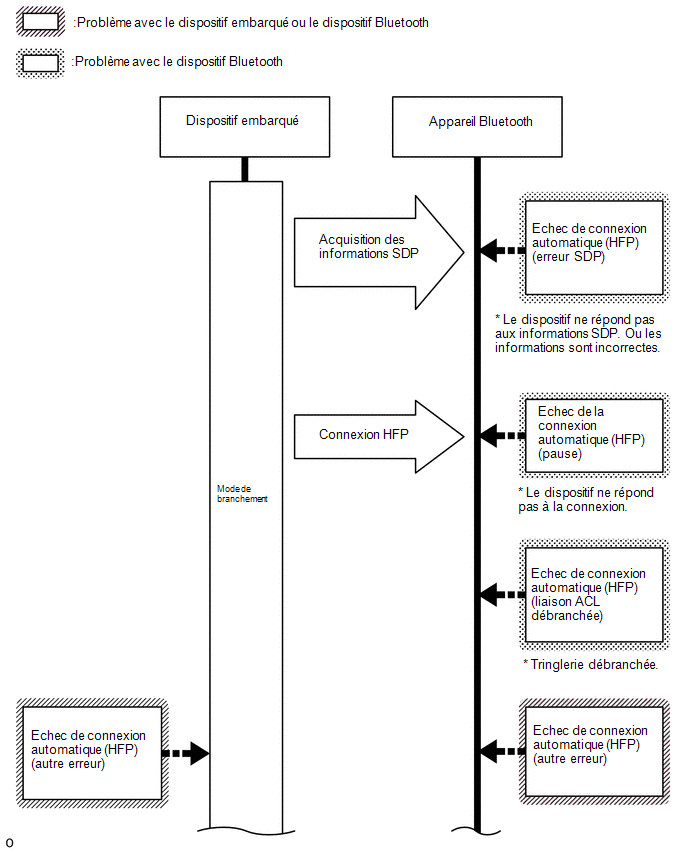
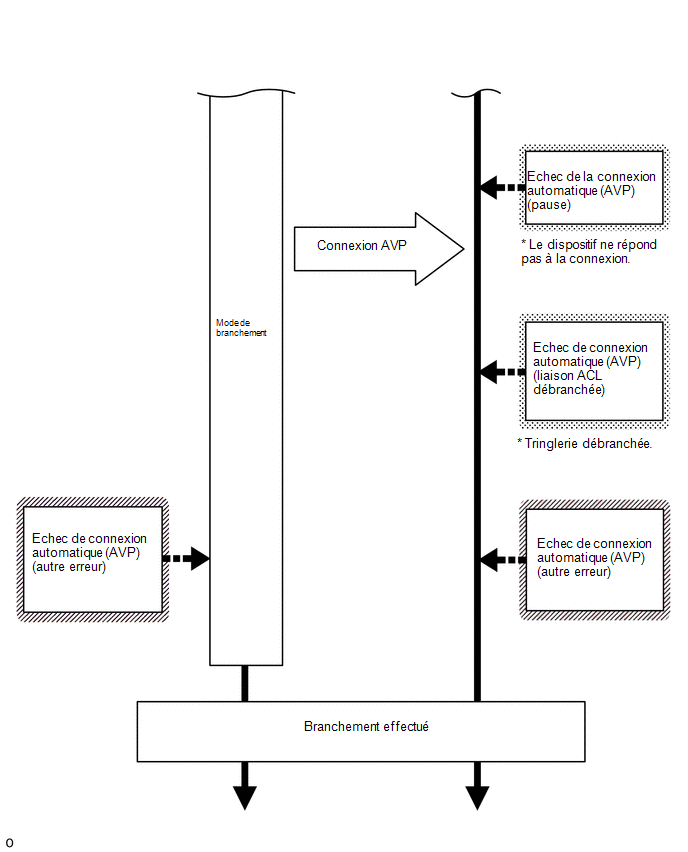
Bluetooth connection sequence (registration from a Bluetooth device)
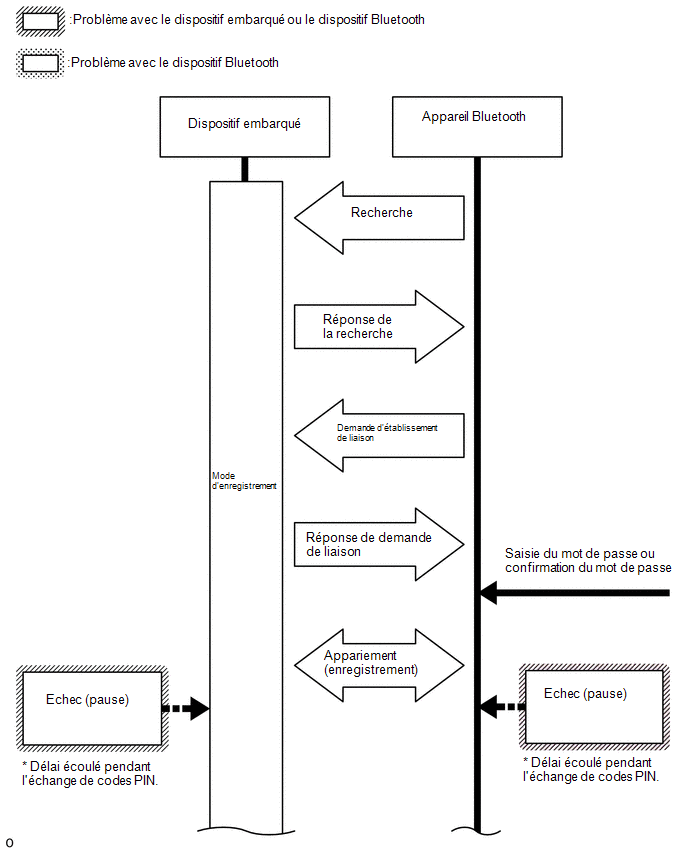
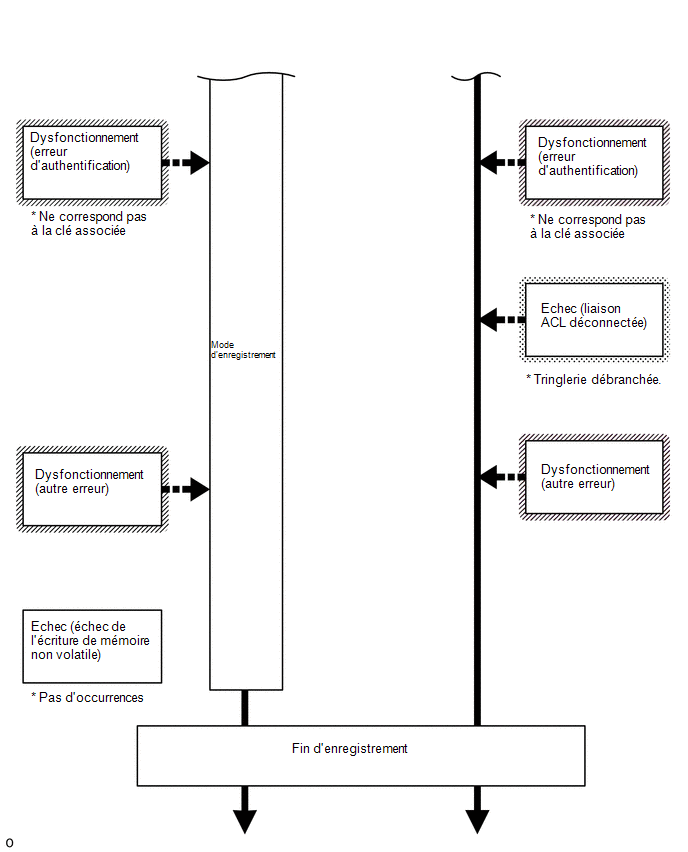
Bluetooth connection sequence (connection from a Bluetooth device after registration)
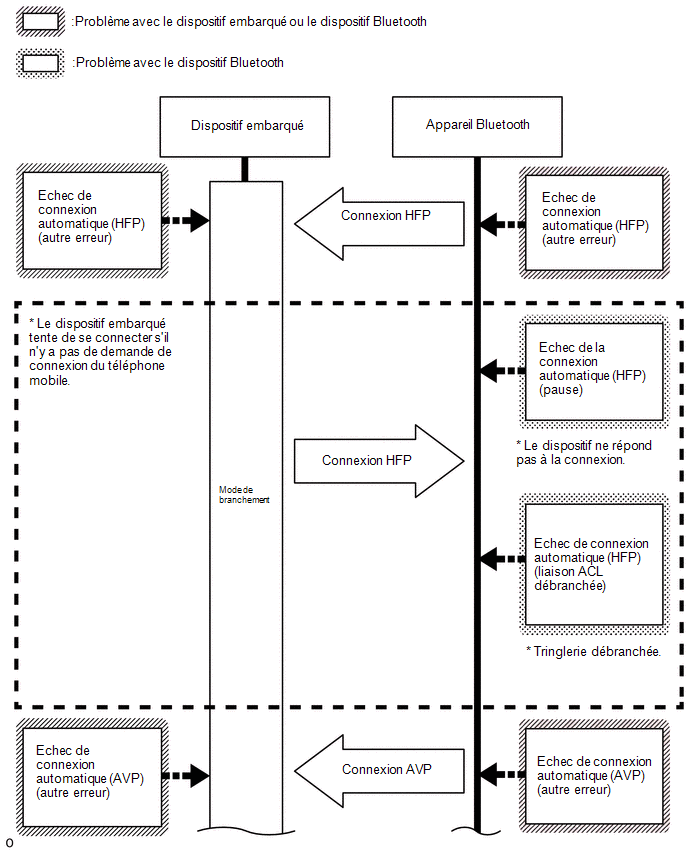
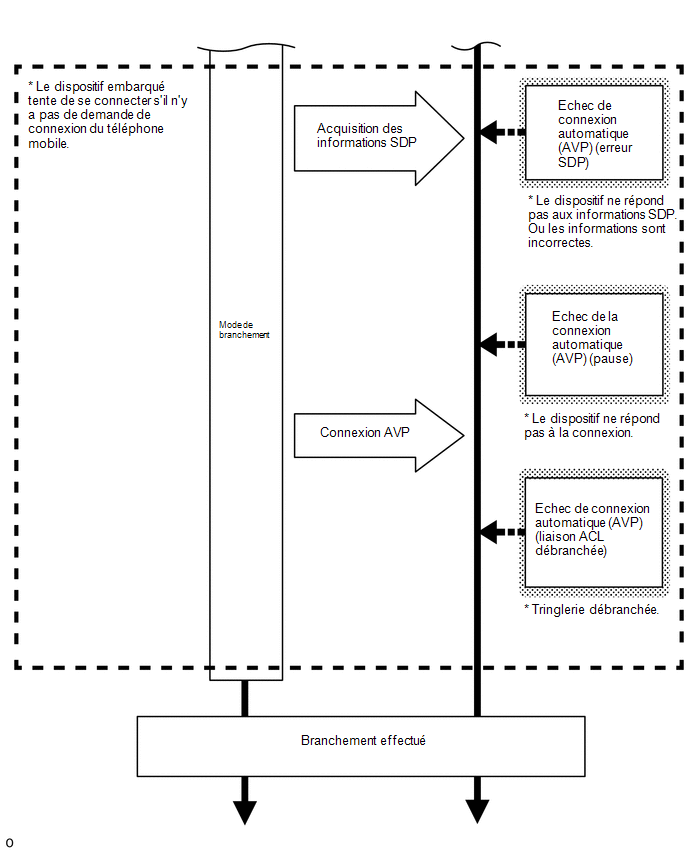
Bluetooth connection sequence (automatic connection)
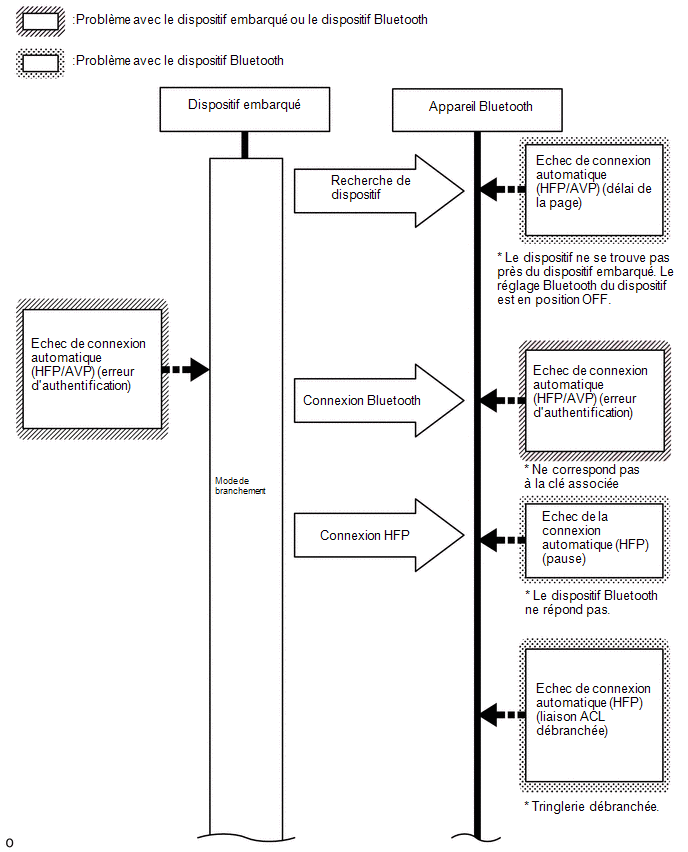
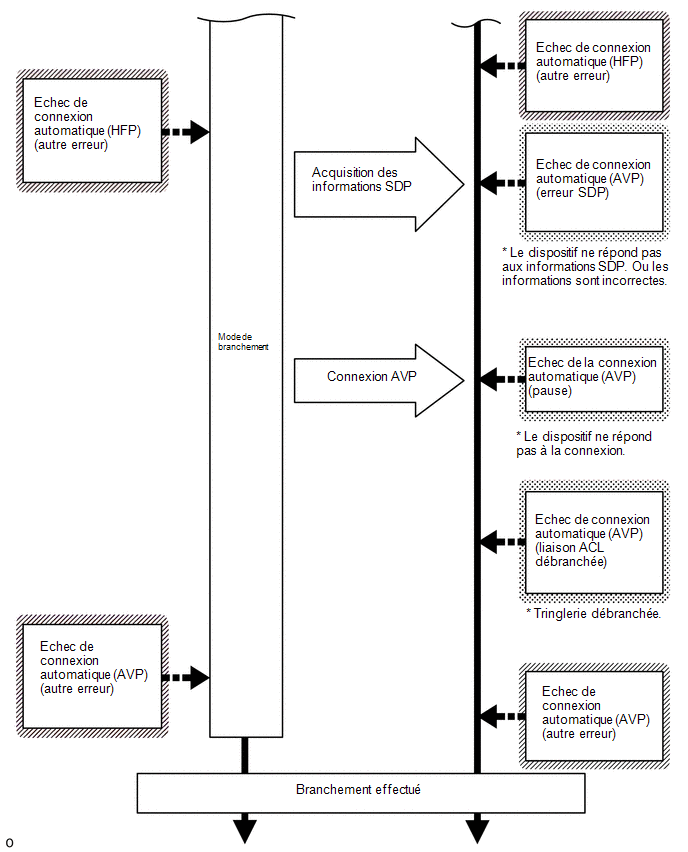
Bluetooth connection sequence (manual connection)
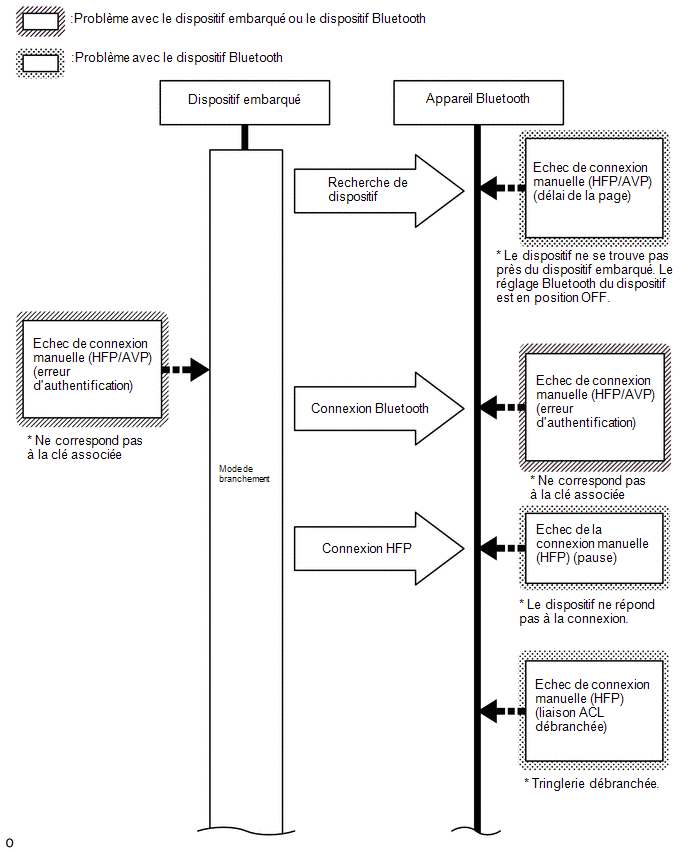
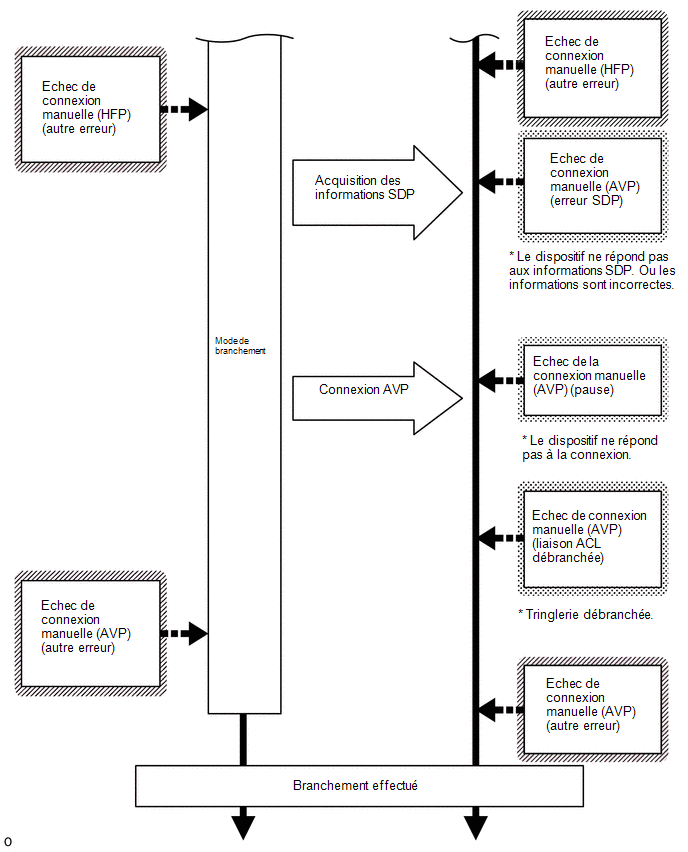
Bluetooth connection sequence (disconnection processing)
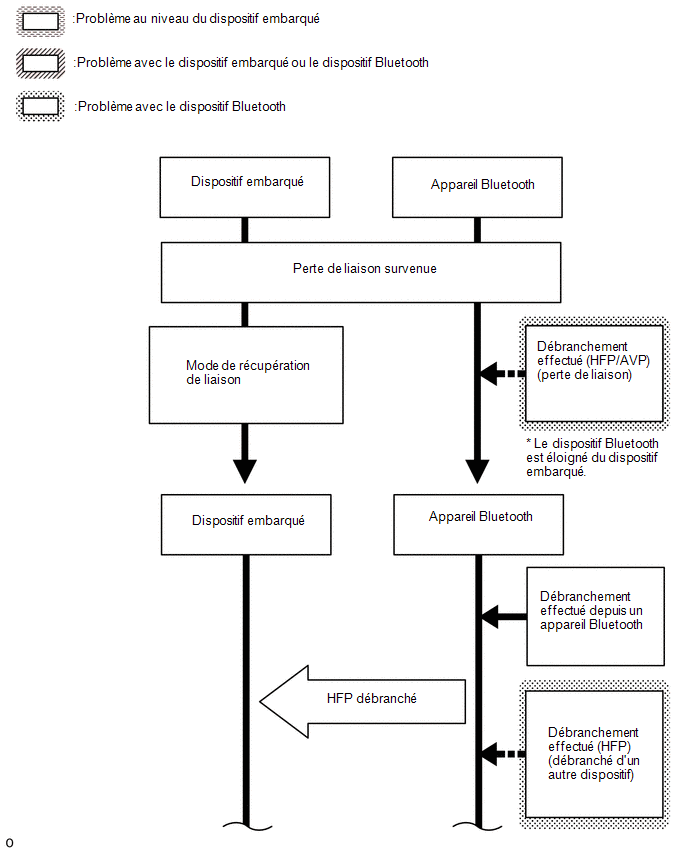
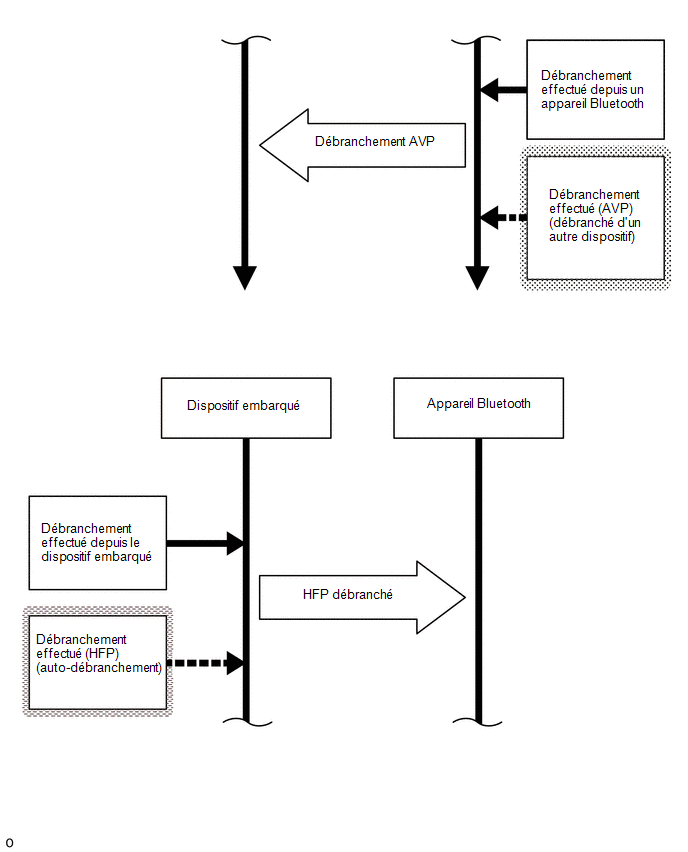
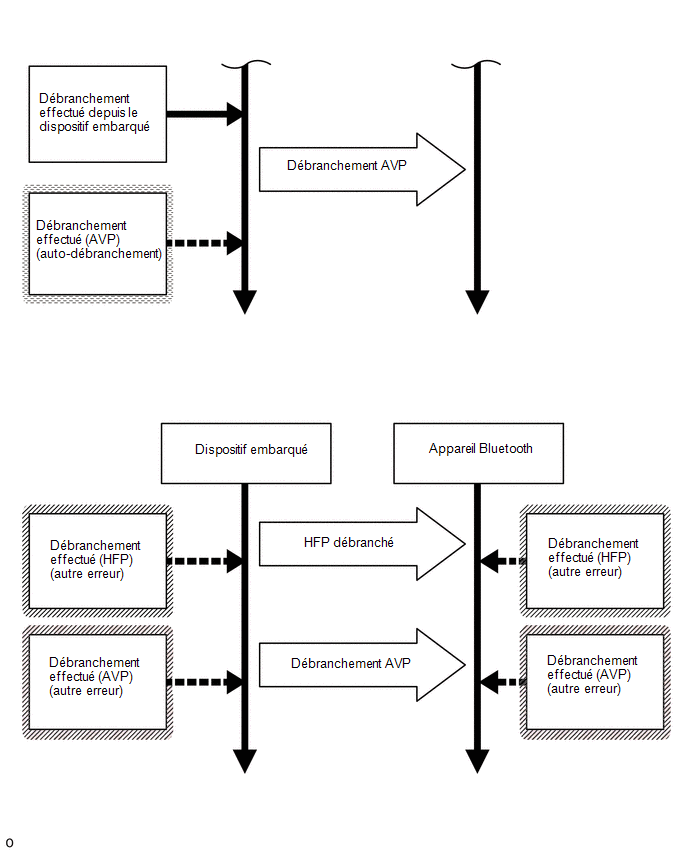
Bluetooth connection sequence (telephone call processing)
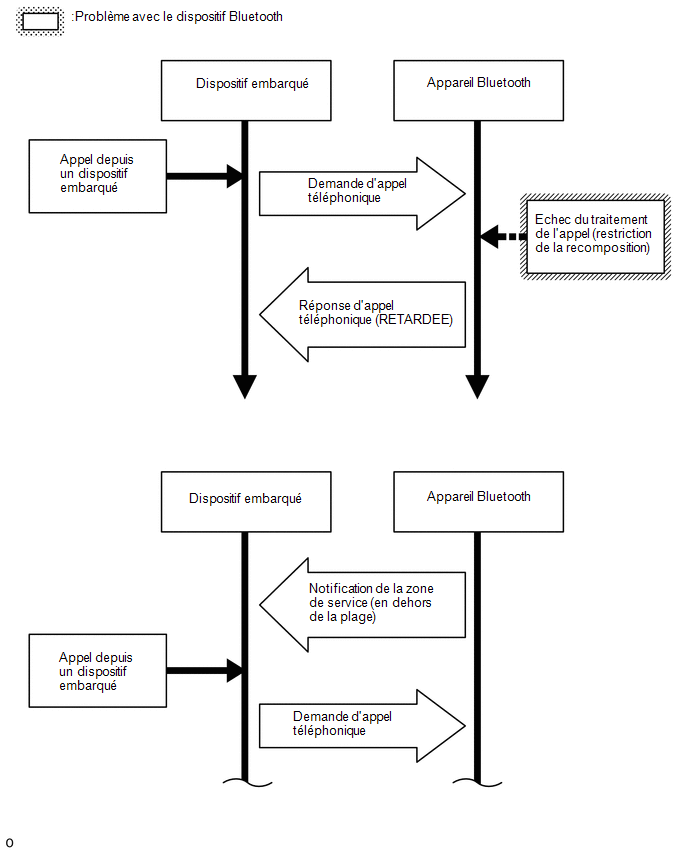
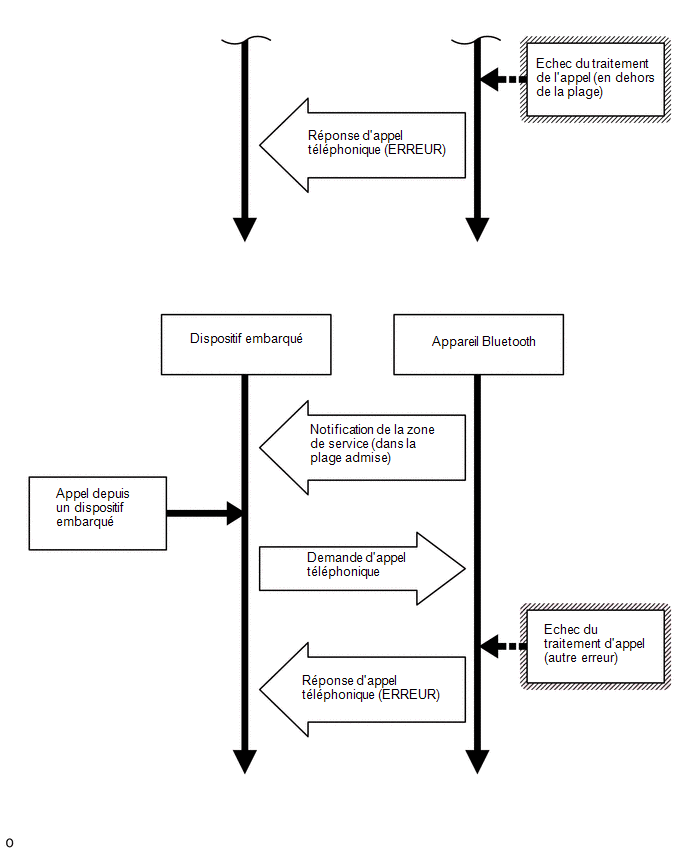
HINT:
Terms related to Bluetooth technology:
References in the repair manual | Description |
|
|---|---|---|
HFP |
(Hands-Free Profile) |
Profile for making and receiving telephone calls. |
AVP |
(Audio/Video Profile) |
Profile for music playback, lyrics display and operations. |
ACL |
(Asynchronous Connection Less) |
One of the Bluetooth connection methods used for data transfer. |
SDP |
(Service Discovery Protocol) |
Protocol used to determine which types of service are supported by the connected device. |