Speaker Output Short Circuit (B15C3)
DESCRIPTION
This DTC is stored when a malfunction occurs in the speakers.
DTC No. | Detection Item | DTC Detection Condition | Suspected Area |
|---|---|---|---|
B15C3 |
Speaker Output Short Circuit |
A short circuit is detected in the speaker output circuit. |
|
- *1: with Manual (SOS) Switch
WIRING DIAGRAM
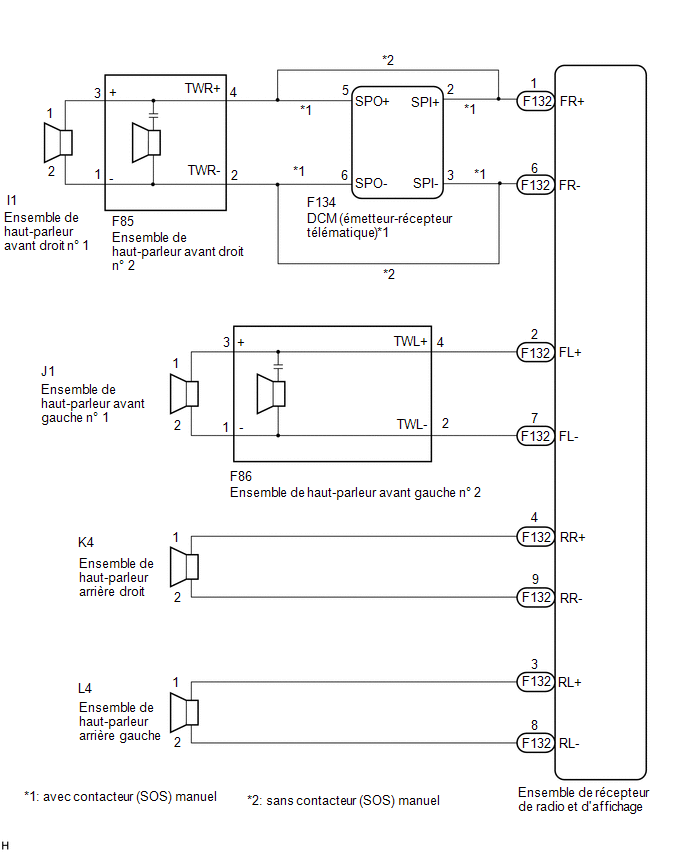
PROCEDURE
CONFIRM MODEL
(a) Select the model to be checked.
Result:
Result | Proceed to |
|---|---|
with manual (SOS) switch |
A |
without manual SOS switch |
B |
| B |  |
GO TO STEP 5 |
|

CHECK HARNESS AND CONNECTOR (RADIO RECEIVER AND DISPLAY ASSEMBLY, DCM (TELEMATICS TRANSCEIVER) OR SPEAKERS - BODY GROUND)
(a) Disconnect the F132 radio receiver and display assembly connectors.
(b) Disconnect the F134 DCM (telematics transceiver) connector.
(c) Disconnect the F86 front LH No. 2 speaker assembly connector.
(d) Disconnect the K4 and L4 rear speaker assembly connectors.
(e) Measure the resistance according to the value(s) in the table below.
Standard resistance:
Tester Connection | Condition | Specified Condition |
|---|---|---|
F132-1 (FR+) or F134-2 (SPI+) - Body ground |
Always |
10 kΩ minimum |
F132-6 (FR-) or F134-3 (SPI-) - Body ground |
Always |
10 kΩ minimum |
F132-2 (FL+) or F86-4 (TWL+) - Body ground |
Always |
10 kΩ minimum |
F132-7 (FL-) or F86-2 (TWL-) - Body ground |
Always |
10 kΩ minimum |
F132-4 (RR+) or K4-1 - Body ground |
Always |
10 kΩ minimum |
F132-9 (RR-) or K4-2 - Body ground |
Always |
10 kΩ minimum |
F132-3 (RL+) or L4-1 - Body ground |
Always |
10 kΩ minimum |
F132-8 (RL-) or L4-2 - Body ground |
Always |
10 kΩ minimum |
| NG | |
REPAIR OR REPLACE HARNESS OR CONNECTOR |
|
CHECK HARNESS AND CONNECTOR (FRONT RH NO. 2 SPEAKER ASSEMBLY OR DCM (TELEMATICS TRANSCEIVER) - BODY GROUND)
(a) Disconnect the F85 front RH No. 2 speaker assembly connector.
(b) Disconnect the F134 DCM (telematics transceiver) connector.
(c) Measure the resistance according to the value(s) in the table below.
Standard resistance:
Tester Connection | Condition | Specified Condition |
|---|---|---|
F85-4 (TWR+) or F134-5 (SPO+) - Body ground |
Always |
10 kΩ minimum |
F85-2 (TWR-) or F134-6 (SPO-) - Body ground |
Always |
10 kΩ minimum |
| NG | |
REPAIR OR REPLACE HARNESS OR CONNECTOR |
|
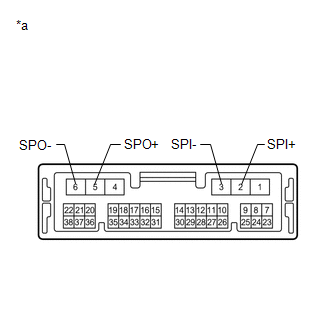
CHECK DCM (TELEMATICS TRANSCEIVER)
(a) Disconnect the DCM (telematics transceiver).
Click here
(b) Measure the resistance according to the value(s) in the table below. Standard resistance:
|
|
| OK | |
GO TO STEP 6 |
| NG | |
REPLACE DCM (DATA COMMUNICATION MODULE) |
CHECK HARNESS AND CONNECTOR (RADIO AND DISPLAY ASSEMBLY OR SPEAKERS - BODY GROUND)
(a) Disconnect the F132 radio receiver and display assembly connectors.
(b) Disconnect connectors F85 and F86 from the No. 2 front speaker assembly.
(c) Disconnect connectors K4 and L4 from the rear speaker assembly.
(d) Measure the resistance according to the value(s) in the table below.
Standard resistance:
Tester Connection | Condition | Specified Condition |
|---|---|---|
F132-1 (FR+) or F85-4 (TWR+) - Body ground |
Always |
10 kΩ minimum |
F132-6 (FR-) or F85-2 (TWR-) - Body ground |
Always |
10 kΩ minimum |
F132-2 (FL+) or F86-4 (TWL+) - Body ground |
Always |
10 kΩ minimum |
F132-7 (FL-) or F86-2 (TWL-) - Body ground |
Always |
10 kΩ minimum |
F132-4 (RR+) or K4-1 - Body ground |
Always |
10 kΩ minimum |
F132-9 (RR-) or K4-2 - Body ground |
Always |
10 kΩ minimum |
F132-3 (RL+) or L4-1 - Body ground |
Always |
10 kΩ minimum |
F132-8 (RL-) or L4-2 - Body ground |
Always |
10 kΩ minimum |
| NG | |
REPAIR OR REPLACE HARNESS OR CONNECTOR |
|
CHECK HARNESS AND CONNECTOR (NO. 1 FRONT SPEAKER ASSEMBLY OR NO. 2 FRONT SPEAKER ASSEMBLY - BODY GROUND)
(a) Disconnect connectors I1 and J1 from the No. 1 front speaker assembly.
(b) Disconnect connectors F85 and F86 from the No. 2 front speaker assembly.
(c) Measure the resistance according to the value(s) in the table below.
Standard resistance:
Tester Connection | Condition | Specified Condition |
|---|---|---|
F85-3 (+) or I1-1 - Body ground |
Always |
10 kΩ minimum |
F85-1 (-) or I1-2 - Body ground |
Always |
10 kΩ minimum |
F86-3 (+) or J1-1 - Body ground |
Always |
10 kΩ minimum |
F86-1 (-) or J1-2 - Body ground |
Always |
10 kΩ minimum |
| NG | |
REPAIR OR REPLACE HARNESS OR CONNECTOR |
|
INSPECT NO. 1 FRONT SPEAKER ASSEMBLY
(a) Remove the No. 1 front speaker assembly.
Click here
(b) Inspect the No. 1 front speaker assembly.
Click here
| NG | |
REPLACE NO. 1 FRONT SPEAKER ASSEMBLY |
|
INSPECT NO. 2 FRONT SPEAKER ASSEMBLY
(a) Remove the No. 2 front speaker assembly.
Click here
(b) Inspect the No. 2 front speaker assembly.
Click here
(c) Clear the DTCs.
Click here
(d) Check the DTCs again and make sure no DTCs are output.
Body Electrical > Navigation System > Trouble CodesOK:
No DTC is output.
| OK | |
END |
|
INSPECT REAR SPEAKER ASSEMBLY
(a) Remove the rear speaker assembly.
Click here
(b) Inspect the rear speaker assembly.
Click here
| OK | |
REPLACE RADIO AND DISPLAY RECEIVER ASSEMBLY |
| NG | |
REPLACE REAR SPEAKER ASSEMBLY |