Microphone Circuit
DESCRIPTION
- without manual (SOS) switch:
The Radio Receiver and Display Assembly, Reading Light Assembly and Telephone Microphone Assembly are connected to each other using microphone connection detection signal lines.
Through this circuit, the Radio Receiver and Display Assembly supplies power to the Reading Light Assembly and Telephone Microphone Assembly, and the Reading Light Assembly and Telephone Microphone Assembly send microphone signals to the Radio Receiver and Display Assembly.
- with manual (SOS) switch:
The Radio Receiver and Display Assembly, Reading Light Assembly and Telephone Microphone Assembly are connected to each other using microphone connection detection signal lines.
Through this circuit, the DCM (Telematics Transceiver) supplies power to the Reading Light Assembly and Telephone Microphone Assembly, and the Reading Light Assembly and Telephone Microphone Assembly send microphone signals to the Radio Receiver and Display Assembly via the DCM (Telematics Transceiver).
WIRING DIAGRAM
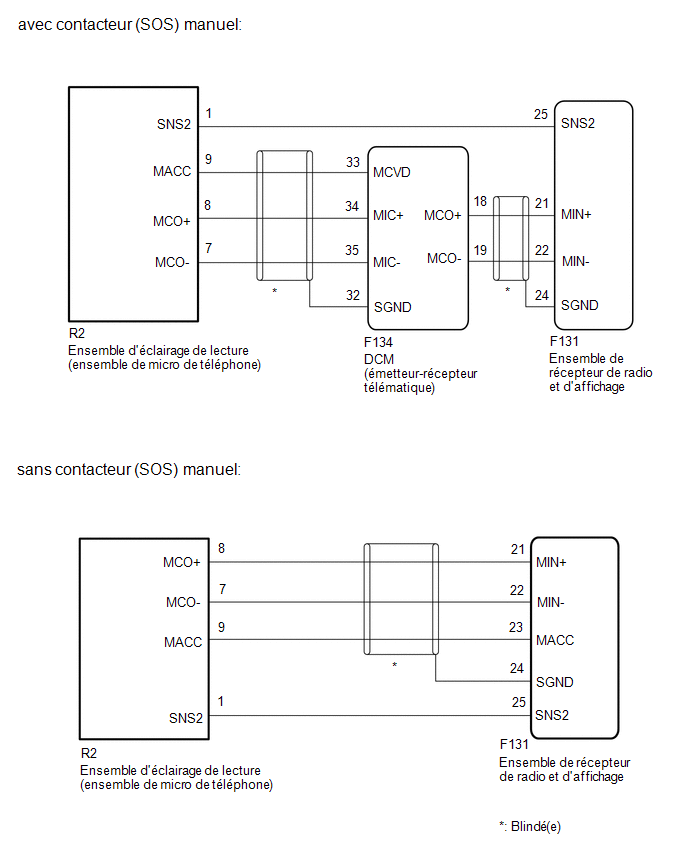
PRECAUTION / NOTICE / HINT
NOTICE:
- Depending on the parts replaced during inspection or maintenance of the vehicle, initialization, registration or calibration may be required. Refer to the precautions for the audio and visual system.
Click here

- When replacing the radio and display receiver assembly, always replace it with a new one. If a radio and display receiver assembly that was installed in another vehicle is reused, the following may occur:
- A communication malfunction DTC is stored.
- The radio and display receiver assembly may not operate normally.
PROCEDURE
CHECK MICROPHONE AND VOICE RECOGNITION (INPUT TO RADIO RECEIVER AND DISPLAY ASSEMBLY)
(a) Select the "Microphone Check" screen. Refer to Microphone Check (Input to Radio Receiver and Display Assembly) in Operation Check. Click here |
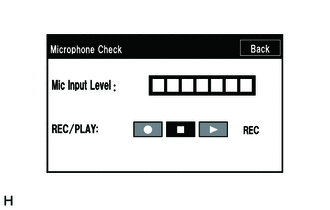 |
(b) When voice is picked up by the microphone, check whether the microphone input level value changes according to the voice.
OK:
The check result is normal.
Result:
Result | Proceed to |
|---|---|
NG (with manual (SOS) switch) |
A |
NG (without manual (SOS) switch) |
B |
OK |
C |
| A |  |
GO TO STEP 10 |
| C | |
USE SIMULATION METHOD TO CHECK |
|

CHECK WIRE HARNESS AND CONNECTOR (RADIO AND DISPLAY RECEIVER ASSEMBLY - MAP LIGHT ASSEMBLY (TELEPHONE MICROPHONE ASSEMBLY))
(a) Disconnect the F131 connector from the radio and display receiver assembly.
(b) Disconnect connector R2 from the map light assembly (telephone microphone assembly).
(c) Measure the resistance according to the value(s) in the table below.
Standard resistance:
Tester Connection | Condition | Specified Condition |
|---|---|---|
F131-25 (SNS2) - R2-1 (SNS2) |
Always |
Below 1 Ω |
F131-25 (SNS2) or R2-1 (SNS2) - Body Ground |
Always |
10 kΩ minimum |
| NG | |
REPAIR OR REPLACE HARNESS OR CONNECTOR |
|
CHECK HARNESS AND CONNECTOR (RADIO RECEIVER AND DISPLAY ASSEMBLY - DCM (TELEMATICS TRANSCEIVER))
(a) Disconnect the F131 connector from the radio and display receiver assembly.
(b) Disconnect the F134 DCM (telematics transceiver) connector.
(c) Measure the resistance according to the value(s) in the table below.
Standard resistance:
Tester Connection | Condition | Specified Condition |
|---|---|---|
F131-21 (MIN+) - F134-18 (MCO+) |
Always |
Below 1 Ω |
F131-22 (MIN-) - F134-19 (MCO-) |
Always |
Below 1 Ω |
F131-21 (MIN+) or F134-18 (MCO+) - Body Ground |
Always |
10 kΩ minimum |
F131-22 (MIN-) or F134-19 (MCO-) - Body Ground |
Always |
10 kΩ minimum |
F131-24 (SGND) - Body ground |
Always |
10 kΩ minimum |
| NG | |
REPAIR OR REPLACE HARNESS OR CONNECTOR |
|
CHECK WIRE HARNESS AND CONNECTOR (DCM (TELEMATICS TRANSCEIVER) - READING LIGHT ASSEMBLY)
(a) Disconnect connector F134 from the DCM (Data Communication Module).
(b) Disconnect connector R2 from the Reading Light Assembly.
(c) Measure the resistance according to the value(s) in the table below.
Standard resistance:
Tester Connection | Condition | Specified Condition |
|---|---|---|
F134-33 (MCVD) - R2-9 (MACC) |
Always |
Below 1 Ω |
F134-34 (MIC+) - R2-8 (MCO+) |
Always |
Below 1 Ω |
F134-35 (MIC-) - R2-7 (MCO-) |
Always |
Below 1 Ω |
F134-33 (MCVD) or R2-9 (MACC) - Body Ground |
Always |
10 kΩ minimum |
F134-34 (MIC+) or R2-8 (MCO+) - Body Ground |
Always |
10 kΩ minimum |
F134-35 (MIC-) or R2-7 (MCO-) - Body Ground |
Always |
10 kΩ minimum |
F134-32 (SGND) - Body Ground |
Always |
10 kΩ minimum |
| NG | |
REPAIR OR REPLACE HARNESS OR CONNECTOR |
|
CHECK RADIO AND DISPLAY RECEIVER ASSEMBLY
(a) Connect the Radio Receiver and Display Assembly connector. |
|
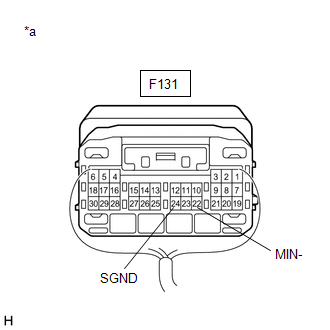
(b) Disconnect the F134 DCM (telematics transceiver) connector.
(c) Measure the resistance according to the value(s) in the table below.
Standard resistance:
Tester Connection | Condition | Specified Condition |
|---|---|---|
F131-24 (SGND) - Body ground |
Always |
Below 1 Ω |
F131-22 (MIN-) - Body ground |
Always |
Below 1 Ω |
| NG | |
REPLACE RADIO AND DISPLAY RECEIVER ASSEMBLY |
|
CHECK DCM (TELEMATICS TRANSCEIVER)
(a) Connect the DCM (Telematics Transceiver) connector.
(b) Measure the voltage according to the value(s) in the table below. Standard voltage:
|
|
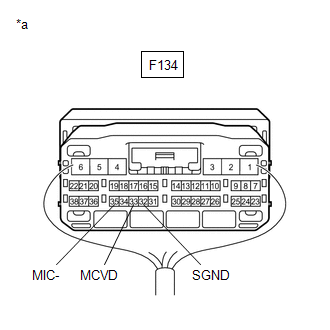
(c) Measure the resistance according to the value(s) in the table below.
Standard resistance:
Tester Connection | Condition | Specified Condition |
|---|---|---|
F134-35 (MIC-) - Body ground |
Always |
Below 1 Ω |
F134-32 (SGND) - Body Ground |
Always |
Below 1 Ω |
| NG | |
REPLACE DCM (DATA COMMUNICATION MODULE) |
|
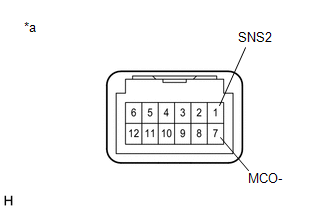
CHECK MAP LIGHT ASSEMBLY (TELEPHONE MICROPHONE ASSEMBLY)
(a) Remove the map light assembly (telephone microphone assembly).
Click here
(b) Measure the resistance according to the value(s) in the table below. Standard resistance:
|
|
| NG | |
REPLACE MAP LIGHT ASSEMBLY (TELEPHONE MICROPHONE ASSEMBLY) |
|
CHECK READING LIGHT ASSEMBLY (TELEPHONE MICROPHONE ASSEMBLY) (OUTPUT TO DCM (TELEMATICS TRANSCEIVER))
(a) Connect the F131 connector of the Audio and Display System Assembly.
(b) Connect the R2 connector of the Reading Light Assembly (Telephone Microphone Assembly).
(c) Connect the R134 connector of the DCM (Telematics Transceiver).
(d) Turn the ignition switch to ACC.
(e) Connect an oscilloscope to terminals 8 (MCO+) and 7 (MCO-) of the R2 connector of the Reading Light Assembly (Telephone Microphone Assembly). |
|
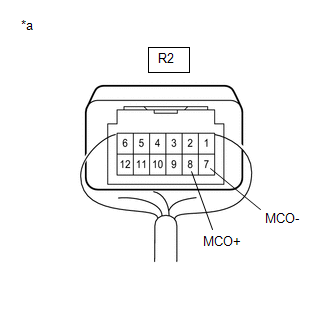
Result:
Result | Proceed to |
|---|---|
A waveform synchronized with the voice volume sent to the Reading Light Assembly (Telephone Microphone Assembly) is output. |
A |
No waveform synchronized with the voice volume sent to the Reading Light Assembly (Telephone Microphone Assembly) is output. |
B |
| B | |
REPLACE MAP LIGHT ASSEMBLY (TELEPHONE MICROPHONE ASSEMBLY) |
|
CHECK DCM (TELEMATICS TRANSCEIVER) (OUTPUT TO RADIO RECEIVER AND DISPLAY ASSEMBLY)
(a) Connect the F131 connector of the Audio and Display System Assembly.
(b) Connect the R2 connector of the Reading Light Assembly (Telephone Microphone Assembly).
(c) Connect the F134 connector of the DCM (Telematics Transceiver).
(d) Turn the ignition switch to ACC.
(e) Connect an oscilloscope to terminals 18 (MCO+) and 19 (MCO-) of the F134 connector of the DCM (Telematics Transceiver). |
|
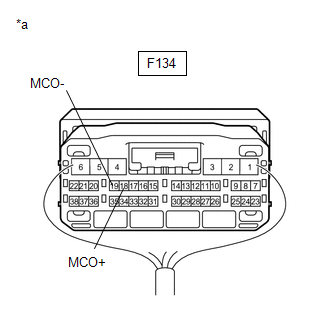
Result:
Result | Proceed to |
|---|---|
A waveform synchronized with the voice volume sent to the Reading Light Assembly (Telephone Microphone Assembly) is output. |
A |
No waveform synchronized with the voice volume sent to the Reading Light Assembly (Telephone Microphone Assembly) is output. |
B |
| A | |
GO TO APPLICABLE SYSTEM AS INDICATED IN THE PROBLEM SYMPTOMS TABLE |
| B | |
REPLACE DCM (DATA COMMUNICATION MODULE) |
CHECK WIRE HARNESS AND CONNECTOR (RADIO AND DISPLAY RECEIVER ASSEMBLY - MAP LIGHT ASSEMBLY (TELEPHONE MICROPHONE ASSEMBLY))
(a) Disconnect the F131 connector from the radio and display receiver assembly.
(b) Disconnect connector R2 from the map light assembly (telephone microphone assembly).
(c) Measure the resistance according to the value(s) in the table below.
Standard resistance:
Tester Connection | Condition | Specified Condition |
|---|---|---|
F131-25 (SNS2) - R2-1 (SNS2) |
Always |
Below 1 Ω |
F131-23 (MACC) - R2-9 (MACC) |
Always |
Below 1 Ω |
F131-21 (MIN+) - R2-8 (MCO+) |
Always |
Below 1 Ω |
F131-22 (MIN-) - R2-7 (MCO-) |
Always |
Below 1 Ω |
F131-25 (SNS2) or R2-1 (SNS2) - Body Ground |
Always |
10 kΩ minimum |
F131-23 (MACC) or R2-9 (MACC) - Body Ground |
Always |
10 kΩ minimum |
F131-21 (MIN+) or R2-8 (MCO+) - Body Ground |
Always |
10 kΩ minimum |
F131-22 (MIN-) or R2-7 (MCO-) - Body Ground |
Always |
10 kΩ minimum |
F131-24 (SGND) - Body ground |
Always |
10 kΩ minimum |
| NG | |
REPAIR OR REPLACE HARNESS OR CONNECTOR |
|
CHECK RADIO AND DISPLAY RECEIVER ASSEMBLY
(a) Connect the F131 connector of the Audio and Display System Assembly.
(b) Connect the R2 connector of the Reading Light Assembly (Telephone Microphone Assembly).
(c) Measure the voltage according to the value(s) shown in the table below. Standard voltage:
|
|
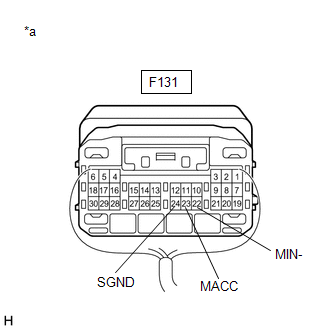
(d) Measure the resistance according to the value(s) in the table below.
Standard resistance:
Tester Connection | Condition | Specified Condition |
|---|---|---|
F131-24 (SGND) - Body ground |
Always |
Below 1 Ω |
F131-22 (MIN-) - Body ground |
Always |
Below 1 Ω |
| NG | |
REPLACE RADIO AND DISPLAY RECEIVER ASSEMBLY |
|
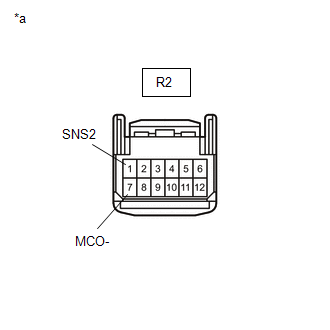
CHECK MAP LIGHT ASSEMBLY (TELEPHONE MICROPHONE ASSEMBLY)
(a) Remove the map light assembly (telephone microphone assembly).
Click here
(b) Measure the resistance according to the value(s) in the table below. Standard resistance:
|
|
| NG | |
REPLACE MAP LIGHT ASSEMBLY (TELEPHONE MICROPHONE ASSEMBLY) |
|
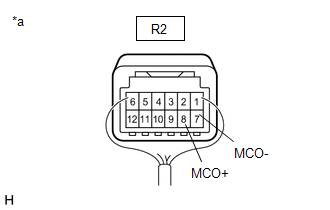
CHECK MAP LIGHT ASSEMBLY (TELEPHONE MICROPHONE ASSEMBLY)
(a) Connect the F131 connector of the Audio and Display System Assembly.
(b) Connect the R2 connector of the Reading Light Assembly (Telephone Microphone Assembly).
(c) Turn the ignition switch to ON (ACC).
(d) Connect an oscilloscope to terminals 8 (MCO+) and 7 (MCO-) of the R2 connector of the Reading Light Assembly (Telephone Microphone Assembly). |
|
Result:
Result | Proceed to |
|---|---|
A waveform synchronized with the voice volume sent to the Reading Light Assembly (Telephone Microphone Assembly) is output. |
A |
No waveform synchronized with the voice volume sent to the Reading Light Assembly (Telephone Microphone Assembly) is output. |
B |
| A | |
GO TO APPLICABLE SYSTEM AS INDICATED IN THE PROBLEM SYMPTOMS TABLE |
| B | |
REPLACE MAP LIGHT ASSEMBLY (TELEPHONE MICROPHONE ASSEMBLY) |