Replace spark plugs / check ignition leads
Gasoline engines
Required special tool:
A 16 mm spark plug socket, available from accessory retailers.
The following wear parts must be purchased:
The correct spark plugs, see page 92.
Removal
The engine must have cooled to at least hand-warm, otherwise the thread in the cylinder head can be damaged when unscrewing the plugs.
1.4/1.6 L engine:

1.4 L engine: remove the ignition lead cover with a Torx T40 screwdriver (arrows). The upper left screw only needs to be loosened, not removed.

Before pulling off the spark plug connectors, number them 1 to 4 with masking tape so they are not swapped when refitted. The first cylinder is on the timing belt side of the engine.
Pull off all spark plug connectors, pulling only on the connectors and not on the leads.
If possible, blow out the spark plug recesses with compressed air so that no dirt falls into the threaded bore when the plugs are removed.
1.8/2.0 L engine: remove the ignition coils, see page 86.
Unscrew the spark plugs with the spark plug socket and check the condition of each plug (so-called "plug face"). With some experience, conclusions about the operating condition of the engine can be drawn from it.
The following rules apply:
Electrodes and insulator
Medium grey = spark plug working correctly and correct mixture
Black = mixture too rich
Light grey = mixture too lean
Oil-fouled = misfiring of the affected spark plug or poorly sealing piston rings (check compression).
Check the spark plug insulators for creepage currents. Creepage currents appear as thin, irregular tracks on the surface. If creepage tracks are present, check whether the spark plug connector leaks and replace it if necessary.
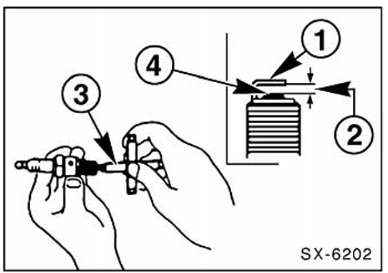
Check electrode gap - 2 - with a feeler gauge. Specified value: 0.8 mm.
New spark plugs are generally set to the correct electrode gap. Certain makes are no longer adjustable; see page 92.
To adjust the spark plug gap, bend ground electrode -1-.
A simple, practical tool - 3 - is available for this. Otherwise, carefully tap the ground electrode sideways. When bending, support a small screwdriver on the thread edge of the plug, but never on the center electrode - 4 -, as it will be damaged.
Bend the ignition cables only over a wide radius and check them for cracks. Replace all ignition cables if necessary.
Installation
Clean the spark plug threads with a clean cloth.
Screw in the spark plugs by hand until they seat on the cylinder head. Caution: do not insert the plugs at an angle.
Tighten the spark plugs to 25 N·m.
Warning: If no torque wrench is available, tighten new spark plugs with a spark plug wrench by approx. 1/4 turn. Tighten used spark plugs by approx. 15° only. Spark plugs tightened too far may break off when removed or damage the thread in the cylinder head.
In this case, repair the spark plug thread with Helicoil inserts.
1.4/1.6 L engine: Push the spark plug connectors on according to the markings made during removal. On the 1.4 L engine, then refit the ignition cable cover.
1.8/2.0 L engine: Install the ignition coils and engine cover, making sure the cable connectors and ground straps are seated correctly; see page 86.
Test yourself
A quick Fiat Bravo quiz: every answer comes with an explanation and a link to the manual page.