Crankshaft Installation and Main Bearing Clearance Check
PROCEDURE
1. Crankshaft installation is the first step of actual engine assembly. It is assumed that at this stage the crankshaft and engine block have already been properly cleaned, inspected, and reconditioned.
2. Turn the engine upside down.
3. Remove the bolts and remove the main bearing caps and/or the main bearing cap assembly (4-cylinder engines).
4. If not already done, remove the old main bearing inserts from their seats in the block and caps. Wipe the seats with clean lint-free cloth - they must be perfectly clean.
Main Bearing Clearance Check
PROCEDURE
Avoid touching the surfaces of new bearing inserts with bare hands to prevent unwanted contact with oil and chemically aggressive substances that are always present on the fingers.
1. Wipe the backs of the new main bearing inserts and install the halves with the oil groove (if provided) into their seats in the block. Install the remaining bearing insert halves into the corresponding bearing caps. Make sure the bearing tabs engage the matching locating slots in the block seats and caps. The oil holes in the block must also be properly aligned with the holes in the inserts.
Never try to hammer a bearing insert that does not fit into its seat. Do not lubricate the bearings at this stage!
2. When working on a V6 engine, remember that the thrust bearing washers are installed on the third bearing. On 4-cylinder engines, the thrust bearing is No. 4 bearing.
3. Wipe the bearing surfaces in the block and the crankshaft main journals with clean lint-free cloth. Check that the crankshaft oil passages are open and clean them if necessary. Any foreign particles in the oil passages will eventually end up in the bearings.
4. Carefully lay the thoroughly cleaned crankshaft into the main bearings in the block.
5. Before installing the crankshaft permanently, check the main bearing clearances.
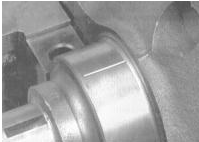
6. Cut pieces of calibrated plastic gauge wire from the Plastigage set slightly shorter than the width of the bearing shells. Place one piece of wire on each main journal of the crankshaft, parallel to its axis.
7. Clean the bearing surfaces of the caps and install the caps and/or the bridge assembly in their original position. Take care not to move the calibrated wire pieces placed on the journals. Lightly lubricate the threads of the bolts with oil and install them to secure the caps.
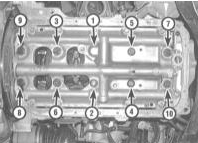
8. Tighten the main bearing cap bolts and/or bridge assembly bolts to the specified torque in three stages, in the sequence shown in the illustration.
Do not allow the crankshaft to rotate while tightening the bolts!
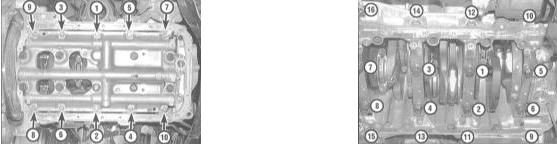
9. Remove the bolts and carefully remove the main bearing caps and/or the bridge assembly. Keep the caps in the order they were installed on the engine. Take care not to damage the flattened calibrated wire and do not rotate the crankshaft. If any cap does not come off, tap it gently with a soft-faced hammer to loosen it.
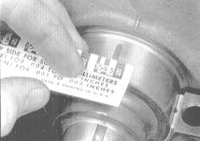
10. Using the scale printed on the Plastigage envelope, measure the width of the flattened wire to determine the bearing operating clearance. Compare the measurement results with the Specifications.
11. If the clearance is outside the specified limits, the bearing shells may be of the wrong size (see the section Inspection and Selection of Main and Connecting Rod Bearing Shells). Before selecting new shells, make sure no dirt or oil got between the shells and the journals. If the calibrated wire is flattened more at one end than the other, the journal is tapered (see the section Crankshaft Inspection).
12. Carefully remove the calibrated wire from the journals by scraping off all traces with a non-metallic tool (for example, the edge of an old plastic card). As a last resort, use a fingernail, but make sure no scratches or scoring remain on the journal or bearing surfaces.
Test yourself
A quick Honda Accord quiz: every answer comes with an explanation and a link to the manual page.