Cylinder Head Condition Inspection
Condition Inspection
Before deciding whether machining of the cylinder head is required, perform a thorough inspection of its condition. After carefully reviewing the material in this subsection, make a list of components that require special attention.
Cylinder Head
PROCEDURE
1. Carefully inspect the cylinder head for signs of coolant leaks, cracks and other damage. A cracked cylinder head must be replaced without exception. If you are not certain of the condition of the cylinder head, send it to an automotive service shop for inspection. If repair is not possible, replace the defective cylinder head.
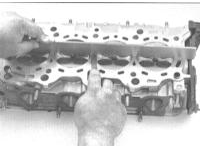
2. Using a straightedge and feeler gauge, check the mating surface of the cylinder head for signs of distortion. If the flatness deviation exceeds the value specified in the Specifications, send the cylinder head to a machine shop for resurfacing.
3. Inspect the valve seats in each combustion chamber. If pitting, cracks or burn marks are found, the cylinder head must undergo special restoration work. This work is beyond the capability of an average home mechanic and must be performed by an automotive service specialist.
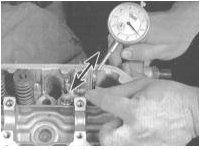
4. Using a DTI gauge, measure the valve stem play in the valve guides. The valve must be lifted approximately 1.6 mm off its seat. Divide the total valve side play by two to determine the valve-to-guide clearance. Compare the results of these calculations with the Specifications. If you are unsure of the condition of the components, have them inspected by an automotive service shop.
Valves
PROCEDURE
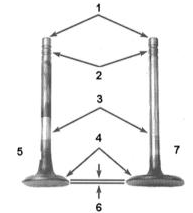
1. Carefully inspect the valve faces for signs of uneven wear, distortion, cracks, pitting and burn marks. Evaluate the degree of valve stem wear. Check the valve stem necks for cracks. Rotate the valves to check for stem bending. Make sure there is no pitting or signs of excessive wear on the valve tips. If any of the listed defects is found, send the valves to an automotive service shop for repair.
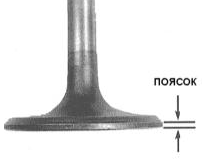
2. Measure the width of the cylindrical margin (edge) of each valve head. If the margin width is less than the value specified in the Specifications, replace the valve.
Valve Components
PROCEDURE
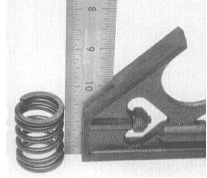
1. Assess the degree of wear on the end faces of each valve spring and check the springs for cracks or pits. Stand each spring upright on a flat surface and check that the ends are square. Springs with out-of-square ends, as well as sagged springs, must be replaced.
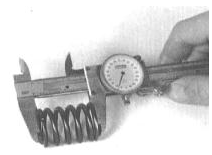
2. Measure the free length of the valve springs and compare the results with the Specifications. If a spring is shorter than the lower allowable limit, it is sagged and must be replaced. Also check the spring pressure against specification (it is better to have this work performed by a repair shop technician). If you are not sure of the spring condition, it is safer to replace the springs.
3. Check the valve spring retainers and valve keepers for cracks and signs of wear. Replace all parts in doubtful condition with new ones to prevent future failures.
4. Replace all defective components.
5. If the valve components are significantly worn, as is likely in an engine requiring a major overhaul, assemble the valve assemblies, install them in their original positions in the head, and proceed with the valve service procedures (see Valve Service section).
Test yourself
A quick Honda Accord quiz: every answer comes with an explanation and a link to the manual page.